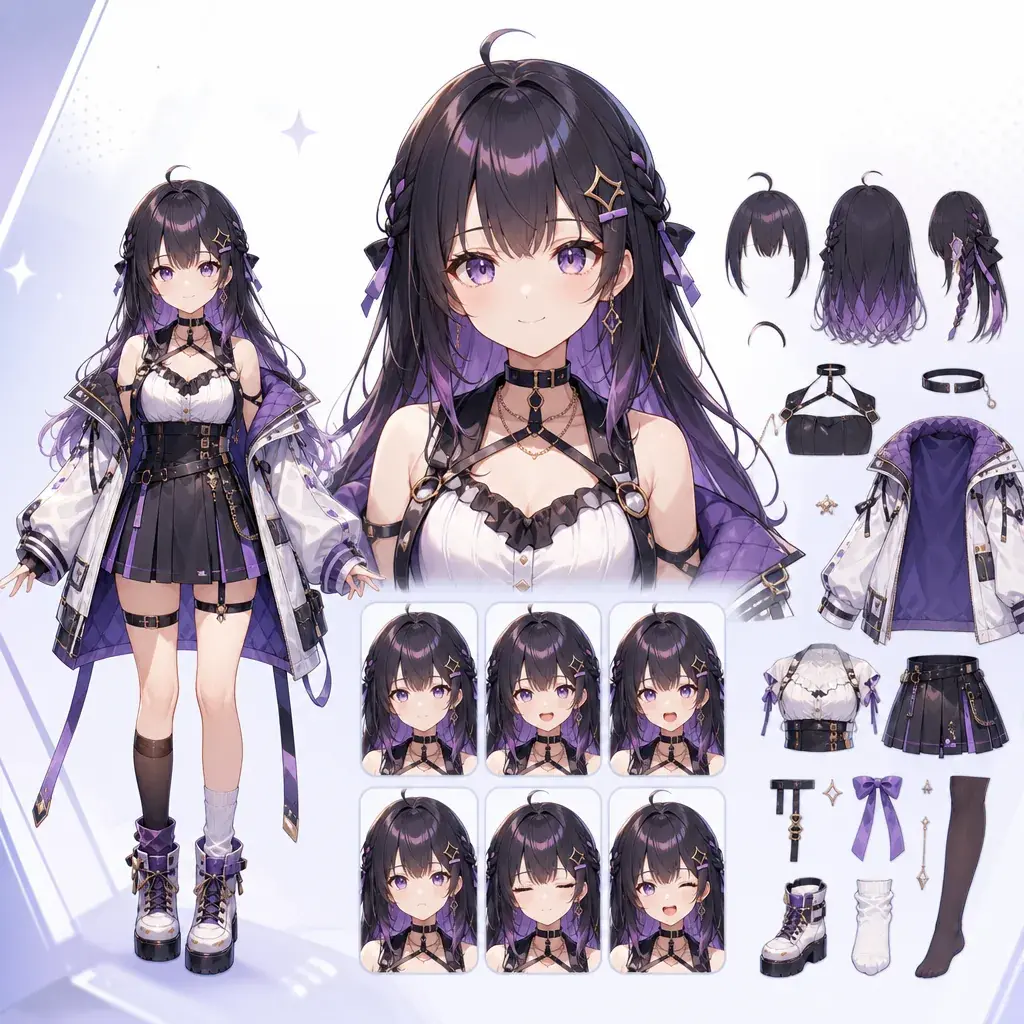
What Makes a Live2D Prompt Different
A Live2D model prompt has a different job from a normal anime illustration prompt. A normal prompt can chase one dramatic image: floating hair, extreme angle, layered effects, complex lighting, and a pose that looks impressive for a single frame. A Live2D-ready prompt should create a character design that can be separated, rigged, and animated. It still needs charm, but it also needs clarity.
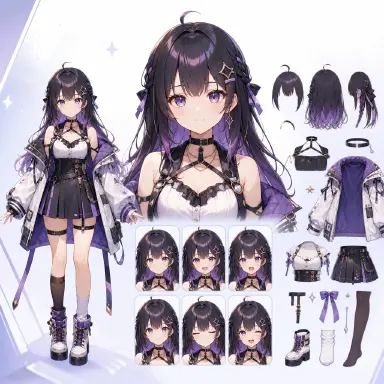
When you design anime avatars, VTuber concepts, stream mascots, or original characters, this distinction matters. A beautiful image can become painful to rig if the bangs cover both eyes, the outfit has dozens of tiny chains, the sleeves hide the hands, and the body is twisted in a three-quarter action pose. A better prompt asks for a clean front-facing or slight three-quarter character sheet, visible joints, readable accessories, and expression-friendly facial features.
This guide explains how to write prompts for Live2D-style anime model concepts. It does not replace a professional rigger or layered PSD workflow, but it helps you generate art that is easier to convert into a usable avatar. For a reusable avatar sheet, start with Riggable Avatar Sheet.
Principles for a Rig-Ready Design
The first principle is riggability before drama. For a Live2D model, the character must be readable when standing still, talking, blinking, turning slightly, and reacting. Extreme perspective and action poses are less useful than a balanced front-facing pose.
The second principle is clean separation. Hair sections, face, eyes, mouth, neck, torso, sleeves, hands, accessories, and clothing layers should be visually distinct. Even if the generator does not output actual separated layers, the design should imply separable parts.
The third principle is expression range. A model should support neutral, happy, surprised, sad, angry, and embarrassed expressions. Prompts should ask for clear eyes, eyebrows, mouth shape, and visible cheeks instead of hiding the face behind heavy shadows or props.
The fourth principle is controlled detail. Detailed costumes are attractive, but tiny repeated ornaments can jitter or become inconsistent in animation. Choose a few signature elements: a hair clip, emblem, collar shape, ribbon, headset, or pendant.
The fifth principle is symmetry with personality. A nearly front-facing pose helps rigging, but perfect symmetry can feel stiff. A slight head tilt, asymmetrical accessory, or one lifted hand can add life while staying manageable.
The sixth principle is to avoid generated text and logos. Text on clothing, name tags, and signs often become distorted. Use symbols, shapes, and color blocks instead.
How to Build a Live2D Prompt Layer by Layer
Start with the model purpose. Is this a cozy streamer avatar, fantasy idol, game guide character, villain host, educational assistant, or lore-heavy original character? The purpose affects costume, expression, and posture.
Define the view. Use "front-facing character sheet" or "slight three-quarter front view." Ask for a neutral standing pose with arms visible. If you need hands, say that both hands should be visible and unobstructed.
Describe the character silhouette. Hair length, shoulder shape, sleeves, skirt, jacket, cape, horns, ears, headphones, or tail all affect animation. Keep the outline recognizable.
Add color and material notes. A strong palette helps the model stay consistent: midnight blue and silver, cream and mint, black and neon cyan, red and ivory. Mention soft cel shading and clean line art.
Add rig-friendly part notes. Ask for separated hair locks, visible neck, clear shoulder line, simple accessories, readable eyes and mouth, and no heavy objects covering the face.
Request expression support. You can ask for a neutral main pose plus small expression thumbnails, or write that the face should be designed for blinking, mouth shapes, eyebrow movement, and cheek blush toggles.
End with boundaries. Avoid extreme perspective, crossed arms hiding torso, hands behind back, cluttered background, tiny text, heavy motion effects, complex chains, extra fingers, and photorealistic rendering.
For direct Live2D concepts, compare the examples with Riggable Avatar Sheet.
From Character Sheet to Rig-Ready Pipeline
Live2D work is where the pipeline becomes obvious. A good result starts with a character sheet, not with a dramatic pose. The character sheet decides the front view, outfit boundaries, expression range, and the reference type that should stay stable later. A small storyboard then decides which expressions or gestures the avatar needs to perform. The final prompt turns those decisions into one clear model design instead of one overloaded illustration request.
This is the cheapest place to catch problems. If the outfit is too detailed, the bangs cover too much of the face, or the accessories fight the eye line, you will pay for that mistake later in rigging and redraws. It is faster to draft a simple, readable model first and then add decorative detail only after the silhouette is stable. That keeps retry cost under control and avoids building an avatar that looks good in a still frame but breaks as soon as it moves.
Reference choice matters here more than in ordinary anime art. Use a front-facing character sheet for identity, an expression sheet for emotions, and a pose reference only when it helps the rigging plan. Do not ask one prompt to solve face design, motion design, and costume complexity at the same time. For model generation, the cleanest action plan is usually a single neutral stance plus a small hand gesture, with two supporting motions such as a head tilt and visible blinking range.
That is also how you avoid motion drift. Live2D avatars fail when the design is built like a splash illustration and then expected to behave like a puppet. Keep the large shapes clear, keep the face readable, and keep the first pass simple enough that a rigger can actually use it.
Example 1: Cozy Streamer Avatar
Create a Live2D-ready anime character concept sheet for a cozy late-night streamer avatar. The character is a young adult with short fluffy ash-brown hair, warm hazel eyes, round glasses, and a cream oversized cardigan over a mint green shirt. Front-facing neutral standing pose, slight friendly head tilt, both shoulders visible, both hands visible near waist height holding a simple ceramic mug. Clean 2D anime line art, soft cel shading, transparent or plain light background. Design for easy rigging: separate readable hair clumps, visible eyebrows, clear eye shapes, simple mouth, visible neck, clear cardigan sleeves, no objects covering the face. Include small expression thumbnails beside the main model: neutral, happy, surprised, sleepy, embarrassed, and focused. Cozy palette of cream, mint, warm brown, and soft gold. Avoid complex patterns, tiny text, heavy shadows, extreme perspective, extra fingers, photorealism, 3D render, and cluttered background.
This prompt prioritizes a usable avatar over a dramatic scene. The mug adds personality, but the prompt keeps it simple and visible.
Example 2: Fantasy Idol Model
Generate a Live2D-friendly anime model design for a fantasy idol who performs in a moonlit theater. She has long sapphire hair divided into clear riggable sections, violet eyes, small silver star earrings, and a crescent-moon hair ornament on the left side. Outfit: navy and white idol dress with short capelet, simple layered skirt, silver waist ribbon, and knee-high boots. Use a front-facing full-body character sheet pose with one hand open near the chest and the other relaxed at her side. Clean cel-shaded anime style, crisp line art, balanced proportions, plain pale background. Make the face expressive and easy to animate: visible eyebrows, clear eyelids, detailed but readable eyes, simple mouth shapes, slight blush option. Add notes visually through the design: separable bangs, side hair, back hair, capelet, ribbon, skirt layers, and sleeves. Avoid tiny chains, unreadable lace, text logos, crossed arms, hidden hands, extreme lighting, 3D look, extra limbs.
The key is that the prompt asks for fantasy detail in large readable shapes. That is better for Live2D than hundreds of small ornaments.
Example 3: Cyberpunk Assistant Avatar
Create a Live2D-ready anime avatar concept for a calm cyberpunk AI assistant. Character: androgynous young adult with sleek black bob hair, teal underlights, pale blue eyes, and a minimal transparent visor lifted above the eyes. Outfit: cropped black jacket with teal circuit accents, white high-collar inner shirt, simple utility belt, fitted gloves, and dark pants. Pose: slight three-quarter front view, upright posture, one hand raised in a small greeting gesture, the other hand visible at the side. Use clean 2D anime line art, sharp cel shading, simple neon accents, plain dark gray background. Make the design rig-friendly: clear face, no visor covering the eyes, separated front hair pieces, visible neck, clean shoulder line, simple jacket panels, readable fingers. Expression range should support neutral, polite smile, alert, concerned, and amused. No tiny readable text, no dense wires, no heavy glow hiding edges, no 3D render, no realistic skin, no extra fingers.
This prompt shows how to use sci-fi styling without burying the character under effects. The visor is lifted because eyes are essential for avatar expression.
Design Choices That Break Rigs
The biggest mistake is using a dynamic illustration prompt for a model design. "Flying through the sky with hair exploding in all directions" may look exciting, but it is not a good base for a rigged avatar. Start with a character sheet.
Another mistake is hiding the rigging points. Crossed arms, oversized props, heavy scarves, and hair over both eyes can make the model less expressive. If those features are central to the character, simplify them.
Creators also overload outfits with tiny details. A few large, memorable elements are better than dozens of small ornaments that may not stay consistent.
A fourth mistake is forgetting expression design. A Live2D model is meant to react. If the mouth, eyebrows, and eyes are too stylized or obscured, the avatar may feel lifeless.
Finally, do not ask for actual production-ready separated PSD layers unless your pipeline supports it. A prompt can encourage separable design, but human cleanup may still be needed for serious rigging.
FAQ
Should a Live2D prompt ask for front view or three-quarter view?
Use front-facing or slight three-quarter front view for most models. It gives the design more dimension while keeping the face, shoulders, and body easier to animate.
Can I include props in a Live2D model prompt?
Yes, but keep props simple and avoid covering the face or hands. A mug, microphone, wand, book, or small mascot can work if it supports the character and stays readable.
What details help a rigger most?
Clear face parts, visible neck and shoulders, separated hair sections, simple sleeves, readable hands, and limited accessories help most. The design should look like it wants to move.
Can you use AI to make anime avatars for Live2D?
Yes, but the safe path is to treat the AI output as a character sheet, not a finished rig. Generate a clean front-facing design first, then refine the outfit and expressions before rigging.
How do I keep a Live2D avatar from drifting?
Keep the identity anchors stable and do not overload the design with tiny decorations. A simpler first pass is easier to rig, easier to redraw, and easier to keep consistent across later expressions and pose variations.