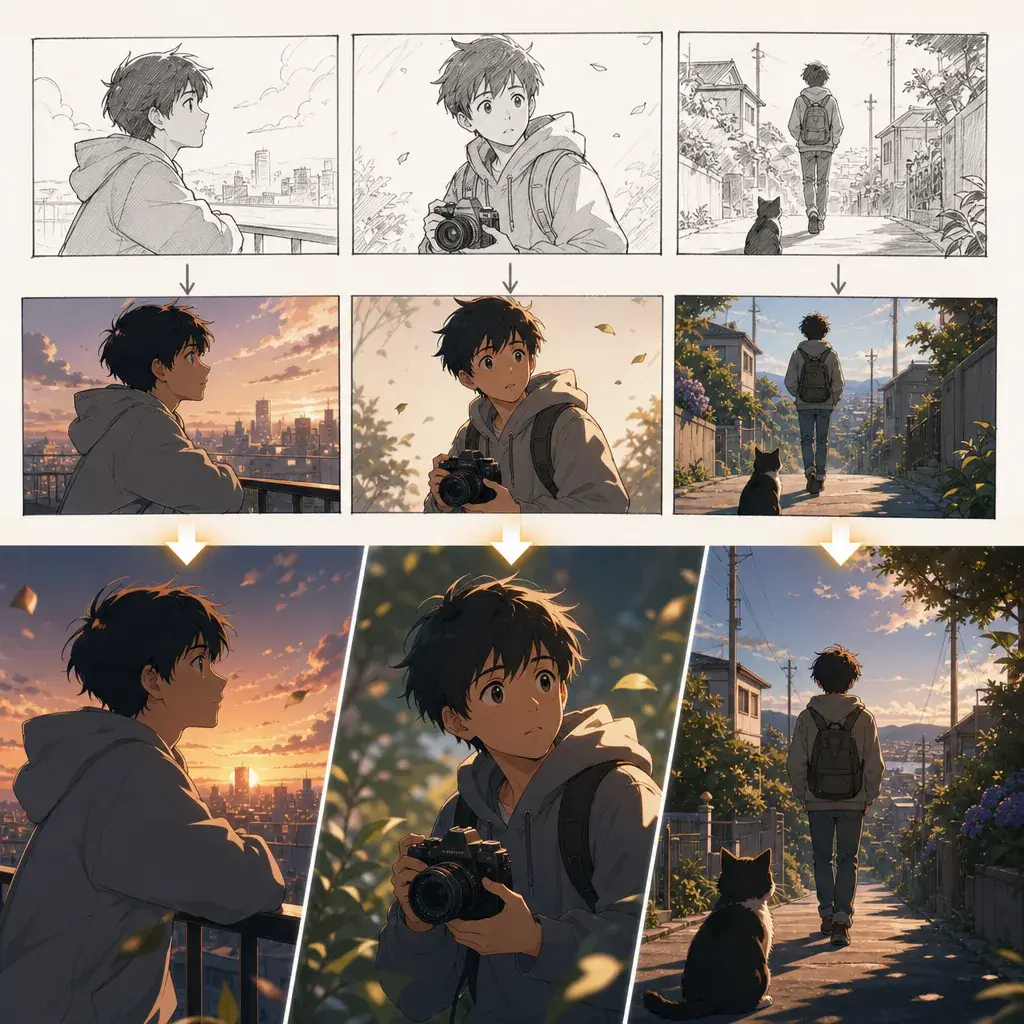
Why Good Clips Still Break as a Short
AI anime clips can look impressive one by one and still fail as a short. The first shot has a beautiful city. The second has a different character face. The third changes the prop. The fourth reverses screen direction. The viewer may not know why the edit feels wrong, but they feel it. The shots do not belong to the same moment.
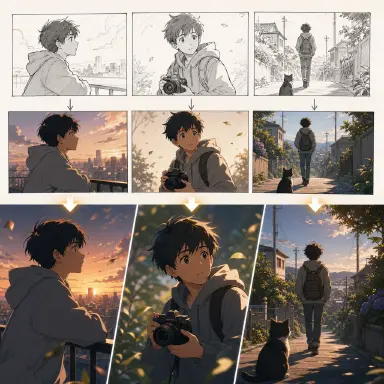
Storyboard continuity is the fix. A storyboard is not decoration or paperwork. It is a contract between story, character, reference, and generation. It tells each shot what it must do and what must stay the same. For short-form anime, three shots are often enough: a hook, a reaction, and a reveal. The trick is making those shots connect.
The strongest AI anime shorts usually work because they feel like a scene or a series, not because every frame is the highest possible quality. A recurring character, a clear object, a readable emotional turn, and a final hook can outperform a pile of unrelated pretty clips. A Three-Shot Continuity Board keeps that structure visible.
Rules That Hold a Sequence Together
The first principle is one job per shot. A shot can establish the location, show a reaction, reveal a prop, or create a cliffhanger. It should not do all of them at once.
The second principle is continuity anchors. Repeat the same character sheet, outfit, signature accessory, prop, location rule, time of day, and color mood. These anchors help the viewer stitch the edit together.
The third principle is screen direction. If the character moves left to right in shot one, do not reverse it in shot two unless the story calls for a reversal. Direction creates invisible logic.
The fourth principle is shot contrast. Use wide, medium, close-up, insert, and final pose shots. Repeating the same shot size makes a sequence feel flat.
The fifth principle is an ending hook. A short anime sequence should end on a question, decision, reveal, or emotional beat. That makes it feel like part of a world.
How to Break a Beat into Shots
Start with a one-sentence story beat. Example: "An apprentice witch discovers that her broken lantern is receiving a signal from the missing moon." This gives the board a reason to exist.
Choose continuity anchors. The witch has a green cloak, round glasses, a cracked brass lantern, and a crescent pin. The setting is a night market under violet fog. The prop is the cracked lantern. These stay stable.
Break the beat into three shots. Shot one establishes the market and character. Shot two shows the lantern reacting. Shot three shows the witch choosing to follow the signal.
Assign a camera role to each shot. Use a wide shot for place, an insert for the prop, and a medium close-up for the decision. The edit now has rhythm.
Write each shot as a separate prompt. Do not make one giant prompt asking for all three shots unless your tool specifically supports that. Separate prompts are easier to reject, rerun, and edit.
Add continuity notes to every prompt. Repeat the character's anchors in short form and state the prop rule. Use Hook to Reveal Storyboard when the sequence needs a stronger final turn.
The Storyboard as a Cost Control Tool
Continuity is also cost control. Without a storyboard, a creator may spend retries on clips that cannot be edited together. One shot looks great but faces the wrong direction. Another has the right action but changes the prop. Another has a stronger background but breaks the character's outfit. The editor ends up choosing between visual quality and story logic.
A storyboard makes review cheaper. You can judge a draft by the job of the shot. If shot two is only supposed to show the lantern flickering, it does not need a new camera orbit, a crowd reaction, or a costume change. If shot three is supposed to end on a decision, the final frame matters more than background complexity.
The best reference strategy follows the same idea. A character sheet controls the witch. A prop reference controls the lantern. A scene reference controls the night market. A storyboard controls order. This is how you avoid prompt bloat.
Using the Board to Decide What Not to Finish
A storyboard is also a way to choose what not to finish. In serious AI short production, the visible final edit may represent a small fraction of the generated material. A creator might explore hundreds of stills, dozens or hundreds of animated clips, multiple voice reads, and several music directions before the final sequence becomes a few dozen shots. That is not waste if the board gives every take a reason to exist.
Use the board to separate three decisions. First, choose the emotional beat: what the viewer should feel at the end of the shot. Second, choose the visual boundary: the first frame, last frame, screen direction, and recurring prop. Third, choose the finishing lane: rough draft, selected take, local repair, or final pass. When a take fails, you know whether to change the prompt, repaint a masked region, replace the first or last frame, or cut the shot.
For comic-style work, the same logic applies panel by panel. A sketch, pose guide, or rough layout gives the model a job that text cannot do alone. After the base image appears, the creator still checks proportion, line cleanup, speech space, prop placement, and character continuity. The page is not a pile of generated panels; it is a sequence of decisions.
A four-panel board is a useful minimum for vertical anime scenes: style rule, hook panel, reaction panel, action panel, and reveal panel. Keep the labels plain and repeat the same character anchors in every panel. If the tool supports start and end frames, use them to pin the opening and closing poses, but keep the storyboard as the reason those two frames belong together.
Example Prompt 1: Three-Shot Board
Create a three-shot AI anime storyboard for a 15-second short. Global continuity: original apprentice witch named Mira, short dark-green hair, round glasses, moss-green cloak, crescent pin, cracked brass lantern, violet night-market setting, clean 2D anime style, no text, no logo.

Shot 1, 5 seconds, wide establishing shot: Mira walks through a narrow night market under violet fog, holding the cracked brass lantern at waist height. Stalls close behind her, paper charms sway overhead, and the crescent pin catches a small glint. Camera slowly tracks behind her from left to right.

Shot 2, 4 seconds, insert shot: close-up of the cracked brass lantern in Mira's hands. The flame turns pale blue and points toward an empty alley. Her fingers tighten around the lantern grip. Camera locked, shallow anime depth.

Shot 3, 6 seconds, medium close-up: Mira turns toward the empty alley, eyes widening behind round glasses, then steps into frame right with quiet resolve. The lantern glow lights her face and cloak. End on a stable profile pose.
This board connects place, object, and decision. The viewer can follow the scene without dialogue.
Example 2: Hook-to-Reveal Board
Storyboard a 12-second vertical anime short built around one hook and one reveal. Original character: a calm academy gardener with silver-blue hair, black apron, white sleeves, and a small seed pouch. Setting: an abandoned greenhouse at dawn.

Clip 1, hook, 3 seconds: close-up of a cracked flowerpot shaking on a dusty table. A faint gold root pushes through the soil. Camera locked, dust floating in sunrise light.

Clip 2, reaction, 4 seconds: medium shot of the gardener leaning in, one hand hovering above the pot, expression controlled but startled. Keep silver-blue hair, black apron, white sleeves, and seed pouch visible.

Clip 3, reveal, 5 seconds: wide shot as the greenhouse glass brightens and ghostly flowers bloom along the rafters in a wave. The gardener stays small in the foreground, back turned, hand still raised. End on the scale reveal.
The hook arrives before the explanation. That structure is useful for social clips.
Example 3: Series Continuity Prompt
Episode continuity note for a recurring AI anime short series:

Main OC: Toma, a courier with orange scarf, slate-blue jacket, left cheek bandage, and a brass message tube. World rule: messages glow only when the recipient is nearby. Visual style: clean 2D anime, painted city backgrounds, warm dusk lighting.

Episode 1 storyboard: Shot 1, Toma lands on a train platform from frame left. Shot 2, insert of the brass tube glowing under his hand. Shot 3, he looks up and sees a shadow reflected in the train window.

Continuity constraints for every shot: keep orange scarf, slate-blue jacket, cheek bandage, brass tube, dusk lighting, and left-to-right travel direction. Do not change the message tube shape. Do not add a new outfit. End each shot on a stable edit frame.
This prompt is useful when the goal is not just one short, but the first piece of a repeatable series.
The Most Common Ways a Board Falls Apart
The biggest mistake is confusing a storyboard with a longer prompt. A storyboard is not more text. It is separated decisions.
Another mistake is using every shot as an establishing shot. Once the viewer knows the place, move closer to reaction, hands, props, and choices.
Creators also forget props. A recurring prop is one of the easiest ways to make separate shots feel connected.
A fourth mistake is breaking screen direction accidentally. Direction mistakes are small, but they make edits feel wrong.
Finally, do not make the hook too complicated. A glowing letter, cracked lantern, moving shadow, or missed call can be stronger than a full lore explanation.
FAQ
How many shots does a short AI anime scene need?
Three shots are enough for many shorts: setup, reaction, and reveal. Add more only when each new shot has a distinct job.
What should stay consistent across shots?
Keep the same character sheet, outfit, signature prop, setting rule, time of day, color mood, and screen direction unless the story intentionally changes them.
Should I generate the whole storyboard at once?
Usually generate shots separately. Separate clips are cheaper to rerun, easier to compare, and easier to edit into a clean sequence.