
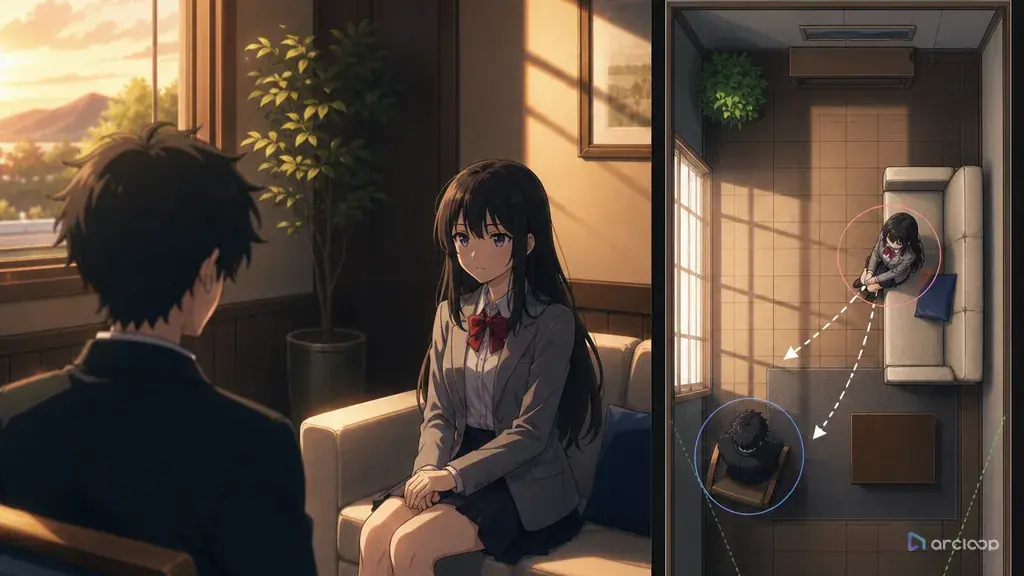
Why a single cut breaks the room
A scene can look expensive and still feel fake in one cut. Picture a tense rooftop exchange: the courier begins beside the antenna mast, the captain blocks the stair door, and a red signal case sits between them. The next angle is sharper, but the courier has jumped to the other side of the mast, the captain is now near the railing, and the case has drifted behind both characters. The viewer spots the problem immediately. The creator who has been staring at single takes often misses it.
That is the trap with character blocking consistency. AI anime tools can give you impressive isolated frames, but a scene is not judged as isolated frames. It is judged as space, relationship, pressure, and movement. If the character on frame left becomes frame right without a reason, the audience may not describe it as a blocking error, but they feel the scene break.
Character blocking is the plan for where characters stand, where they face, how they move, and which camera side is allowed. In AI anime, every new generation may reinterpret the room.
Use this guide when a dialogue scene, confrontation, chase pause, reveal, or group shot needs to survive multiple shots. Start in Creative Worlds, keep identity stable with Character Asset References, and use three-shot continuity template for hook, reaction, and reveal.
Rules that keep blocking honest
Blocking is story information. A character near the exit has a different status from one trapped behind a desk. A character higher on a stair owns the frame differently from someone below. Put the power relationship into the map.
The first and last frames matter more than the prettiest middle frame. If shot one ends with the heroine on screen right facing left, shot two should respect that unless the story shows her crossing.
Use fixed anchors that are not characters. A table, doorway, railing, lamp, case, signpost, or stair line gives the viewer a stable object to measure against.
Choose a camera side before writing beauty language. If two characters face each other across a counter, decide which side the camera may occupy. Crossing the axis without a transition makes conversation feel scrambled.
Separate standing position from body action. "Nara stays left foreground" is a position rule. "Nara reaches for the signal case" is an action rule. When they are mixed into one long sentence, the model may keep the action and forget the position.
Keep the blocking map smaller than the prompt. Three positions and three cameras are enough for most short scenes.
Review blocking before polish. A beautiful render with flipped positions is still a failed scene. Approve the room logic, then spend final quality on the selected take.
How to lock character positions across shots
Start with the dramatic relationship. Write one sentence: "Rysa guards the exit while Kael tries to reach the signal case." This tells the blocking what it must express.
Draw or describe a top-down map. It can be plain text: exit at north wall, table center, signal case on table, Rysa north of table, Kael south of table, window east. Use labels that are easy to repeat.
Assign character positions. Give each character a stable code such as C1 and C2, then attach name, role, side, and facing direction. For vertical shorts, include foreground/background because depth affects subtitles and face readability.
Mark camera positions. Camera A may be wide from the window side, Camera B close on Kael, and Camera C over Rysa's shoulder. Remove angles that cross the axis unless the crossing is intentional.
Choose anchor props. A red case, blue lamp, broken chair, or glowing floor seal can hold continuity better than background description. Repeat the anchor in every shot prompt.
Break the scene into shot jobs: relationship, pressure, decision, reveal. A shot that relocates characters, reveals a prop, changes expression, and moves the camera at once will often fail.
Write each shot prompt from the same map. Reference the map, camera, character codes, positions, and anchor props. Change only the action and shot size.
Review the cut on edges. Compare each last frame with the next first frame. Check side, facing direction, prop location, eye line, and camera side.
When a shot fails, repair the smallest layer. If the character identity is right but the side is wrong, fix the side rule. If the prop jumps, strengthen the prop anchor. If the camera crosses the axis, remove that angle instead of rewriting the entire scene.
Blocking lives in the shot, not the asset
This is the split that keeps blocking stable. Who they are lives in the character asset — face, costume, props, voice — and enters a shot through an @ reference. Where they stand is shot-level information and belongs in the shot description, because it changes every time. Pushing blocking into the asset backfires: it starts carrying a position it has no business remembering.
Create one project space in Creative Worlds. Store the character references, top-down blocking note, shot list, and review decisions together. Use Character Asset References for identity and AI Short Drama guides for hook timing and subtitle space.
The review order is simple: identity, blocking, eye line, action, then polish. Detail cannot fix a scrambled room.
For multi-shot work, keep a small rejection note beside the selected take. "Reject if Kael moves north of the table before shot three" is better than "keep scene consistent."
Build each character once in My Assets → Characters and bind a main image plus a couple of reference images — that is the identity layer, done. Do the same for the location: create a Scene asset for the rooftop, the tea shop counter, or the stairwell, so the fixed anchors (the crate, the register, the rail) travel into every shot without you retyping them.
Open the episode, click Generate Shots, then edit each shot card one at a time. Pull in @Nara, @Veyr, and the scene with @ references, and write only what changes in that shot — who is screen-left, who is facing what, what they are doing. Generate the image first and check the blocking against the last frame of the previous shot before you touch video at all.
On a shot that keeps drifting, generate a few takes on the same shot card and set them side by side. Keep the one where the positions match your plan; discard the rest instead of hand-fixing a flipped take. Once a run of shots holds, batch them from the AI Chat Panel — "Generate videos for Shots 4 through 6." — and drop the results into Edit to check the cut against neighboring shots.
Example 1: Rooftop Signal Case Blocking
Wide two-shot on the rooftop at dusk, camera holding from the south-east corner so both @Nara and @Veyr stay in frame along with the stair door. @Nara stands screen right beside the utility crate, facing north-west, one hand tightening around her satchel strap. @Veyr blocks the door on screen left, arms crossed, facing south-east, refusing to step aside. The red signal case sits untouched between them on the crate, with the antenna mast rising behind. Cold dusk light rakes low across the rooftop and wind hums past the railing — no dialogue, just the standoff holding until Nara breaks eye contact.
This prompt makes spatial memory part of the deliverable. The camera can change without letting characters trade places.
Example 2: Clockwork Tea Shop Counter
Medium two-shot across the tea shop counter. @Pavo stands in the customer aisle on screen left, facing right toward @Selle, fidgeting with his winding-key necklace. @Selle stands behind the counter on screen right, facing left, setting her porcelain teacup down beside the brass register without looking up. The wall of ticking clocks behind her stays in frame; the register stays centered as the anchor between them. Camera holds level at counter height, capturing both faces. Warm shop light spills from above; the only sound is the clocks ticking and the soft clink of the cup meeting the counter.
This example uses the counter as a hard spatial boundary. The viewer always knows who belongs on each side.
Example 3: Flooded Archive Stairwell Review
Vertical two-shot in the flooded archive stairwell under emergency blue light. @Marek stands on the lower step, screen left, water lapping his boots, facing up and to the right toward @Tella. @Tella stands three steps above him, screen right, one hand braced on the rail, facing down and to the left, the brass document tube clipped to her belt on her right side. The broken wall light flickers above Marek's shoulder on screen left. Camera holds a static mid-shot up the stairwell so both characters and the rail stay readable. Water drips echo through the stairwell; no dialogue, just the standoff on the steps.
This prompt is for the review pass. It prevents a repair job from accidentally rebuilding the whole stairwell.
The ways blocking falls apart
The easiest mistake is writing "two characters argue in a room" and expecting the room to stay coherent. A room needs sides, exits, anchors, and cameras.
Another mistake is using reverse angles without an axis rule. Reverse angles work only when the audience can still tell who is on which side.
Creators often approve the most detailed take instead of the most editable take. A less polished shot with correct blocking is usually a better base than a gorgeous shot that flips the scene.
A fourth mistake is letting props float. If the case, cup, letter, phone, or weapon matters, give it a fixed location and a fixed owner. Otherwise it may migrate every time the camera changes.
Some scenes fail because the character moves without a transition. If someone crosses from left to right, show the crossing or reserve it for a new beat. Do not let the edit imply teleporting.
Finally, do not use one huge prompt for an entire conversation unless the workflow keeps shot state. Separate shot cards are easier to review and cut.
FAQ
What is character blocking in AI anime?
Character blocking is the plan for where characters stand, face, move, and relate to objects and cameras. It helps separate shots feel like one scene.
Do I need a drawn floor plan?
No. A text map is enough for many scenes. Write location, anchors, character positions, facing directions, and allowed camera sides.
How many camera positions should I use?
Use two or three for a short dialogue scene. Add more only when the scene needs a clear change in power, reveal, or movement.
What should I check before final render?
Check identity, left-right position, depth, facing direction, prop location, eye line, and whether the camera crossed the axis.
How do I keep blocking consistent across shots?
Reference the same character assets in every shot so identity never re-rolls, then write the spatial relationship explicitly in each shot description — who is screen-left, who is screen-right, who is closer to camera. When a shot comes back wrong, you regenerate that one shot instead of restarting the scene, because the identity layer was never the thing that broke.