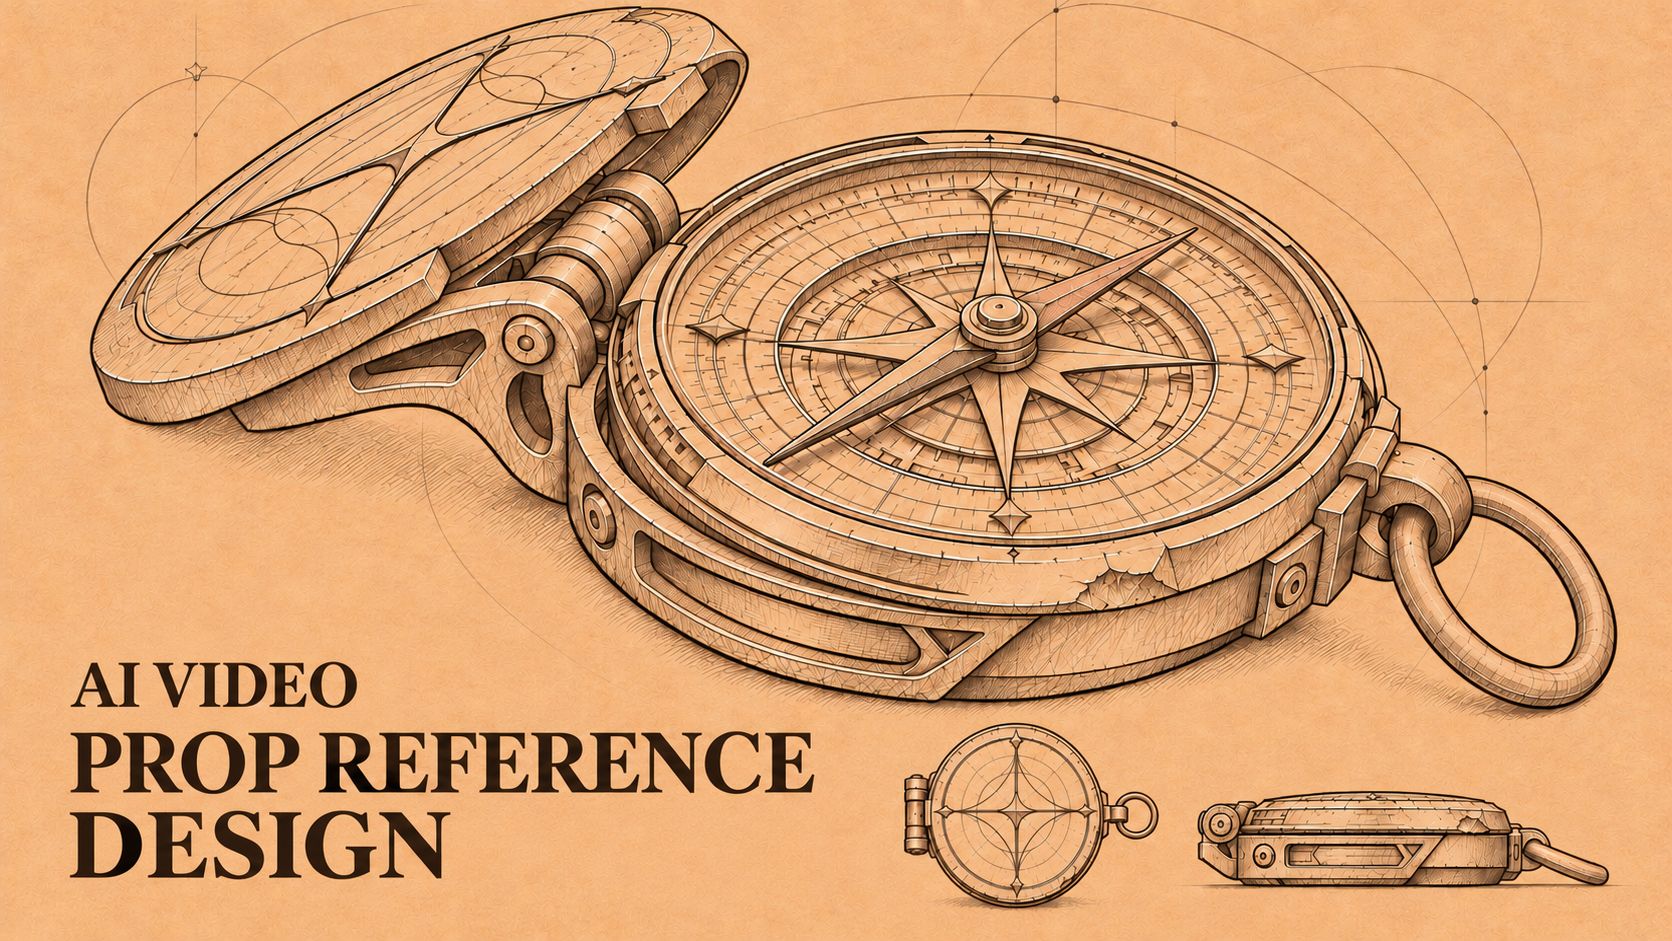
When generating AI videos, props frequently suffer from warping, material drift, or fluctuating sizes. Keeping the same object consistent across different shots requires more than repeatedly prompting the model to "stay consistent"—it requires preparing the right reference images upfront. What to include in your reference images, and at what level of detail, depends on the type of video you are making and what each shot needs to show.
1. Define Prop Requirements by Video Type
Before preparing reference images, first determine whether your video is a product showcase or a narrative piece. Each type has different priorities to establish.
In product or commercial videos, the item itself is the main subject, and viewers need to clearly recognize it as the exact same real-world product. For these references, prioritize real product photos that you have the rights to use, and make sure every image shows the exact same model, color, and version. Avoid mixing photos from different production batches or with different accessories, as the model may stitch together a nonexistent product structure. Lighting changes can alter surface reflections, but they shouldn't turn brushed metal into smooth plastic, nor should the true structure be altered just to make the shot look appealing.
For example, if you are making a video for an insulated tumbler, you can break down your reference images by what each shot requires:
- Primary real-product view: Shows the complete silhouette of the bottle, lid proportions, handle placement, and brand logo without heavy occlusion or extreme perspective. This constrains the basic appearance in still-life showcase shots.
- Close-up and state-change details: Depending on the actions in your script, add images of the lid threads, button mechanism, or the interior opening when uncapped. If a shot includes someone opening the lid to drink, but you haven't provided a reference for the open state, the generated result may invent an inaccurate interior structure.
- In-hand scale reference: Shows where the palm grips the body and how large the tumbler is relative to a person, preventing the tumbler from suddenly turning into a bucket or a miniature cup when cutting to character shots.
In films or short dramas, props primarily serve the characters, actions, and plot. Viewers don't necessarily need to see every screw on the back of a prop, but they must recognize who it belongs to, how it is used, and what role it plays in the story. For a signature weapon, the focus is on a distinct silhouette and smooth gripping and drawing motions. For a keycard or an old keepsake acting as a clue, the focus is on whether the audience can clearly see the plot-driving notch, serial number, or crack in a close-up shot.
Not every narrative prop needs an engineering-grade orthographic turnaround sheet. You can start by identifying the features that will actually appear on camera—clarifying the shape, materials, and key identifying marks—and then decide whether to add more references based on the generated results. If a short drama includes commercial product placement, that specific product still needs references prepared to real-product standards, while other environmental props in the same scene can be prioritized according to their narrative importance.
2. Overall Appearance and Key Details
For an original hero prop in a film or short drama, you can start by creating a concept sheet that includes both the full view and enlarged detail callouts. The overall view establishes the item's silhouette, primary color palette, and structural proportions, while the detail callouts lock in the materials and ornamentation that will be visible in medium close-ups or macro shots. You don't need to mechanically lay out front, side, and back views; the key is that every enlarged callout must come from the exact same object so the model doesn't invent a different wrapping style or a different set of parts when zooming in.
The English weapon concept sheet below shows an original saber. At the top is a full three-quarter hero illustration, and below it are four enlarged callouts for the blade texture, leather grip, guard, and pommel.
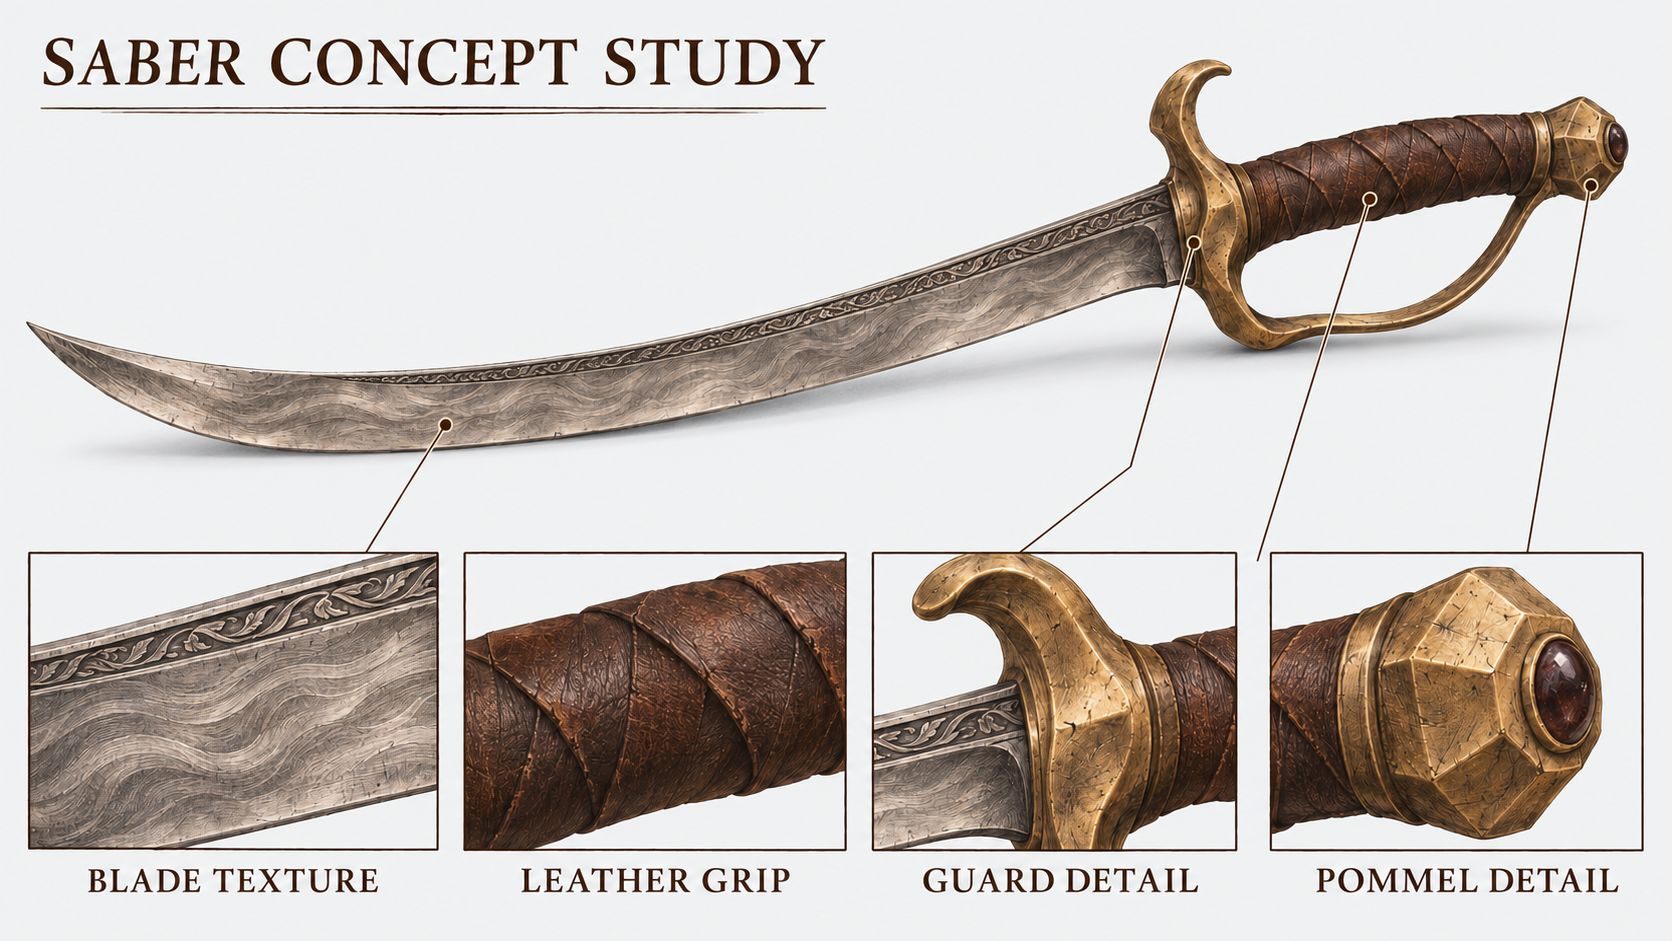
This concept sheet provides four layers of visual reference for subsequent video generation:
- Blade texture (
BLADE TEXTURE): Defines the gentle curve of the blade, the flowing steel grain, and a narrow decorative border near the spine. These patterns need to sit naturally on the metal surface rather than turning into cracks or glowing strips in motion. - Leather grip (
LEATHER GRIP): Establishes the grain of the dark brown leather, the diagonal overlapping wrap, and the worn edges. In close-ups where a hand holds the hilt, inconsistencies in how the grip is wrapped are much easier to spot than tiny patterns seen from afar. - Guard detail (
GUARD DETAIL): Shows the patina of the aged brass, its curved shape, and the junction where it meets the blade and grip, ensuring all materials belong to the same unified design. - Pommel detail (
POMMEL DETAIL): Locks in the faceted brass end-cap and the dark inset stone, which serve as visual anchors during close-ups when the saber is drawn or rotated.
To generate a concept sheet like this, you can use the following English prompt: first describe the complete weapon, then specify the four enlarged callouts and the layout. The background description here matches the final pale gray-white version used:
Create an English weapon concept sheet for an original fictional saber.

Show the complete weapon once as a large three-quarter hero illustration.
Design: a gently curved blade with flowing steel grain and a narrow decorative border near the spine; a dark brown leather-wrapped grip; an aged-brass guard; and a faceted brass pommel with a dark inset stone.

Add four enlarged detail callouts taken from this exact weapon:
1. Blade texture and decorative border.
2. Leather grain, overlapping wrap and worn edges of the grip.
3. Guard shape, surface wear and its visible junction with the grip and blade.
4. Pommel shape and inset stone.

Keep the same shapes, materials and decorative details in the main illustration and every callout. Use fine graphite and sepia ink linework with restrained material shading on a near-white background with a faint neutral light-gray tint. Wide landscape composition with clear spacing.

English title: SABER CONCEPT STUDY
Callout labels: BLADE TEXTURE, LEATHER GRIP, GUARD DETAIL, POMMEL DETAIL.
No front-side-back views, no turnaround sheet, no dimensions, no characters and no action scene.
Confirming the prop's standalone design with an isolated concept sheet before generating shots of a character using it makes troubleshooting much clearer. If you try to design both the prop and complex character actions in a single scene image from the start, any hand occlusion over the guard or lighting shifts on the materials will make it difficult to maintain a consistent reference for later shots.
3. Multi-Shot Live-Action Saber Draw Example
With a clear standalone concept sheet ready, the next step is to test how it performs in a dynamic video. For the first version of the video, the saber concept sheet above was used as the sole input reference image. The goal was to generate a multi-shot live-action sequence where a man draws the saber from its scabbard, admires the blade, inspects the steel grain and grip in a close-up, and finally returns to a medium close-up holding the weapon.
This test used the open-source model MiniMax H3 (a non-SOTA model) hosted via WaveSpeed, outputting at 768p with a duration of approximately 15 seconds and natively generated audio.
Video Prompt Used for This Test
Photorealistic live-action cinema, 16:9. Use <Picture 1> ONLY as the exact physical SABER object design reference: one elegant curved single-edged blade with flowing watered-steel grain and delicate engraved spine border, dark brown leather-wrapped grip, aged brass curved knuckle-bow guard, faceted brass pommel with a dark oval inset. The image is a design sheet, NOT a frame or storyboard. Transform that object into a convincing real metal film prop. Do not reproduce the sheet, illustration style, labels, panel layout, or lettering. No text on screen.
A real adult man in his thirties, wearing a plain charcoal linen shirt, calmly examines this saber in a softly lit pale gray-white studio. Natural skin texture, realistic hands and weight, restrained cinematic lighting, beautiful tactile close-ups. Same man, same clothing, same saber throughout. A simple dark leather scabbard fits the curved blade. He is peacefully admiring craftsmanship, never attacking or swinging.
Create FOUR clearly distinct shots with clean editorial cuts, coherent physical continuity:
[0s-5s] Medium three-quarter shot, waist to head. The man holds the scabbard securely in his left hand, grasps the leather grip in his right, and slowly draws the entire curved blade completely free in one continuous physically plausible motion. Camera gently pushes in. Hands remain on grip and scabbard, not the edge. End with the saber visibly fully unsheathed.
[5s-8s] Cut to a close three-quarter view of his face and the blade. He raises the saber at a comfortable distance, quietly admires the blade, and slowly rotates his wrist a few degrees so a broad soft highlight travels over the watered-steel texture. Natural subtle expression of appreciation.
[8s-12s] Cut to a cinematic macro insert tracking from the flowing steel grain and engraved border near the base of the blade to the aged brass guard and leather wrapping. Preserve the distinctive guard and pommel design from <Picture 1>. Shallow depth of field; realistic metal, leather pores, tiny wear. Only one blade, no duplication or morphing.
[12s-15s] Cut back to a medium close-up from the opposite three-quarter angle, maintaining screen direction. He looks down at the guard and pommel, gently turns the grip to inspect the craftsmanship, then holds the saber still with a quiet appreciative half-smile. Keep blade shape, length, guard, leather and pommel consistent.
Audio: Native synchronized stereo production sound throughout. At 0-5s, clearly audible textured steel sliding out of a leather scabbard, a delicate brass click at release, soft sleeve and leather creaks. At 5-12s, subtle movement of clothing and grip, light natural breathing, quiet indoor room tone. At 12-15s a small leather creak as the grip turns; soft room ambience continues across cuts. Intimate realistic foley, no music, no dialogue, no subtitles. No exaggerated sword swooshes or combat sounds. Real human live action, not animation, not a sketch, no illustration overlays.
Even with only a single standalone weapon concept sheet provided, this video maintains the prop's primary visual features fairly well while executing the drawing and inspection actions. Reviewing the sequence shot by shot reveals both the strengths and limitations of the reference image across different framings:
In the opening medium shot of the draw and the subsequent close-up inspection, the overall curve of the saber and the flowing pattern on the metal surface are preserved, and the motion of the blade emerging from the scabbard is clearly shown. When cutting to the macro insert, the wrapped texture of the dark brown leather, the patina of the brass guard, and the blade grain all correspond to the same set of materials from the concept sheet. When the camera cuts back to the character holding the saber, the grip position and prop state remain largely continuous.
However, when compared closely against the concept sheet, the fine engravings in the close-ups, the exact curves of the guard, and the pommel ornamentation still show some simplification or warping. In this test, the reference image successfully constrained the overall silhouette, primary materials, and core structure within a reasonable range, but it could not guarantee that every tiny pattern remained identical across dynamic cuts. When reviewing generated footage, check wide and medium shots for silhouette, color palette, and gripping logic, and check close-up shots separately to verify whether key identifying features meet your requirements.
4. Relative Scale Between Character and Prop
Just because a prop looks like the same saber doesn't mean it stays at a reasonable size in a character's hand. While the first video stabilized the materials and features, the saber as a whole looked somewhat short in the man's hands—closer to a short blade than the intended long saber. Across multiple shot cuts, the thickness of the grip and the length of the blade relative to the torso are dimensions that require separate control.
Previous attempts to annotate dimensions and scale directly on the reference image did not produce the desired effect. An isolated prop sheet can clearly show a weapon's design, but it lacks a side-by-side visual comparison with a human hand, torso, or environment. When preparing references, you cannot assume that writing dimension numbers on an image will actually constrain the object's physical scale in generation.
Many creators in the community have run into similar issues. In a Reddit discussion on character and object scale in MiniMax H3 Ref2V, the original poster noted that even when relative heights were specified in text, the generated results still suffered from scale drift; commenters suggested providing reference images of the character holding the object, compositing side-by-side scale comparison sheets, or using simple 3D blockouts to establish size. In another thread discussing character-to-environment scale, some users felt that writing exact measurements in centimeters helped, while others reported that numerical values were completely ignored by the model. While these discussions reflect individual creator experiences, they point to a practical takeaway: showing scale relationships directly as a visible image is generally more intuitive than relying on numbers alone.
If you have specific requirements for the relative scale between a character and a prop beyond their standalone references, you can create an additional storyboard frame or reference image showing the character and prop together in the same frame specifically to anchor their proportions.
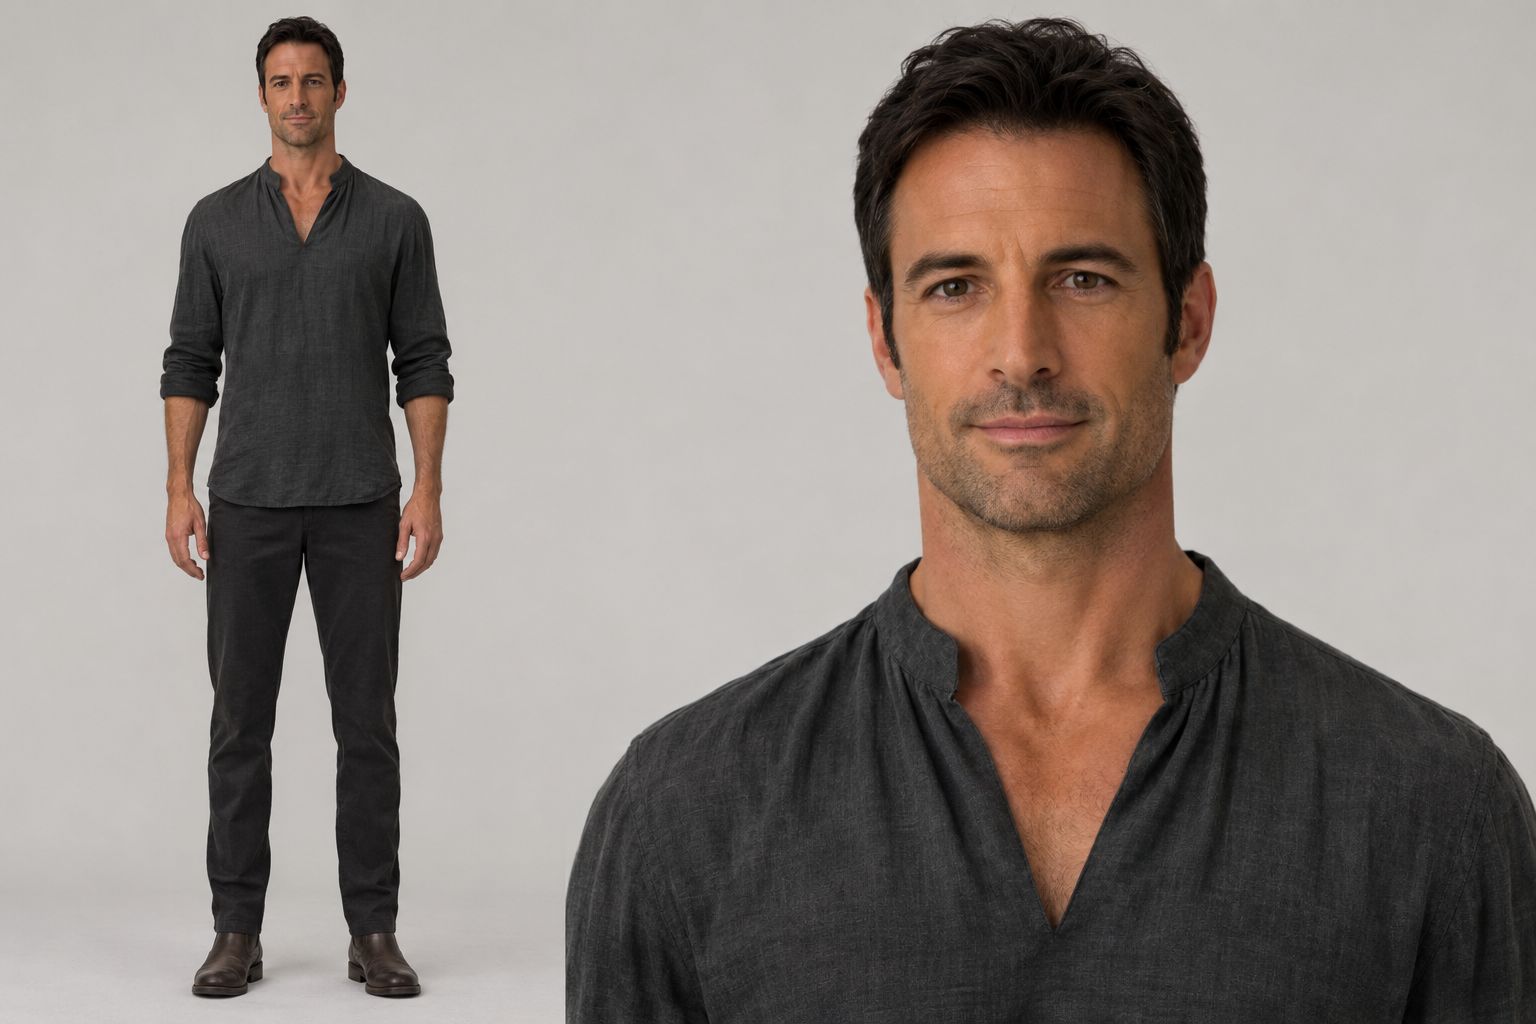
To keep the same character from the original video while attempting to lengthen the blade, we first extracted a frame of the man from the first video to generate a character reference sheet. This sheet preserved the original character's facial features, hairstyle, and charcoal shirt, while filling in the trousers and shoes that weren't visible in the original video to form a complete full-body view alongside a facial close-up. For more on how to organize full-body, profile, and close-up views, see How to Design a Character Turnaround Sheet: From Basic References to Character Asset Management.
Next, we combined this character reference sheet with the original saber concept sheet to generate a full-body scale reference image of the character holding the saber. In this new image, we deliberately lengthened the blade while retaining the steel grain, dark brown leather grip, and brass guard design. The composition keeps the character's full body, the way his palm grasps the grip, and the full length of the saber clearly visible at the same time, with both the man and the blade positioned on a similar depth plane to avoid perspective distortion from pointing the tip toward the camera.
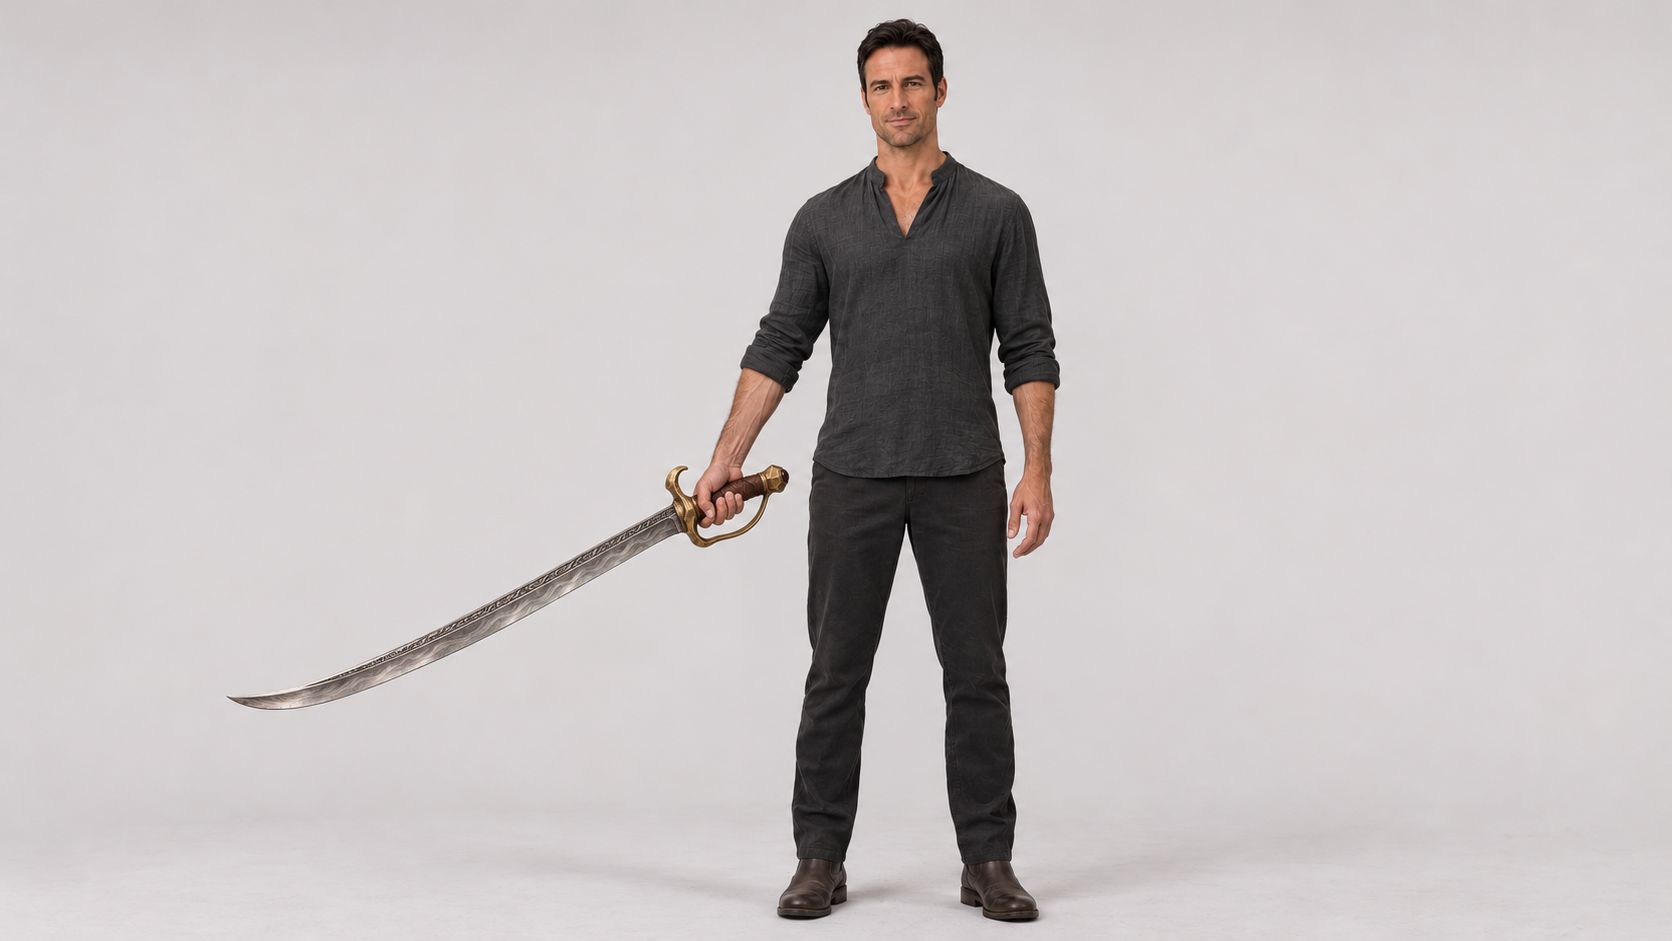
With this scale anchor image ready, we generated a second version of the video. This version again used the open-source MiniMax H3 model hosted on WaveSpeed (768p, approximately 15 seconds, with native audio), keeping the exact same English prompt, generation parameters, and random seed from the first video (fixing the seed was done primarily to reduce test variables; a fixed seed alone cannot guarantee visual or scale consistency).
When feeding in the reference images, the full-body character reference sheet above served only as an intermediate step and was not passed separately to the video model. The actual inputs for the second video were the original standalone saber concept sheet (as <Picture 1>) and the new full-body character-holding-saber scale reference (as <Picture 2>). The prompt was identical to the first version except for the addition of this single instruction:
Use <Picture 2> as the reference for the saber's size relative to the person, including the blade length and grip-to-hand proportions.
Here is the generated result:
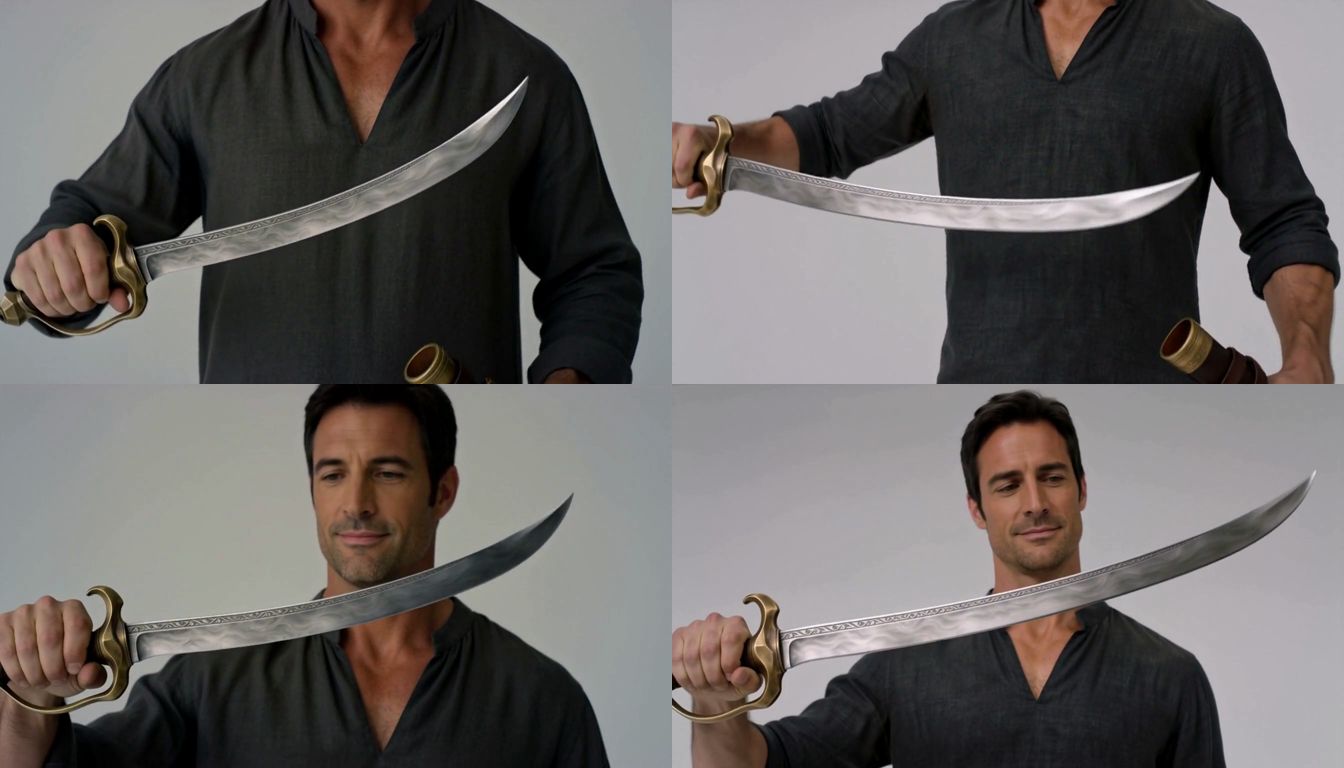
In the comparison image above, the left column shows the first version, and the right column shows the second version with the added scale reference; the top row is sampled at 4.5 seconds from each video, and the bottom row at 6.5 seconds. The frames were extracted directly from the source videos without scaling the saber separately. Because the character's posture and the blade's orientation differ between the two versions, this comparison is intended for observing visual differences rather than taking exact dimensional measurements.
Once you have prepared your prop concept sheet and character-to-prop scale reference, you can open the MiniMax H3 Video Generator, upload your reference assets, specify what each image controls in the prompt, and test drawing, gripping, or showcasing actions.
Comparing the two finished videos, the second version completes the same draw, inspection, and macro close-up sequence, but the blade appears noticeably longer and more slender than in the first version, while the relationship between the grip and the palm remains a key aspect to check shot by shot. It should be noted that because all shots in this video are medium close-ups and macro inserts—with no full-body shot of the character holding the saber—this clip alone does not prove that the exact blade-to-height ratio is completely locked in. This result provides one practical example of supplementing a standalone sheet with an in-frame scale reference, though further testing across more varied shots is still needed to evaluate its stability.
When reviewing scale consistency in videos like this, avoid comparing the on-screen pixel length of the blade in a close-up frame directly against a medium shot—it is normal perspective for the saber to take up more of the frame as the camera pushes in. A more reliable approach is to sample one frame each from the draw, the lift, the close-up, and the cut back to the character, and check whether internal proportional relationships within each frame—such as grip thickness relative to the palm, guard width relative to the back of the hand, and blade length relative to the chest and shoulders—remain consistent.
5. Organizing Breakdown References for Multiple Characters
If a video features multiple characters and each person holds their own distinct weapon or prop, cramming all of that information into a single reference image often forces compromises: a wide group shot makes it hard to see the local materials of each prop, while providing only isolated single-item sheets makes it easy for the height differences between characters and the relative lengths of their weapons to fall out of sync in the video.
For complex scenes like this, contributors in the aforementioned Reddit discussion on MiniMax H3 scale suggested combining individual character sheets with a group height-comparison lineup. Following this logic, when a scene involves multiple characters and multiple props at once, you can try organizing your references into a combination of individual breakdown sheets plus a single-frame scale overview (this multi-character organization method is offered here as a conceptual extension for reference and has not yet been tested in the practical examples in this article):
- Individual character and prop breakdown references: Prepare separate appearance and in-hand prop references for each character, clearly pairing each person with their specific item. For instance, if Character A uses a long saber and Character B holds an antique pocket watch, the breakdown sheets establish each person's facial features, clothing, and the specific textures and grip style of their respective prop, preventing the model from mixing Character A's ornamentation onto Character B's weapon.
- Multi-character scale overview sheet: Prepare an additional full-body lineup showing all characters standing together with their respective props. Keep their feet on the same horizontal baseline and position them at a similar depth plane without extreme high- or low-angle camera tilts. This image isn't meant to show tiny engravings on the props; its dedicated job is to tell the model who is taller between A and B, and how long A's saber is relative to B's body.
When writing your video prompt, refer to each image by number to specify which sheets govern the detailed appearance of individual characters and props, and which sheet governs overall height and relative scale. Also pay attention to how props are held or passed between characters across adjacent cuts so items don't inexplicably switch hands or vanish during a transition.
When preparing prop reference images, work backward from what your final shots need to show: start with an isolated concept sheet to define the overall appearance, use detail callouts to lock in key features, and add an in-frame character-to-prop reference when relative scale matters. After generating the video, always return to the actual shots to verify whether those relationships held up, then decide which reference image to add or which action to adjust next.