In our Character Turnaround Sheet Guide, we covered the design workflow for standard human characters and how to build reusable reference sheets. This article moves on to nonhuman characters, grouped by structure into three categories: humanoid characters with animal traits, animals and fantasy creatures with familiar real-world or mythic counterparts, and original hybrid creatures that lack a single existing archetype. Even though the third group looks unusual as a whole, you can usually break these creatures down into familiar parts and recombine them rather than inventing every detail from scratch.
Fox ears that look pasted onto hair, dragon horns that blur into neck scales, or mechanical trunks and tusks that fight for the same space all require targeted, part-by-part fixes. Below, we walk through each of the three character types using reference sheets and generation examples—showing how to handle anatomical junctions, prepare pose sheets, refine specific features, and combine multiple references into a single cohesive design.
| Character Type | Common Examples | Editing Focus |
|---|---|---|
| Humanoid characters with animal traits | Cat-ear girls, werewolves | Establish the overall body with a character turnaround sheet, then use detail callouts to define animal features and how they attach |
| Creatures with recognizable references | Wolves, Western dragons, griffins | Use pose sheets to show movement, and refine specific features like horns, wings, and tails |
| Fully original hybrid creatures | Cyber mammoth tank, exotic beasts, chimeras | Decide on the core body plan first, then merge multiple component references into a unified design |
Humanoid Characters with Animal Traits: Lock the Overall Body with Turnarounds, Add Detail Callouts for Specific Features
Characters with animal traits start with a human base and add animal ears, tails, or scales, so the workflow still revolves around character turnaround sheets and detail callouts. Define age, gender, build, face shape, and outfit first, then check proportions and silhouettes across front, side, and back views. Animal features need to stay consistent across those angles too: ear placement shouldn't drift when the head turns, and tail length and base attachment should match in every view.
Once the turnaround locks in the overall look, use close-up callout sheets to clarify details that are hard to read at full-body scale—such as whether human ears are kept, how hair falls over the base of animal ears, how a tail passes through clothing, or where wing roots meet the upper back. Having two sets of ears or oversized ears can be a deliberate stylistic choice; what needs fixing are unintended structural conflicts and stiff, pasted-on seams. The sheet below illustrates common detail directions and can be paired with a standard character turnaround.
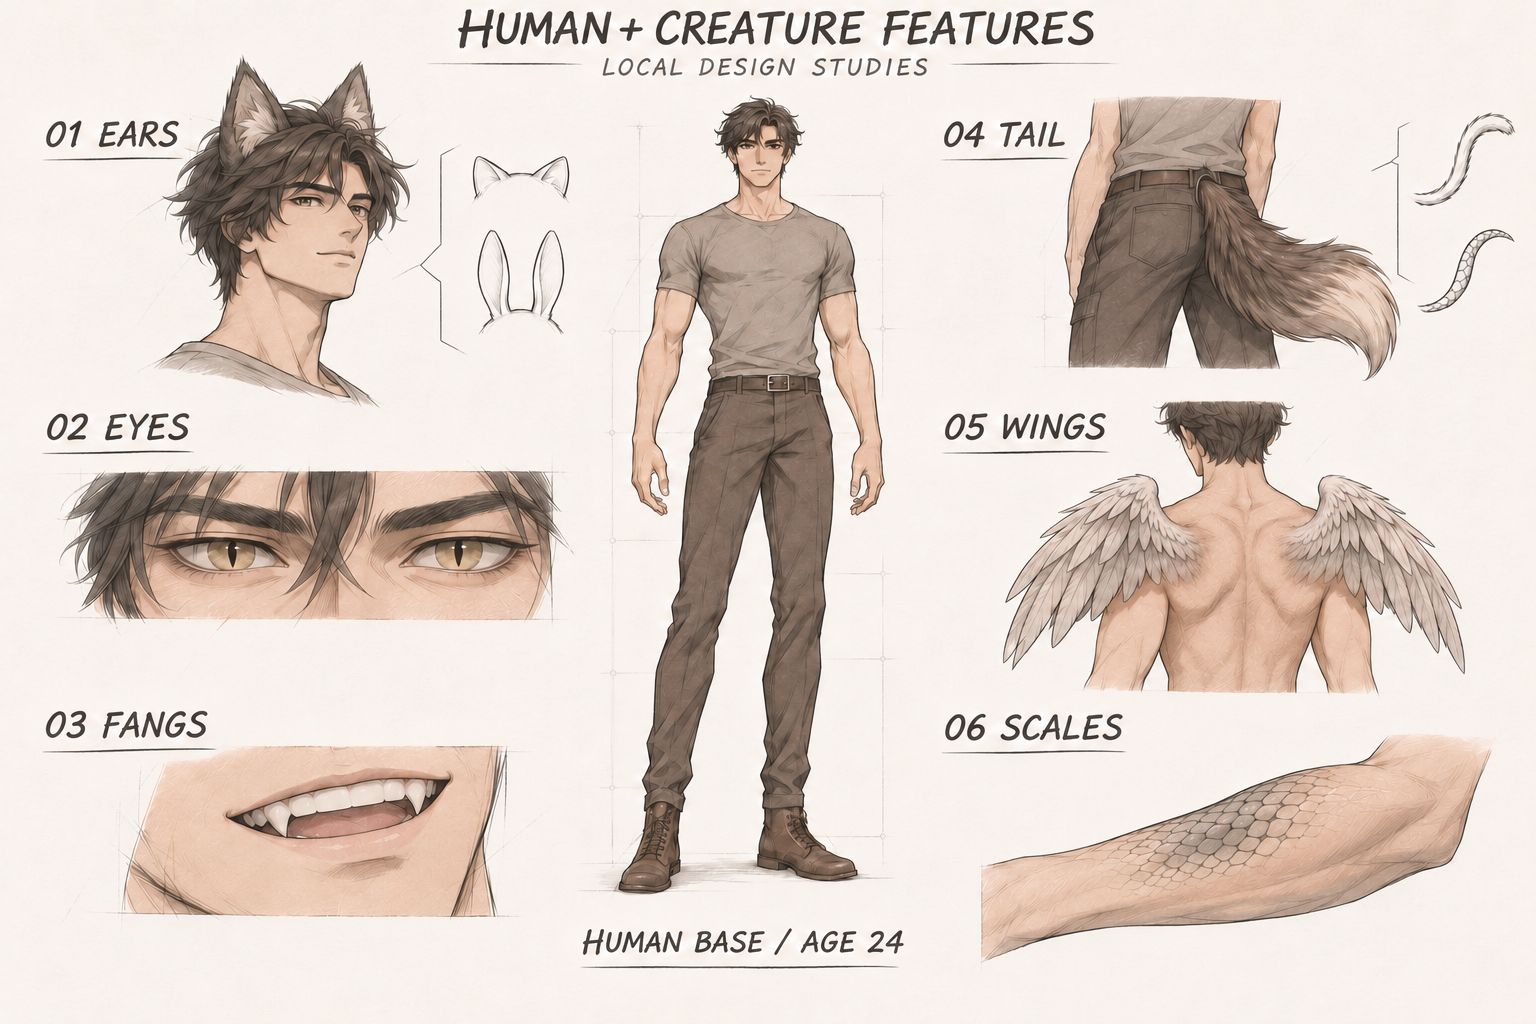
The image above shows how individual features can be laid out on a callout sheet. The table below lists common design directions and sample editing prompts for each part (these single-feature instructions are untested teaching examples):
| Feature | Classic Directions | Sample Editing Prompt |
|---|---|---|
| EARS | Cat, wolf, fox, or rabbit ears; pointed ears as another humanoid fantasy trait | Change only the ears to a pair of wolf ears growing from both sides of the top of the head. Connect the ear bases smoothly along the curve of the skull, with nearby hair strands partially covering the base and clear inner and outer ear fur direction. Keep the human face shape, nose, and jawline; do not include visible human ears in this design. |
| TAIL | Slender cat tail, fluffy fox tail, thick wolf tail, tapering scaled dragon tail | Add only a fox tail extending from the center of the lower back at the sacrum, passing through a dedicated opening at the back of the waistband. Give the base volume, with fur growing toward the tip, hanging naturally before curving slightly upward. Keep the original standing pose and main outfit unchanged. |
| FANGS | Short werewolf canines, longer vampire fangs | Keep the human mouth shape, dental arch, and jawline, and slightly lengthen and sharpen only the upper left and right canine teeth. Part the lips slightly so the fangs and adjacent teeth are visible; do not add a second row of teeth or elongate the snout. |
| EYES | Feline slit pupils, reptilian vertical pupils, unusual iris colors | Change only the pupils to narrow vertical slits while keeping the original iris placement, sclera, eyelids, and gaze direction. Make both eyes follow the same lighting and perspective with normal specular highlights, without letting the pupil shape alter the rest of the face. |
| WINGS | Feathered wings, bat wings, dragon wings | Show the bare upper back of a male character and add a pair of feathered wings in the upper scapular region, with symmetrical root placement on both sides. Layer the feathers outward along the wing bones, connecting the wing roots naturally to the back muscles and skin with volume and contact shadows. Keep the human arms intact; do not grow the wings from the arms or waist. |
| SCALES | Dragonborn forearm scales, neck side scales, localized fish-scale textures | Add only a patch of small scales on the outer forearm that follows the curve of the skin, aligned along the length of the arm and gradually becoming smaller and sparser at the edges as they transition into normal skin. Keep the palm, five fingers, and muscle contours intact without turning the scales into full-body armor. |
Ears, tails, fangs, and vertical pupils work well together for kemonomimi or beastfolk characters, while localized scales and heavy tails lean toward dragon-blooded designs. Details like a forked tongue or fangs visible during speech can be added as separate close-ups. When generating shots later, pick either the full turnaround or specific callouts depending on what needs to read clearly in the frame.
If generated animal ears look like stickers floating on top of the hair, check the ear base placement first, then adjust hair overlap and contact shadows. The comparison below shows four independent one-shot edits starting from the same base image: the top image is the original input (deliberately generated with harsh ear-base seams for demonstration), and the four panels below show raw outputs from different prompts using the exact same crop region, without extra retouching.
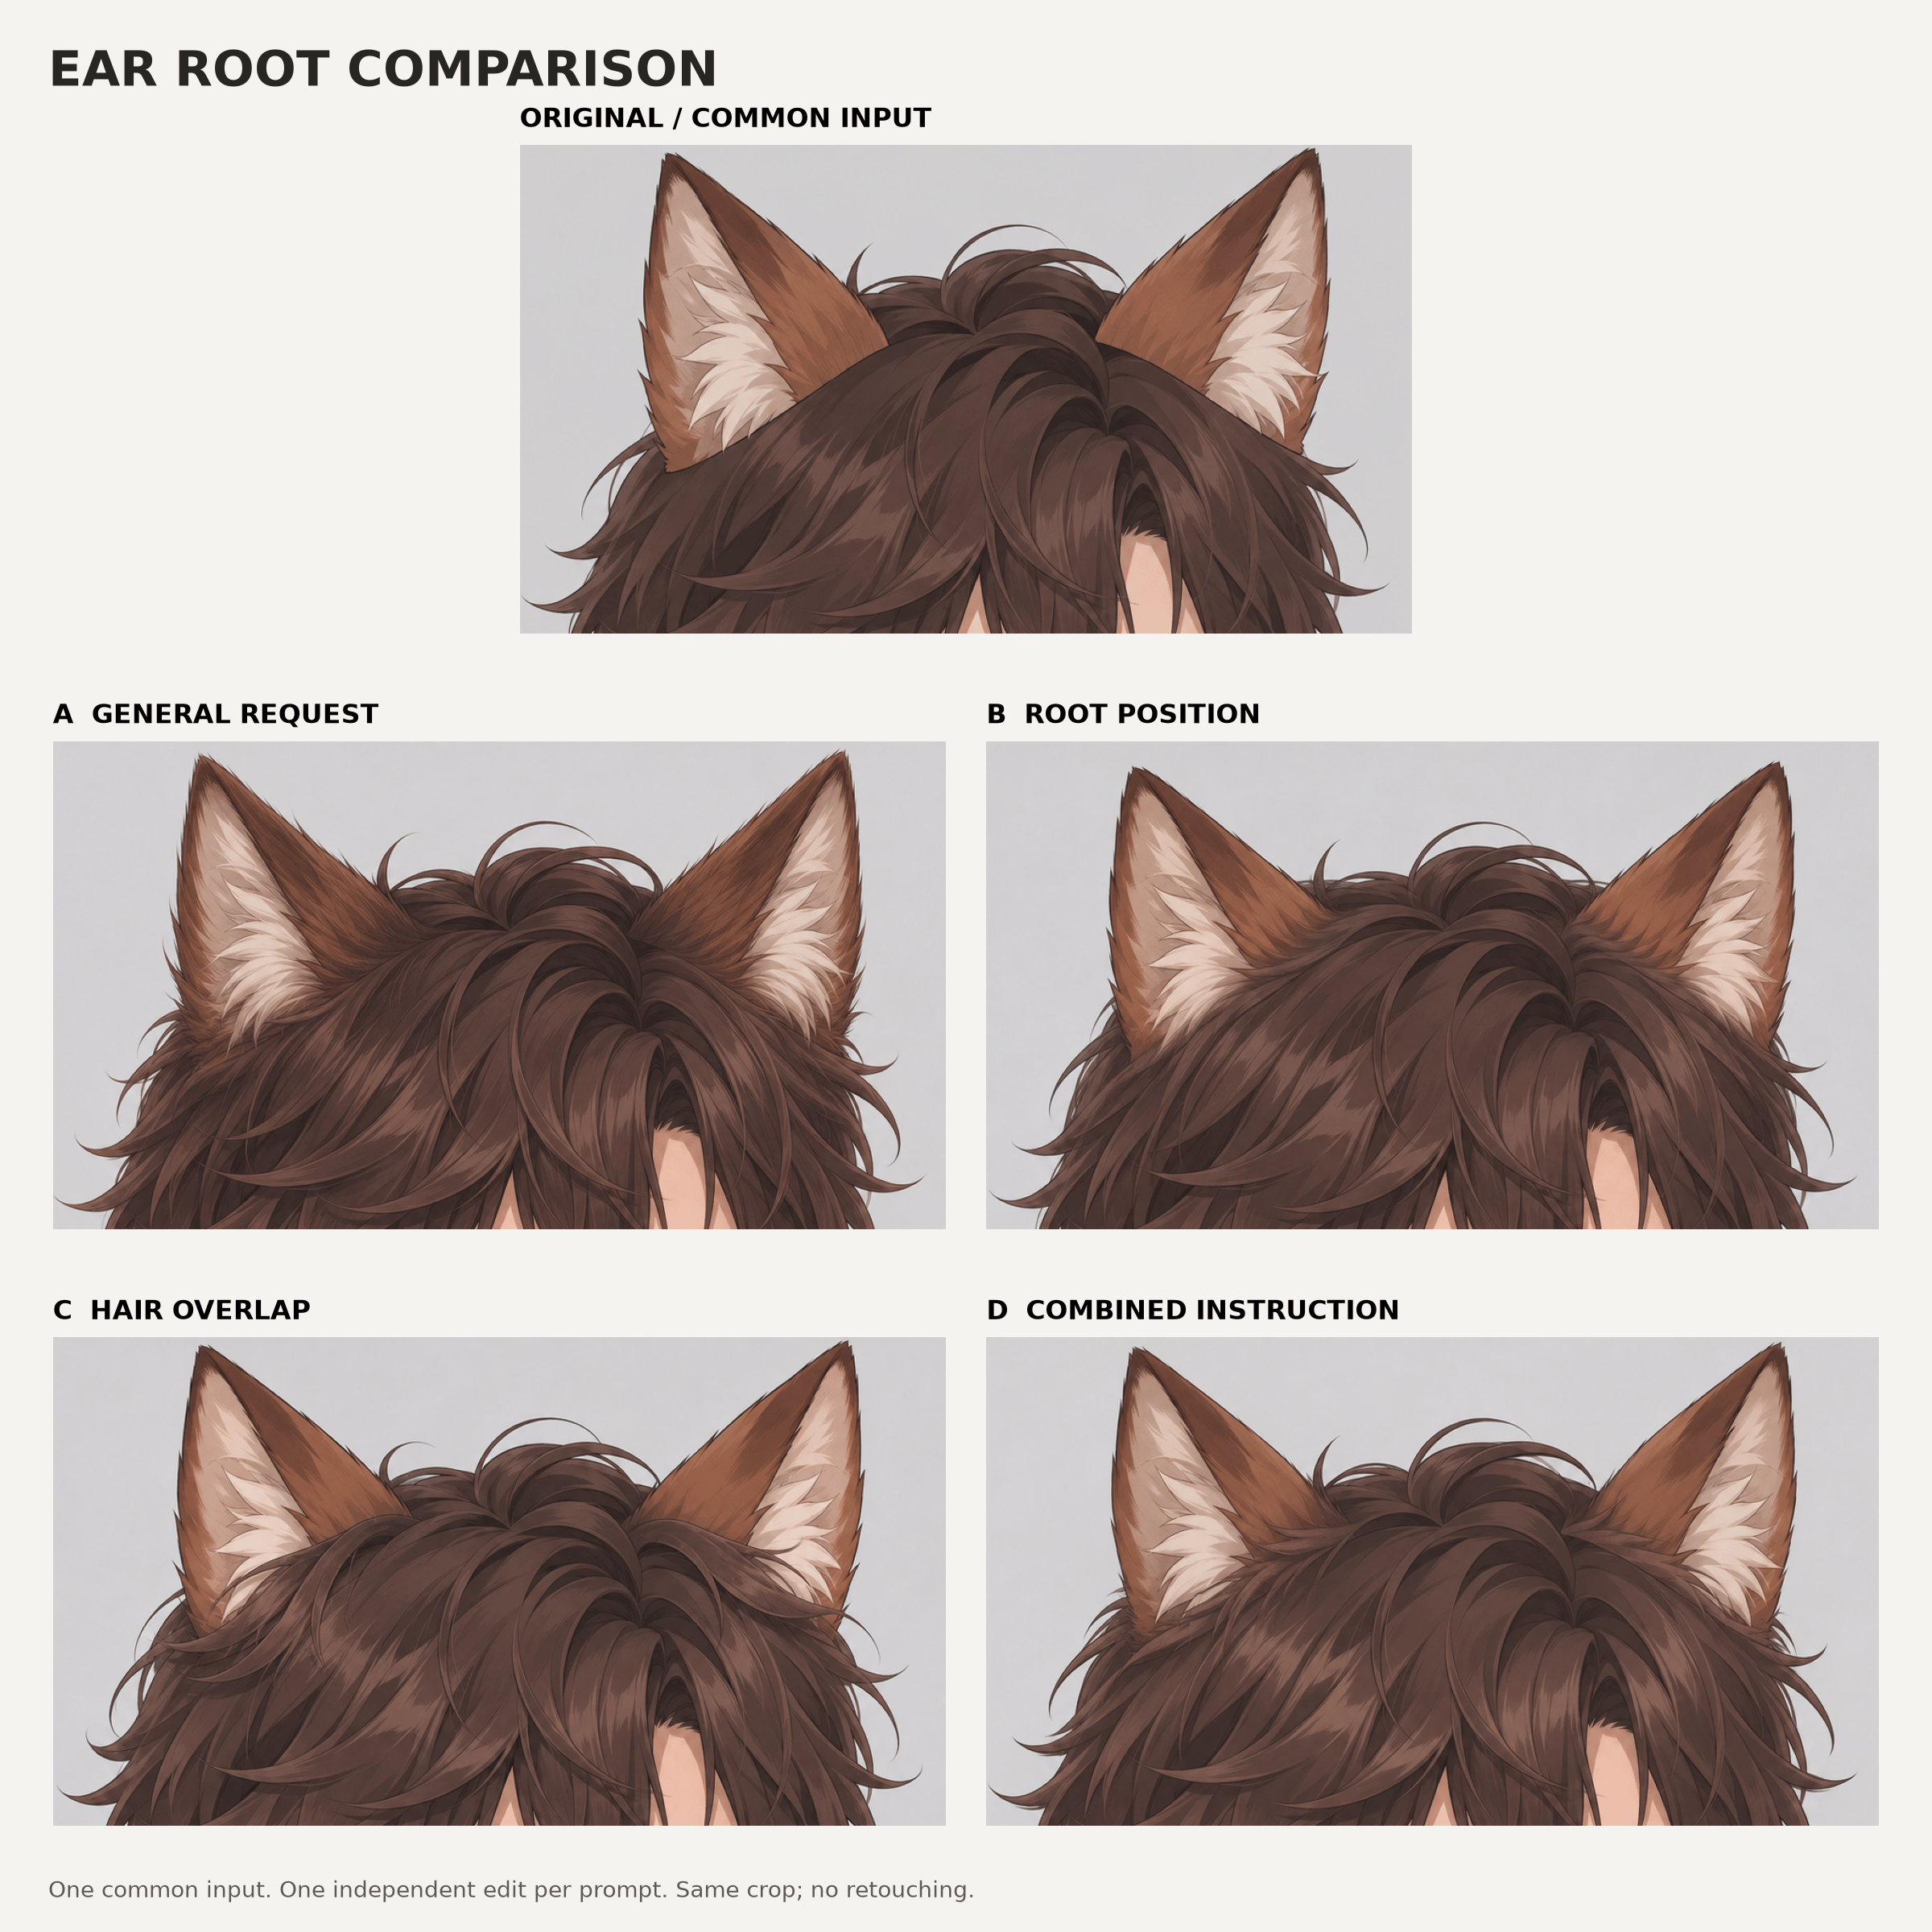
Groups A, B, and C all share the same preservation clause—"Keep the original character's face, expression, main hairstyle, fox ear shape, outfit, camera angle, and art style"—combined with the specific edit instructions in the table below, while D uses a single combined instruction. The prompts shown in the table are English translations of the Chinese instructions used to generate the examples.
| Panel | Prompt | |
|---|---|---|
| A | Make the transition between the fox ears and the head look more natural. | |
| B | Adjust only the base position of both fox ears so the roots connect naturally along the curve of the skull. | |
| C | Modify only the hair strands near the ear bases so a few locks naturally cover part of the roots, creating front-to-back overlap. | |
| D | Based on the character in the original image, modify only the bases of both fox ears and a small amount of surrounding hair. Keep the character's face, expression, main hairstyle, ear shape, and outfit. Make the ear roots connect naturally along the curve of the head, with nearby hair strands partially covering the junction, matching the lighting and linework of the original image. This character design has only one pair of fox ears on top of the head. |
Across these four single-pass attempts, C produced the clearest hair overlap, A softened the transition at the base as well, and B and D stayed more conservative. Because each instruction is represented by only one sample, this comparison is useful for observing how different phrasings nudge the edit in different directions—not for proving that longer prompts or any single phrasing is universally better.
Editing tails or other attachments follows the same logic: narrow the description down to the tail root position, pelvic orientation, and how the waistband opening overlaps the base. It helps to focus on one junction per pass. If the ear base improves but the character's face drifts, shrink the inpainting selection on the next try or explicitly state the face shape and hairstyle details that must remain locked.
Creatures with Recognizable References: Clarify Poses and Specific Features
For real animals like wolves and familiar fantasy creatures like dragons and griffins, you can start with recognizable visual references.
When preparing motion references for these creatures, prioritize pose sheets. A standard turnaround helps verify proportions from different angles, but you still need concrete poses to show how the body actually moves. For quadrupeds that will walk or run, showing the center of gravity, paw placement, and torso flexion across standing, walking, and trotting poses makes it much easier to check whether body mass and markings stay consistent.
The sheet below shows the same gray wolf across five poses: standing, walking, trotting, sitting, and pouncing. All five use a full-body side profile with consistent coat markings, build, and tail length, making it easy to compare limb placement, weight distribution, and spine curvature. The sitting pose shows folded hind legs and braced forelegs, while the pounce captures extended front paws and pushing hind legs mid-leap. This sheet illustrates how to organize distinct pose references rather than a continuous frame-by-frame gait cycle.
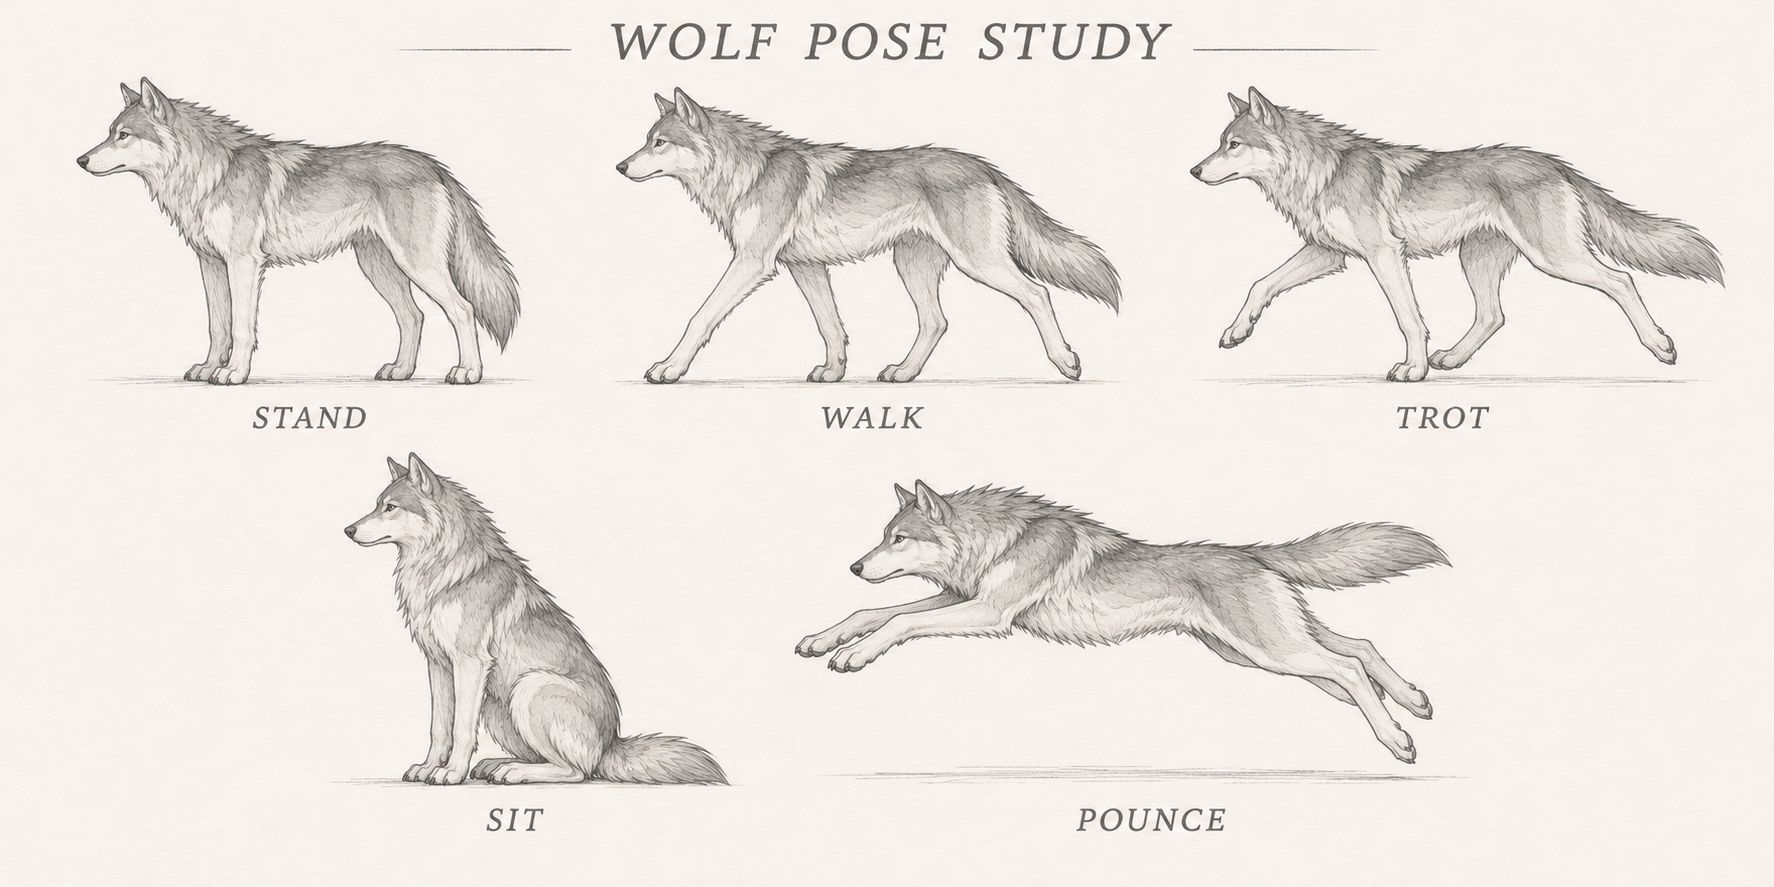
When preparing inputs for video generation, pick the pose closest to your target action and describe how the motion continues from there. Mecha and robots have similar needs: an orthographic turnaround alone doesn't explain how joints hinge or how armor plates clear each other in motion. Pose sheets help specify pivot points, range of motion, and weight support—and after generating, you should still check that rigid parts haven't warped or detached.
Dragons add the extra challenge of coordinating four legs with a pair of wings. When preparing action references, clarify where the wing roots attach, how the neck and tail balance each other, and how the limbs fold or extend when walking versus spreading wings; after video generation, check that those anatomical relationships hold together. The black dragon example below focuses on static design instead, showing how to refine a specific feature through horn variations.
Take the horns of a Western dragon: while you can borrow cues from bull, ram, or stag horns, pasting real animal horns straight onto a dragon often clashes with the proportions of the dragon's head. When writing prompts, it is more effective to describe the number of horns, attachment site, growth direction, curvature, taper, and how the horn base meets the skull ridges—while explicitly locking the snout and jaw structure so changing the horns doesn't cause the model to redraw the entire head.
The black dragon concept sheet below keeps a full hornless body on the left and compares three horn styles built on the exact same head structure on the right, retaining light cranial centerlines, wing-bone construction lines, and pencil hatching to indicate volume.
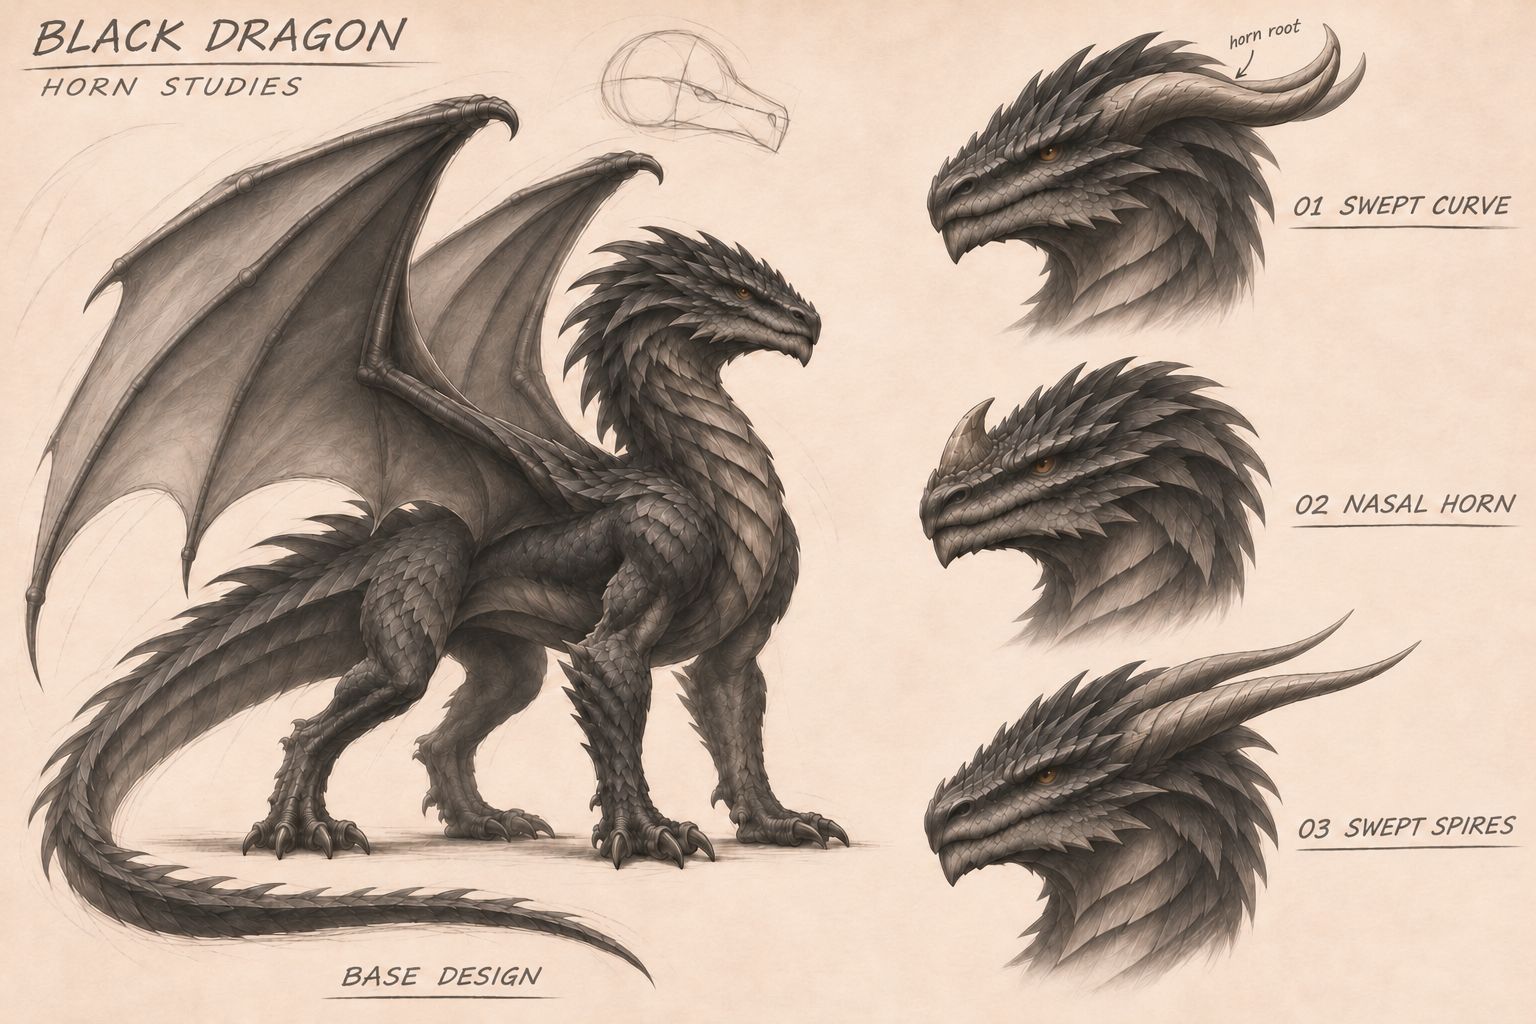
| Option | Label in Image | Shape Focus |
|---|---|---|
| Swept curved horns | SWEPT CURVE | Thick horn bases extending backward from both sides of the cranium, curving naturally upward near the tips in a continuous arc |
| Single nasal horn | NASAL HORN | A short single horn growing from the midline of the nasal bridge, wide at the base and tapering to a point, supported by the mass of the snout |
| Swept long spires | SWEPT SPIRES | A pair of long horns extending backward and upward from the rear of the skull, mostly straight with a subtle natural curve |
When designing your own variations, distill key traits like thick bases, backward sweep, or upturned tips first, then scale them to fit the dragon's skull. Horn bases should seat solidly into the bone structure, while the horn shafts should keep a distinct hard surface silhouette that reads separately from the surrounding neck scales.
To reuse this kind of feature study layout, you can adapt the simplified prompt example below:
Black dragon character concept sheet on light paper, pencil linework with grayscale shading, keeping subtle construction lines. On the left, show a full-body hornless black dragon; on the right, use the same dragon head to compare three horn styles: a pair of backward-curving horns with upturned tips; a short single horn on the nasal bridge; and a pair of long horns extending backward and upward. Connect the horn bases naturally to the skull, keeping a clear distinction between horn texture and scales. Use English titles BLACK DRAGON and HORN STUDIES, and label the three options SWEPT CURVE, NASAL HORN, and SWEPT SPIRES.
If only one horn angle looks off after generation, narrow the scope of your follow-up edit—for example: "Raise the rear horn slightly while keeping the front horn, head shape, and sketch style unchanged."
Fully Original Creatures: Break Down into Parts, Then Fuse Multiple References
For original creatures without a single real-world or mythic template, you can assemble components from different sources. Suppose you are designing a cyber-style mammoth tank: the lower body replaces elephant legs with a low-profile tracked chassis, the upper body keeps a mammoth's head, humped shoulders, shaggy coat, and curved tusks, and the elephant trunk is retrofitted into a flexible cold-air delivery device ending in a dual-port nozzle. If you rely on text prompts alone, you have to describe both the look of every component and how they mechanically connect, which often takes many trial-and-error passes.
Here, we break the design into separate parts before fusing them: we generate the tracked chassis, the mammoth upper body, and the cooling trunk (with an enlarged nozzle head) as three standalone images, then feed them in together as references. Each reference has a clear role:
Click any thumbnail to view the full-size image.
| Reference Name | Preview | Borrowed Elements | Structural Relationships to Lock During Fusion |
|---|---|---|---|
| Tracked chassis | 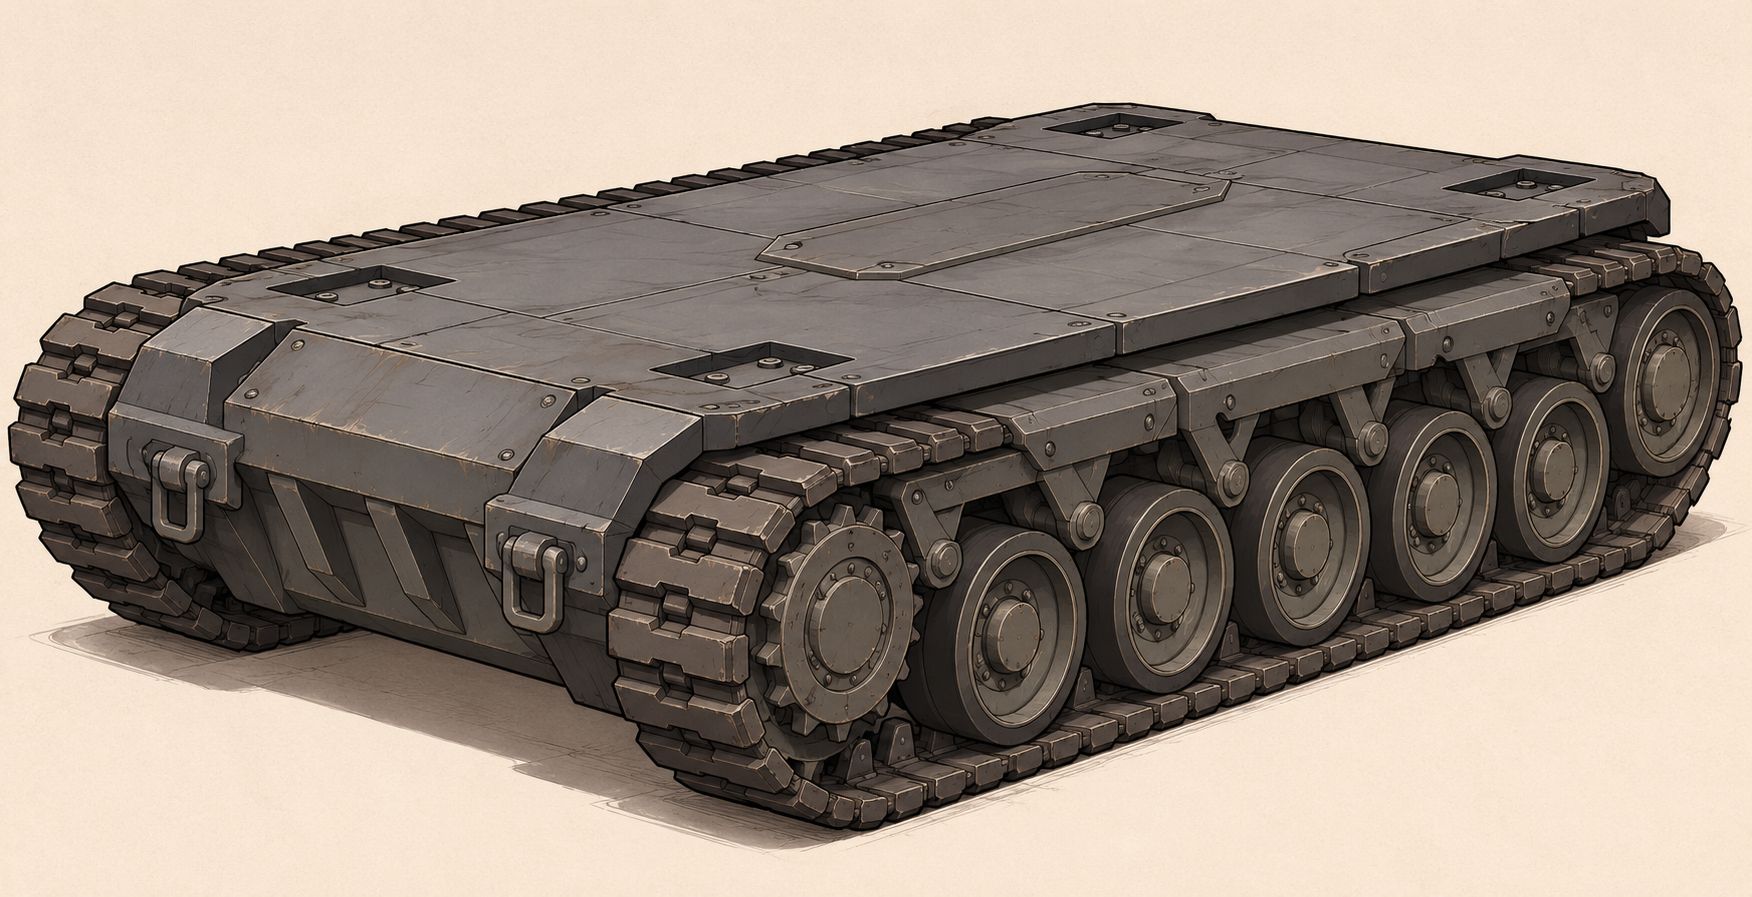 | Tracks, road wheels, low-profile hull, and mounting deck | Supports the lower body and provides locomotion; must scale proportionally to the mammoth torso rather than being pasted at raw image size |
| Mammoth upper body | 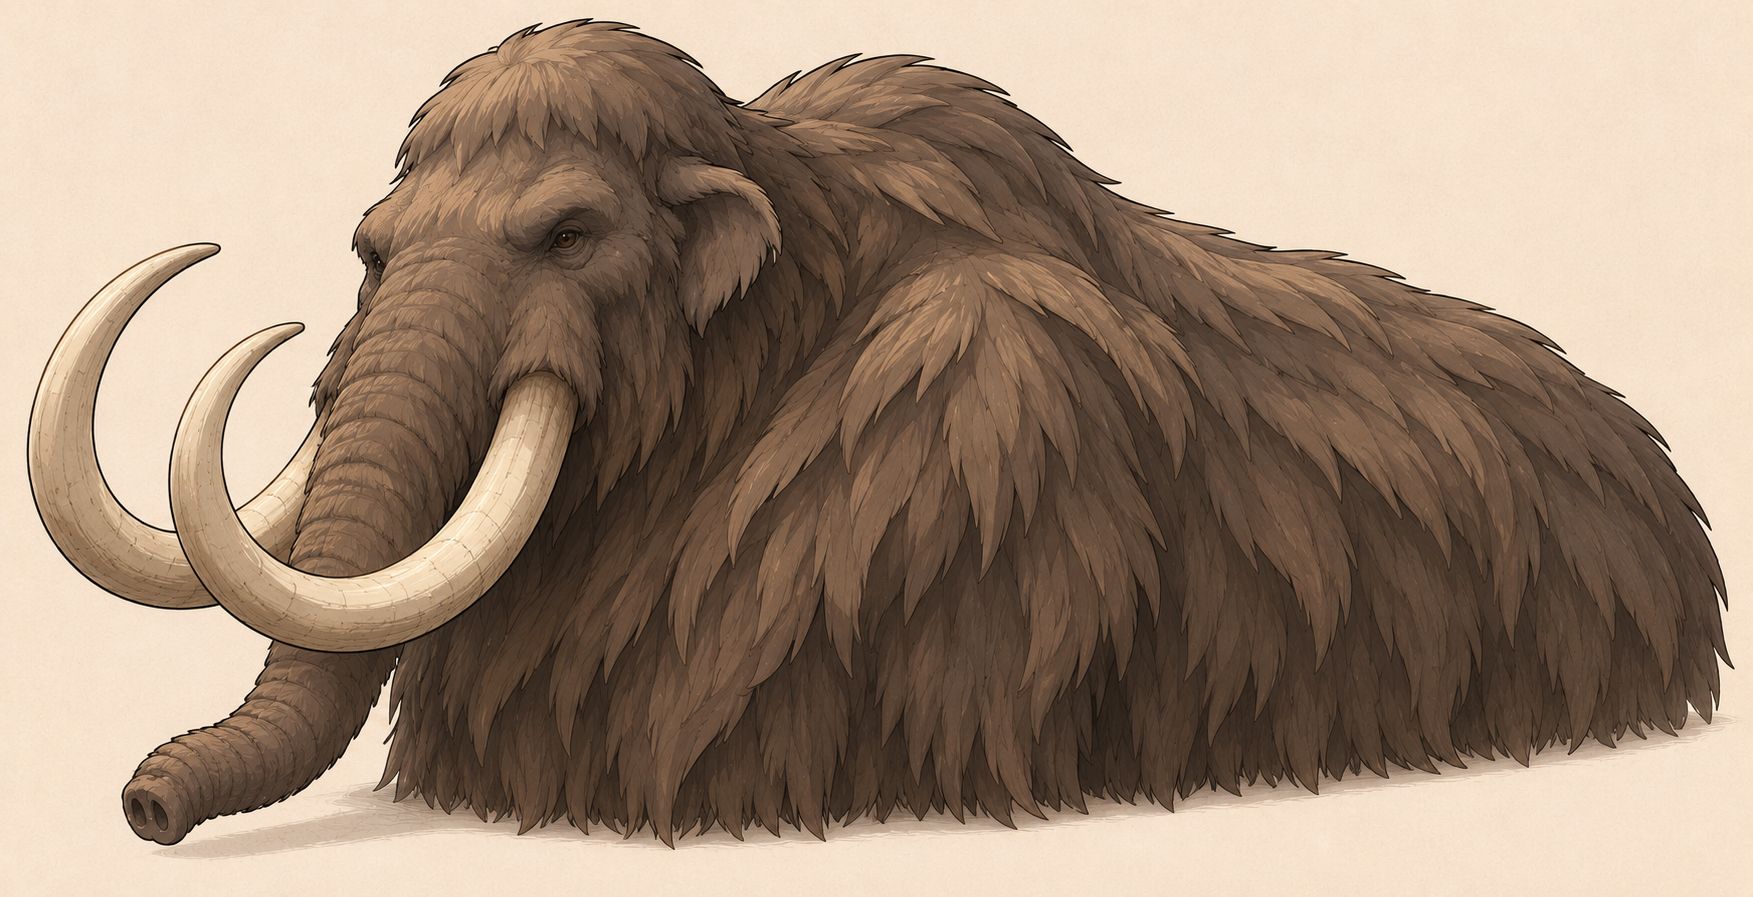 | Head, humped shoulders, shaggy fur, and curved tusks | Governs facial structure, trunk root, trunk path, tusk attachment, and coat; its lower edge meets the hull deck |
| Cooling trunk with enlarged nozzle | 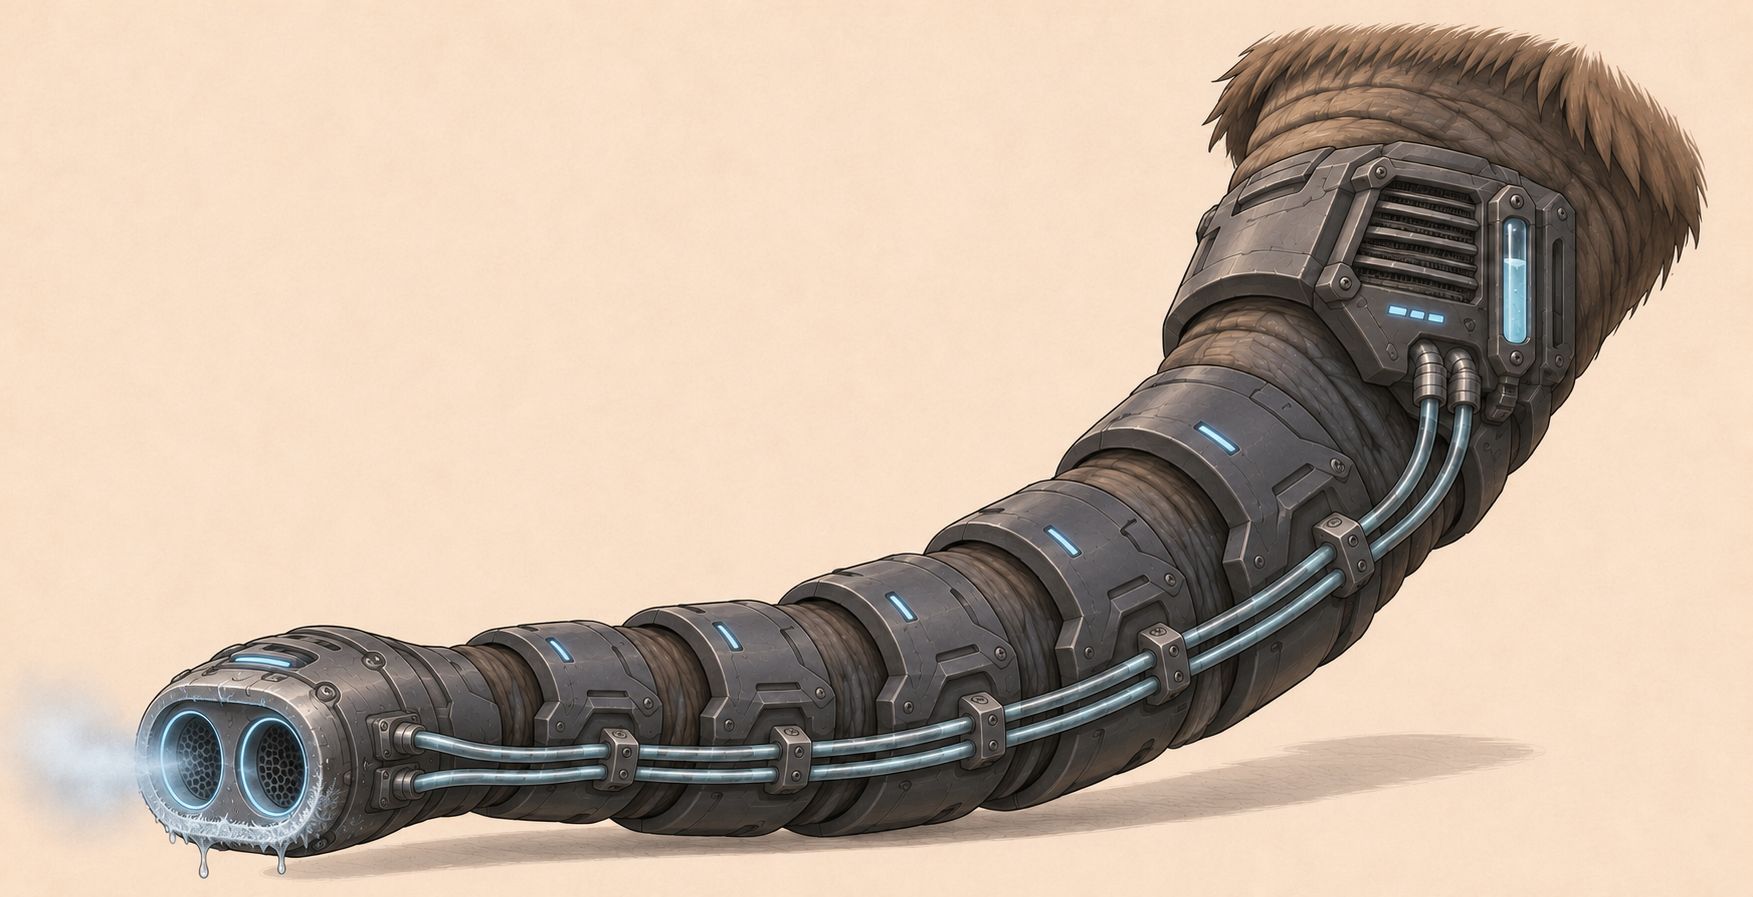 | Segmented armor sleeve, flexible hose sections, coolant lines, and dual-port nozzle | Supplies only the mechanical retrofit details; follows the trunk root and path established by the mammoth upper body, with the tip suspended above the ground clear of the tracks |
When fusing multiple images, tell the model which reference governs the core anatomy and which one only contributes surface or retrofit details. In this setup, Image 1 is the tracked chassis, Image 2 is the mammoth upper body, and Image 3 is the cooling trunk with the enlarged nozzle. The trunk root, trunk curvature, and tusk sockets follow Image 2, while Image 3 provides only the segmented housing, coolant lines, and dual-port nozzle.
Below is the fused result. The mammoth torso seats onto the chassis through a support structure while keeping the tracks and connectors visible; the mechanical housing wraps along the natural curve of the trunk, and the near-side tusk passes cleanly in front of the trunk where they overlap.
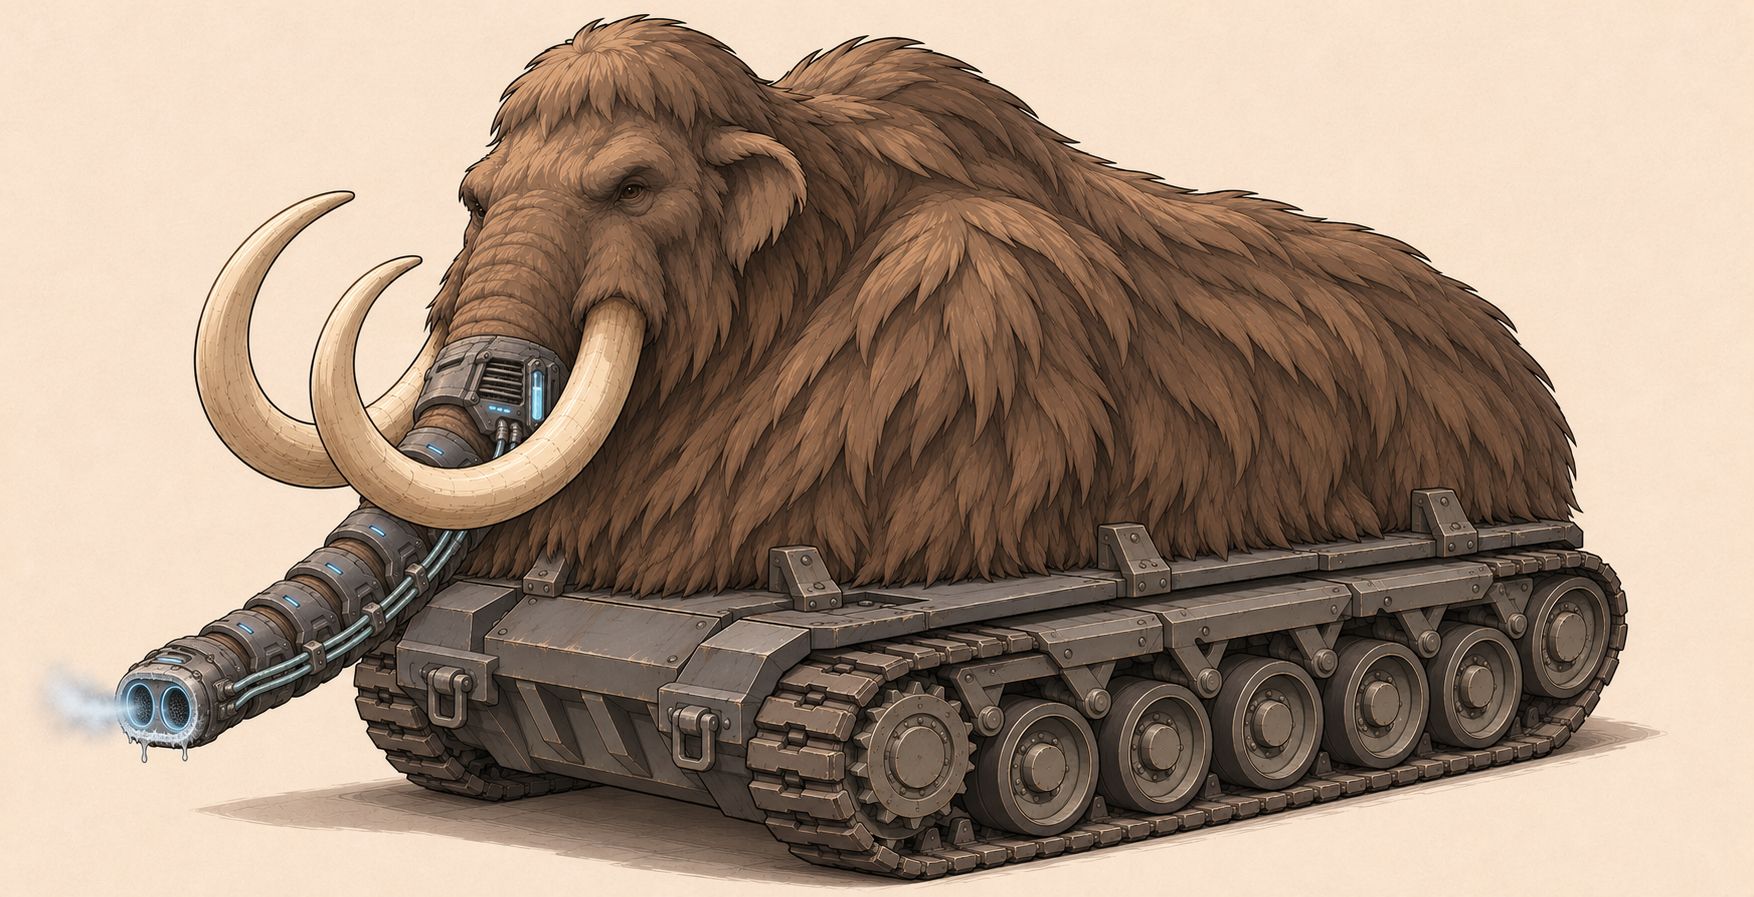
Following this division of labor across the references, you can condense the multi-image fusion prompt into a reusable template like this:
Fuse three reference images: Image 1 provides the tracked chassis, and Image 2 provides the mammoth upper body. Keep the face shape, tusk attachment, and trunk path from Image 2, and apply the segmented mechanical sleeve, coolant lines, and dual-port cold-air nozzle from Image 3 along the existing trunk. Connect the mammoth torso naturally to the chassis while keeping the tracks visible. Unify the Western comic art style, lighting, and proportions, without adding weapons or extra parts.
For comparison, we also ran a text-only generation for the exact same concept without uploading any reference images: the prompt described only the mammoth torso, the tracked chassis, and the cooling trunk, without mentioning weapons at all, yet the generated result still added weapon pods across the shoulders and back.
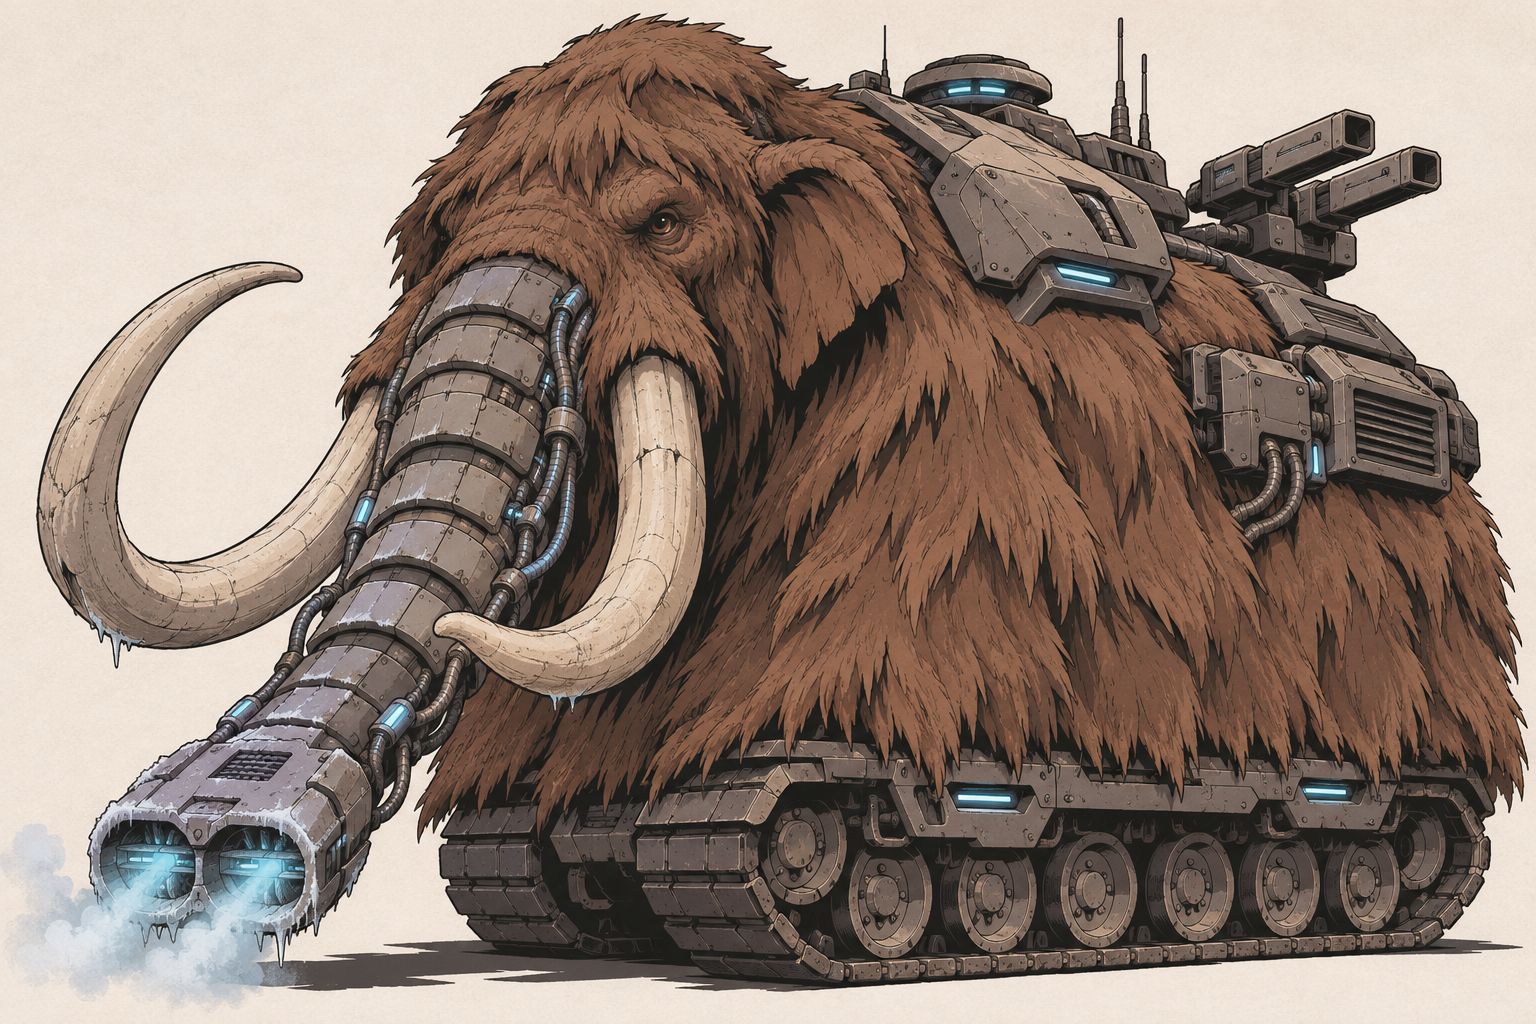
Judging from this output, the model may be associating terms like "cyber" and "tank" with weapons and fills in extra equipment beyond what was specified. With original hybrid creatures that lack a fixed template, an image can look polished and plausible at first glance while quietly drifting away from your actual spec—and once extra guns or appendages appear, they tend to stick around in subsequent edits. When that happens, check the output against your initial component breakdown, strip out the unrequested shoulder weapons first, and keep only the three core elements: the mammoth body, the tracked chassis, and the cooling trunk.
Summary
When designing nonhuman characters, match your workflow to how much existing anatomy you can lean on: for humanoid characters with animal traits, lock the overall figure with a turnaround sheet and use detail callouts for specialized parts; for creatures with recognizable real or mythic counterparts, use pose sheets to clarify movement and refine horns, wings, or tails through focused studies; and for fully original hybrids, break the concept into understandable components with clear primary and secondary roles before fusing multiple references.
The fox-ear comparison showed how different phrasings nudge a single local edit in subtle ways, the gray wolf sheet illustrated how to organize key poses, the black dragon study focused on defining horns through growth direction and skull proportions, and the mammoth tank demonstrated both the value of assigning clear roles to component references and the need to watch out for unrequested details added by the model. When reviewing generated results, verify both that your target features landed accurately and that no extra gear or anatomy crept in—locking down what works first before making targeted fixes for the rest.