Video generation prices have fallen significantly over the past year, yet making a ten-minute video can still be expensive. This guide looks at practical ways to reduce that cost and put more of your budget into usable footage.
Drawing on my own generation tests and creators’ published accounts, this guide covers practical ways to reduce rework and keep costs under control.
1. Measure Cost by the Shots You Can Use
Repeated attempts to get a usable clip can drive up the cost of AI filmmaking. One creator reported spending about $1,200 on a twelve-minute AI short film: they generated over 900 clips and used about 200 in the final cut. That example shows how much generated footage can be left out of a finished film.
The actual cost of video generation often depends on how many attempts are needed to get a usable shot. For example, if a shot requires three generations before a usable version is selected, its generation cost is three times the single-generation price. If only half the duration of the selected clip can be edited into the final video, the cost per final second doubles again. These ratios are just calculation examples, not industry averages. The actual number of attempts varies with the model, shot difficulty, reference material, and acceptance criteria. Therefore, rather than comparing single-generation prices, it's more useful to track total generation cost, number of attempts, and final used seconds to calculate the actual cost per second of the finished video.
2. Plan the Rough Cut Before Generating Video
Choose models and allocate your budget around the demands of each shot. First, work out which shots the scene needs, what each should communicate, and how they will cut together. Discovering those problems after generation means discarding footage you have already paid for and spending more on replacements.
Before generating video, make a shot list. Note each shot’s purpose, the characters involved, and any difficult action. Identify the shots that carry the scene. Lower-cost models may work for establishing shots and simple transitions; dialogue between several characters, complex movement, and important performances deserve a test with a more capable model. Judge the choice by how often you get a usable result.
A clear plan helps you decide where to spend. If you cannot describe what a shot needs to achieve, clarify that before testing models. A rough cut made from stills cannot prove that movement or performance will work, but it can expose unnecessary shots and problems with their order. Resolve those questions early, while changes are inexpensive.
If you mix models within a scene, check visual continuity. Test them with the same character references and scene descriptions, then compare faces, textures, lighting, and expressions. A cheaper generation may offer little saving if it takes substantial work to match the surrounding footage. Consider that work when choosing models and setting the budget.
To try this workflow in Arcloop, start with a script or story idea in the AI Short Drama Generator. Use your shot plan to review the scenes and decide what needs another pass.
Example: Allocate Time for Dialogue and Reactions First
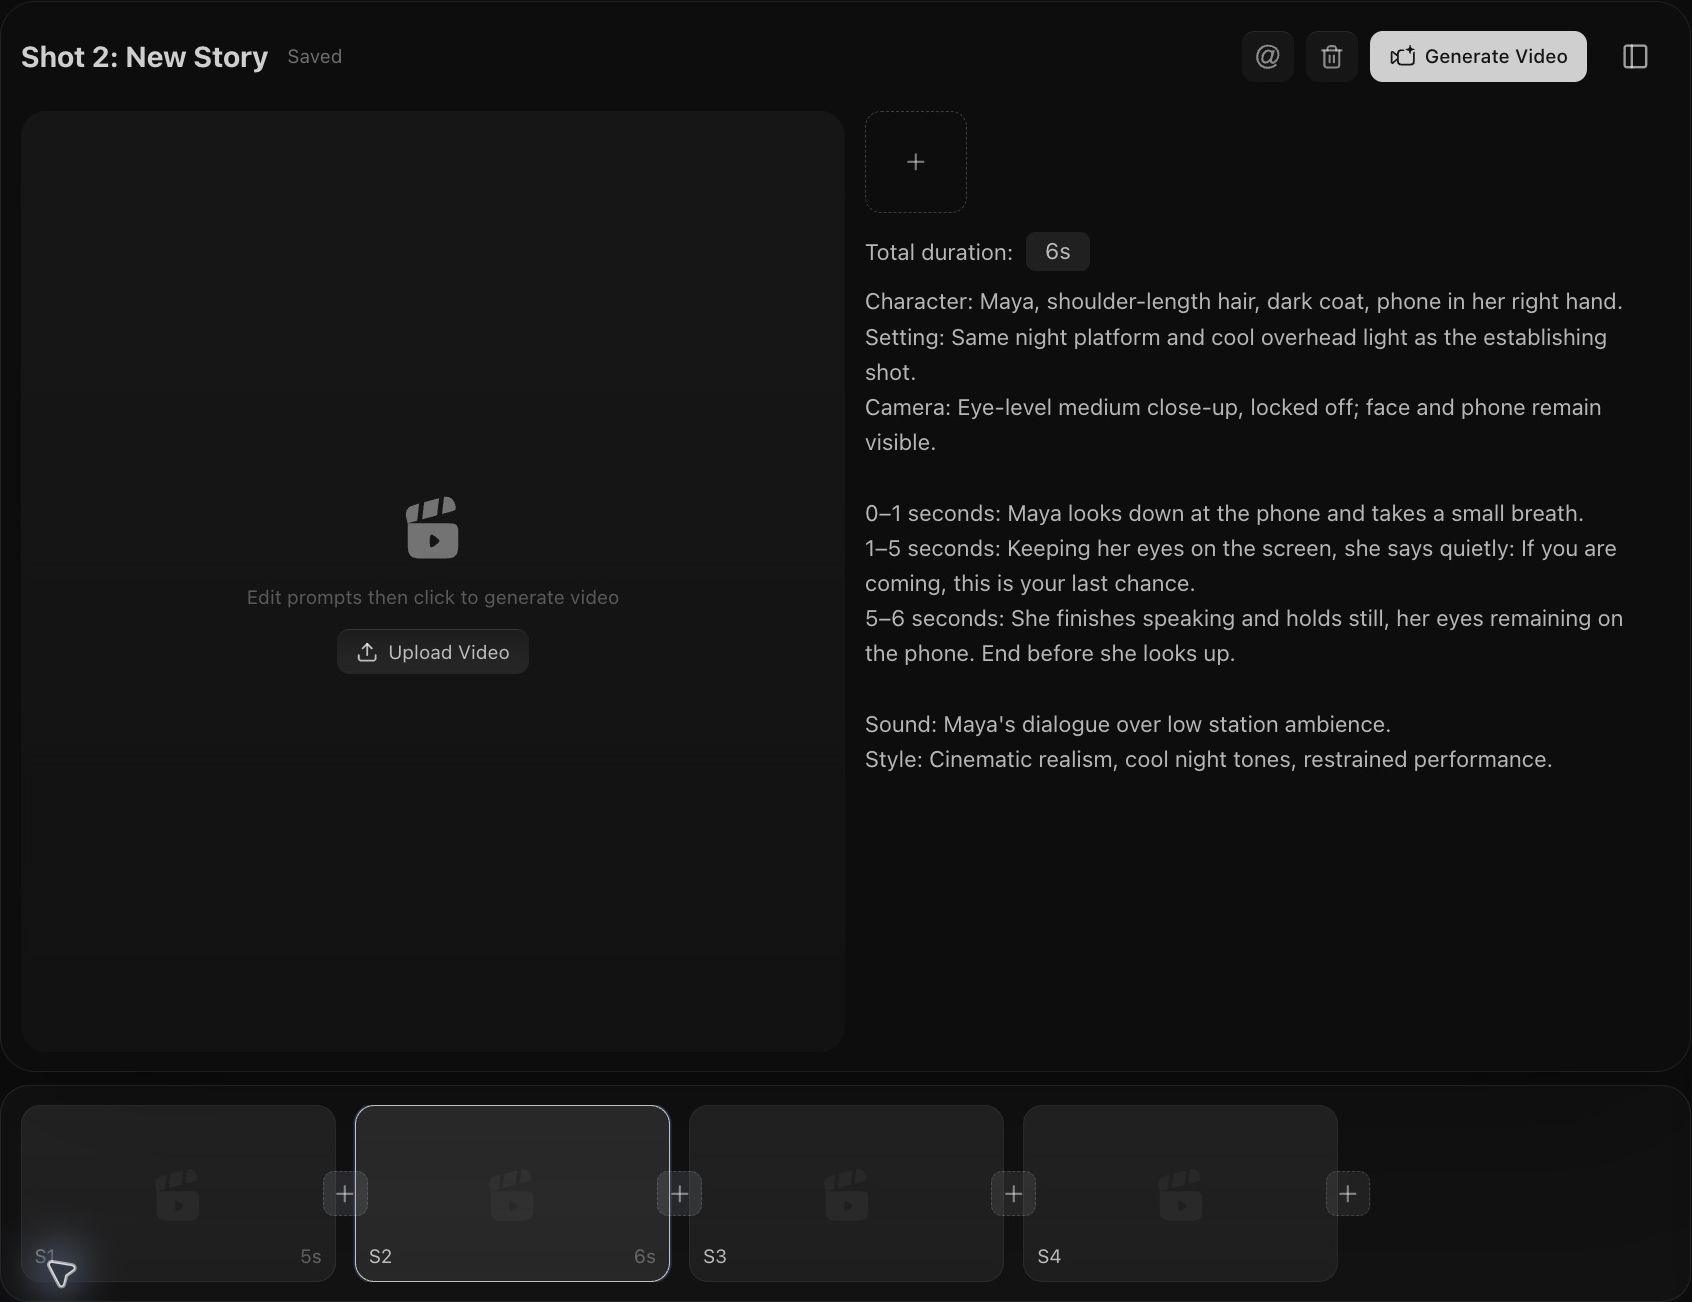
Here is a shot plan for an 18-second scene. Give each shot a clear purpose and leave room for dialogue and reactions. The timings are planning targets: check them with a scratch audio track and a rough cut.
| Shot | Purpose | Edit range | Duration |
|---|---|---|---|
| 01 | Establish the Wait | 00:00–00:04 | 4s |
| 02 | Give the Line Room | 00:04–00:10 | 6s |
| 03 | Reveal the Arrival | 00:10–00:13 | 3s |
| 04 | Let the Reaction Land | 00:13–00:18 | 5s |
For the second shot, divide the six seconds into a lead-in, the line, and a pause:
Camera: Eye-level medium close-up, locked off.

0–1 seconds: Maya looks down at her phone and takes a small breath.
1–5 seconds: She says quietly: If you are coming, this is your last chance.
5–6 seconds: She holds still, eyes on the phone. End before she looks up.

Sound: Temporary dialogue over low station ambience.
Record a scratch dialogue track first to check whether six seconds is enough to say the line naturally, then see if the final five-second reaction shot can carry the emotion. If the dialogue feels rushed or the reaction is too short, adjust the shot plan and edit duration before moving to video generation.
3. Test the Scene Visually with a Storyboard
The shot plan establishes purpose and order; a storyboard makes them visible. Seeing frames together helps you judge where characters stand, where they look, and how one shot connects to the next. Before paying for video, use the board to check composition, geography, and the scene’s emotional progression.
Keep the storyboard prompt simple. Specify the grid, reading order, panel proportions, and one still moment per panel. Give the character only the identifying features needed for consistency, then describe each panel’s framing and key story beat. A long list of appearance details, background elements, and actions can make the essential instructions harder to follow.
A generated storyboard takes work of its own. The image model has to manage panel layout, character consistency, and scene continuity at once. It may get a panel wrong or change details between frames. A dedicated storyboard tool, or an image editor with references, local editing, and individual panel export, makes those revisions easier to manage.
To change one panel, crop it out and edit or regenerate it with the relevant character and scene references. Check it against its neighbors before placing it back in the board. This keeps the panels you already like intact. If a panel will become a video’s first frame, crop it first and check both its resolution and the action’s starting position.
Example: Using a Six-Panel Grid to Check the Same Scene
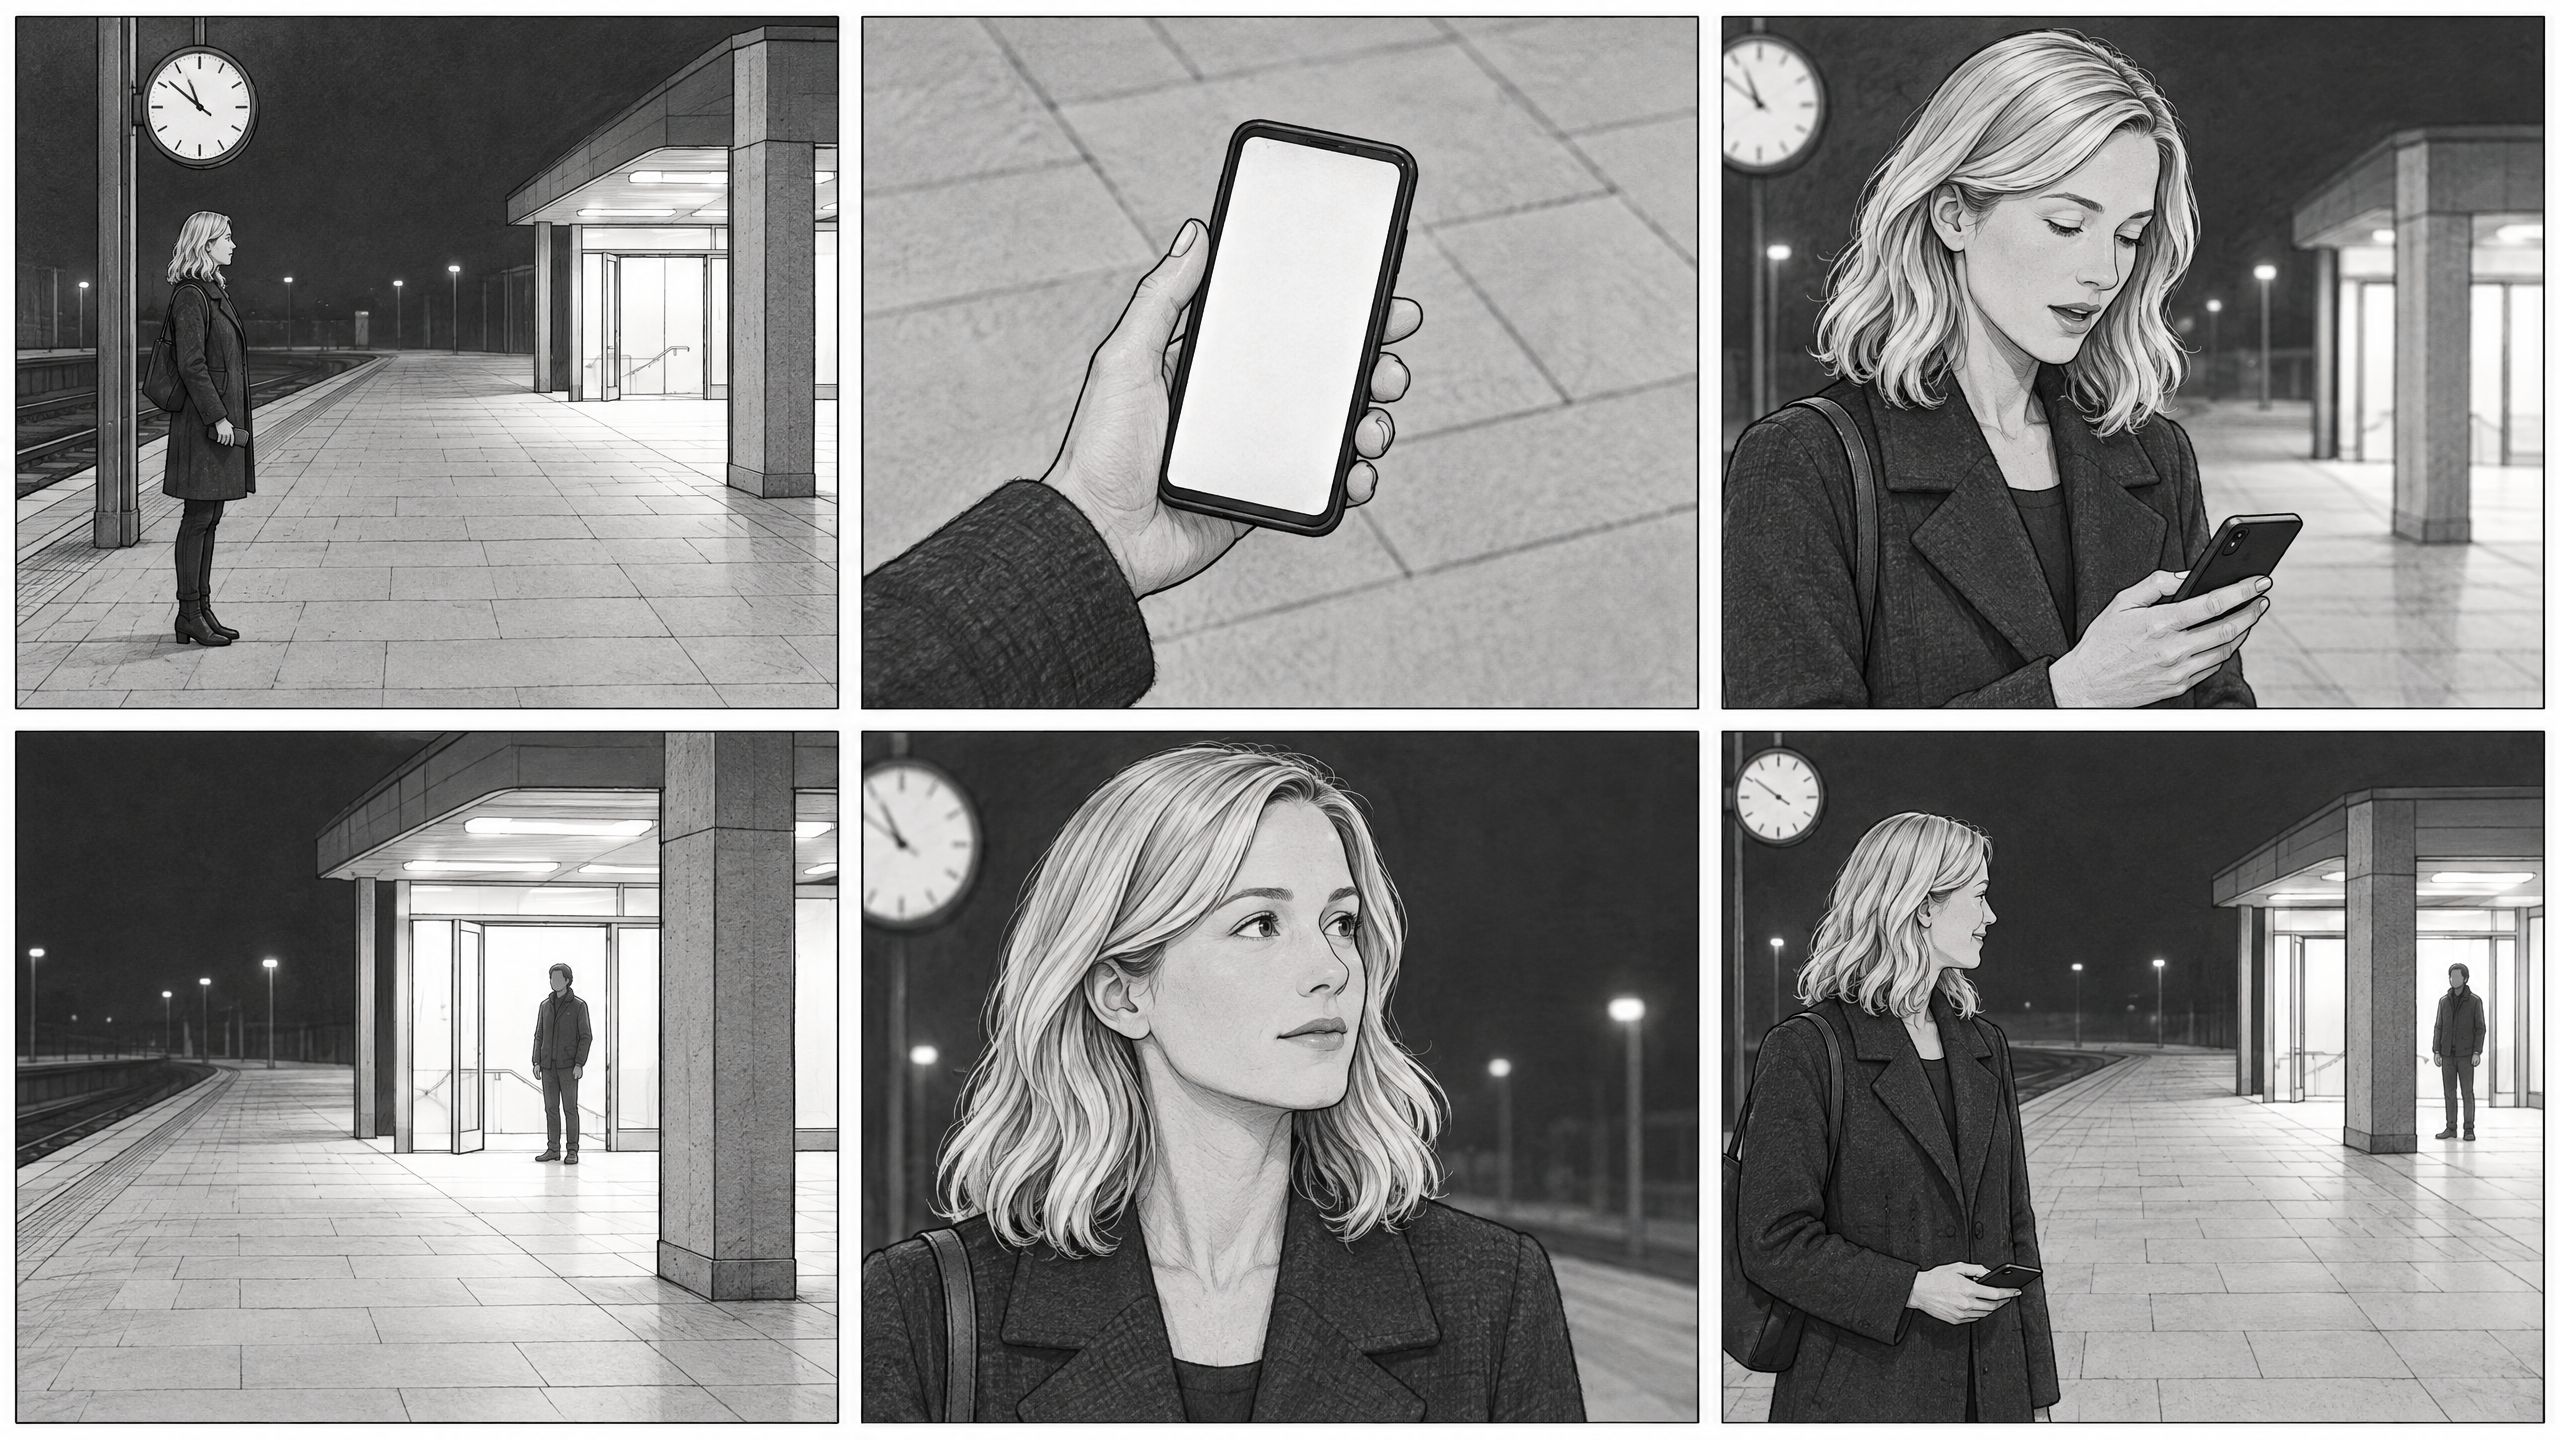
Continuing the station case from Part 2, the six panels show waiting, a phone close-up, speaking, someone arriving, looking up, and smiling. The last panel places Maya in the left foreground and the arriving person in the right background entrance, showing both her reaction and her line of sight. The simplified example prompt below keeps the layout, essential character details, and one key moment per panel. The image shown above was generated with a longer version of the prompt.
Create a six-panel storyboard: 3 columns × 2 rows, six equal landscape panels with narrow white gutters. Read left to right, top row then bottom row. One still moment per panel.

Style: Black-and-white pencil storyboard, simple lines and light gray shading.
Character: Maya is an adult Western woman with shoulder-length blonde hair and a dark coat. Her phone stays in her right hand.
Setting: Night train platform. Maya is on the left; the lit entrance is on the right, on the same platform. Keep the character and station layout consistent.

GRID01 (top-left): Wide shot. Maya waits beneath the station clock. The entrance on the right is empty.
GRID02 (top-center): Close-up. The phone in Maya’s right hand. Blank screen, dark coat sleeve.
GRID03 (top-right): Medium close-up. Maya looks down at her phone, lips parted as she speaks quietly.
GRID04 (bottom-left): Medium-wide shot. One person stands at the lit entrance on the right, facing left. Maya is outside the frame.
GRID05 (bottom-center): Close-up. Maya looks up toward the entrance on the right, her expression softening.
GRID06 (bottom-right): Medium-wide shot. Maya smiles in the left foreground, phone lowered in her right hand. The arriving person remains at the entrance in the right background.

No captions, panel numbers, speech bubbles, or watermarks. Do not draw the GRID labels.
The six panels are story checkpoints; the finished sequence can still follow the four-shot plan from Part 2. The final panel shows where the scene ends, so it is not a suitable first frame for the whole sequence. The board was generated with GPT Image 2.5 Flare. I have not regenerated it with the simplified prompt or measured any cost difference between the two prompts.
Video Example: Follow the Storyboard and Allow Some Flexibility
Give the video model the six-panel board as a reference for the story and emotional progression. It can make small choices about framing, camera movement, pacing, and performance. Keep the sequence clear: she waits, speaks, notices the arrival, and smiles with relief. Ask for natural color and lighting suited to the station, without carrying over the board’s pencil style or grid.
This demonstration compresses Part 2’s 18-second plan into a 15-second video, using Seedance 2.0 Standard at 720p, 16:9, with sound enabled. Spell out the actions the scene depends on: she takes out the phone, a hand close-up follows the movement, and a medium close-up carries her line. The arrival, her glance up, and a wider view of both characters complete the sequence. The model chooses the precise framing and duration of each shot. Here is the prompt used:
Use Image 1 as a six-shot story guide. Keep the same woman, coat and station, with natural colors and believable lighting. Allow small changes in framing and performance.

1. Wide shot: she waits at the station, phone initially inside her right coat pocket. She reaches into that pocket and visibly pulls out the phone.
2. Cut to a hand close-up as the phone clears the pocket. Continue the same movement as she raises it and looks at the screen. Show this action clearly before the dialogue.
3. Match the movement into a medium close-up. Holding the phone in her right hand, eyes on the screen, she quietly says: "If you are coming, this is your last chance."
4. Cut to the entrance as a man arrives and pauses.
5. Cut back to her face: her eyes lift from the phone toward him, then her expression softens.
6. Finish wider, with her in the left foreground and him near the entrance on the right. She lowers the phone and smiles.

Keep the phone action continuous across cuts. Use full-screen shots, quiet station ambience, no grid or captions.
The video above was generated from this prompt, with actual output of about 15.1 seconds and 1280 × 720. The opening adds the action of taking the phone out of the pocket and cutting to a close-up to check it, followed by speaking, the arrival, and the look-up reaction. The ending keeps the two characters in the foreground and background, but her smile is subtle. Review the performance to decide whether it communicates the intended relief. This case has not yet been compared with text-only generation in terms of cost or quality.
4. Preserve Model Capability First, Then Lower Output Resolution
Model capability and output resolution are separate choices. A 480p output contains less detail, but selecting 480p in Seedance 2.5 still uses the same model. At the draft stage, check shot order, actions, and emotion before investing in a higher-resolution version.
For a complex sequence, I would test Seedance 2.5 at 480p before spending on a 1080p generation simply for its resolution. The official documentation describes improved instruction following and production control, including whole-second timing instructions. Those capabilities are worth testing against your shot plan. Whether 2.5 at 480p follows that plan better than 2.0 at 1080p needs a comparison with the same prompt; the model name and pixel count alone cannot establish it.
The official pricing examples also show why a low-resolution test can be useful. BytePlus ModelArk gives the following USD estimates for 16:9, 5-second output, no reference video input:
| Model and output resolution | Estimated cost per 5-second video |
|---|---|
| Seedance 2.5 · 480p | $0.514 |
| Seedance 2.0 · 1080p | $1.87 |
The former is approximately 72.5% cheaper. This compares the total video cost: although 2.5's per-token price is higher, 480p requires fewer output tokens, making it cheaper overall than 2.0 at 1080p. These are official pricing estimates, checked on October 25, 2026, rather than bills from the examples below. Reference video inputs, duration, aspect ratio, and platform markups can change the total.
For a specific scene, you can first check at 480p: whether the phone was taken out, whether the arriving person is in the correct position, and whether the character's line of sight and actions connect. 480p can still reveal these issues; final skin texture, hair strands, and distant details can be checked at the high-resolution stage. However, two independent generations at low and high resolution may change actions and performances, so you cannot assume frame-by-frame reproduction.
If the tool supports the Seedance 2.5 Draft workflow, you can first generate a 480p draft, confirm scene structure, shot planning, and actions, then use the draft task to generate a high-resolution version. This process is better for maintaining consistency between results than submitting a new independent generation; draft and high-resolution tasks are billed separately and should be included in the total cost of the scene.
Reference inputs should also be kept to the necessary parts. When character appearance and static composition can be explained with images, use images first; when you need to reference actions or camera movement, add relevant video clips. For models that calculate input video duration, adding extra reference may increase cost, so calculate input and output together.
Test: Verify at 480p First, Then Regenerate at 1080p with Reference
This scene of a soldier reading a letter under a tree shows a 480p check followed by a new 1080p generation using the first video as a reference. The 480p version uses an existing video as reference, requiring the sequence of sitting under the tree, a letter close-up, a reading close-up, and a pull-back wide shot, with handwritten text appearing on the letter at about the sixth second.
The output is 864 × 496 and about 15.1 seconds long. That is enough to assess the four-shot sequence and the continuity of the reading action. The letter has handwriting, but the model turned the requested words, "Come home safe.", into several lines of text. This is a useful problem to catch early. Accurate wording needs another adjustment or a fix in post-production; a higher output resolution alone will not correct it.
Next, I used the 480p clip as a reference for another Seedance 2.0 Standard generation, set to 1080p and 15 seconds. The shorter prompt asks for continuity of character, setting, action, and shot order, with more detailed textures and cinematic natural light:
Use Video 1 as the reference. Keep the same soldier, face, uniform, tree, meadow, letter, actions and shot order. Maintain visual continuity and the original pacing. Enhance the scene with cinematic natural morning light, realistic skin and fabric detail, and restrained film color grading. Preserve the handwritten letter. No added subtitles or dialogue.
The second output is 1920 × 1080 and about 15.1 seconds long. The keyframes show broadly consistent character appearance, uniform, tree, and meadow, with the four-shot structure preserved. The 480p clip provided a useful reference after the initial check. The new version still needs review: 1080p output does not guarantee accurate detail, and characters and actions may change between generations.
Both videos were billed as separate reference-generation tasks using a Volcengine asset library video reference in asset:// format. This example uses a different process from Seedance 2.5’s Draft workflow. I have not verified the USD charges for these tasks or run a comparison across models, so the table above should not be read as their measured cost. Include every attempt and the final high-resolution generation when assessing the total saving.
5. Try an Edit Before Regenerating a Failed Clip
Suppose a six-second clip has a convincing performance for the first three seconds, followed by a distorted hand. Before regenerating it, try cutting away before the error, inserting a reaction shot, and continuing the audio across the cut. The usable portion may still work in the scene.
Keep a clear quality threshold. A changed face, an incorrect key prop, or an action that no longer makes sense can confuse the audience. Those problems need to be fixed even if doing so costs more.
Mark the usable portions before deciding what to generate next. During dialogue, a cut to the listener may hide an action error while preserving the line. An establishing shot can also help bridge a transition. Check eyelines, movement, and sound after the edit. Some clips will still need to be replaced.
Conclusion
Reducing rework is central to controlling cost. Define what each shot needs to achieve, test the uncertain parts with an inexpensive draft, and reserve more of the budget for the shots that carry the story. Track the cost of usable footage across the whole edit, including retries and finishing work.