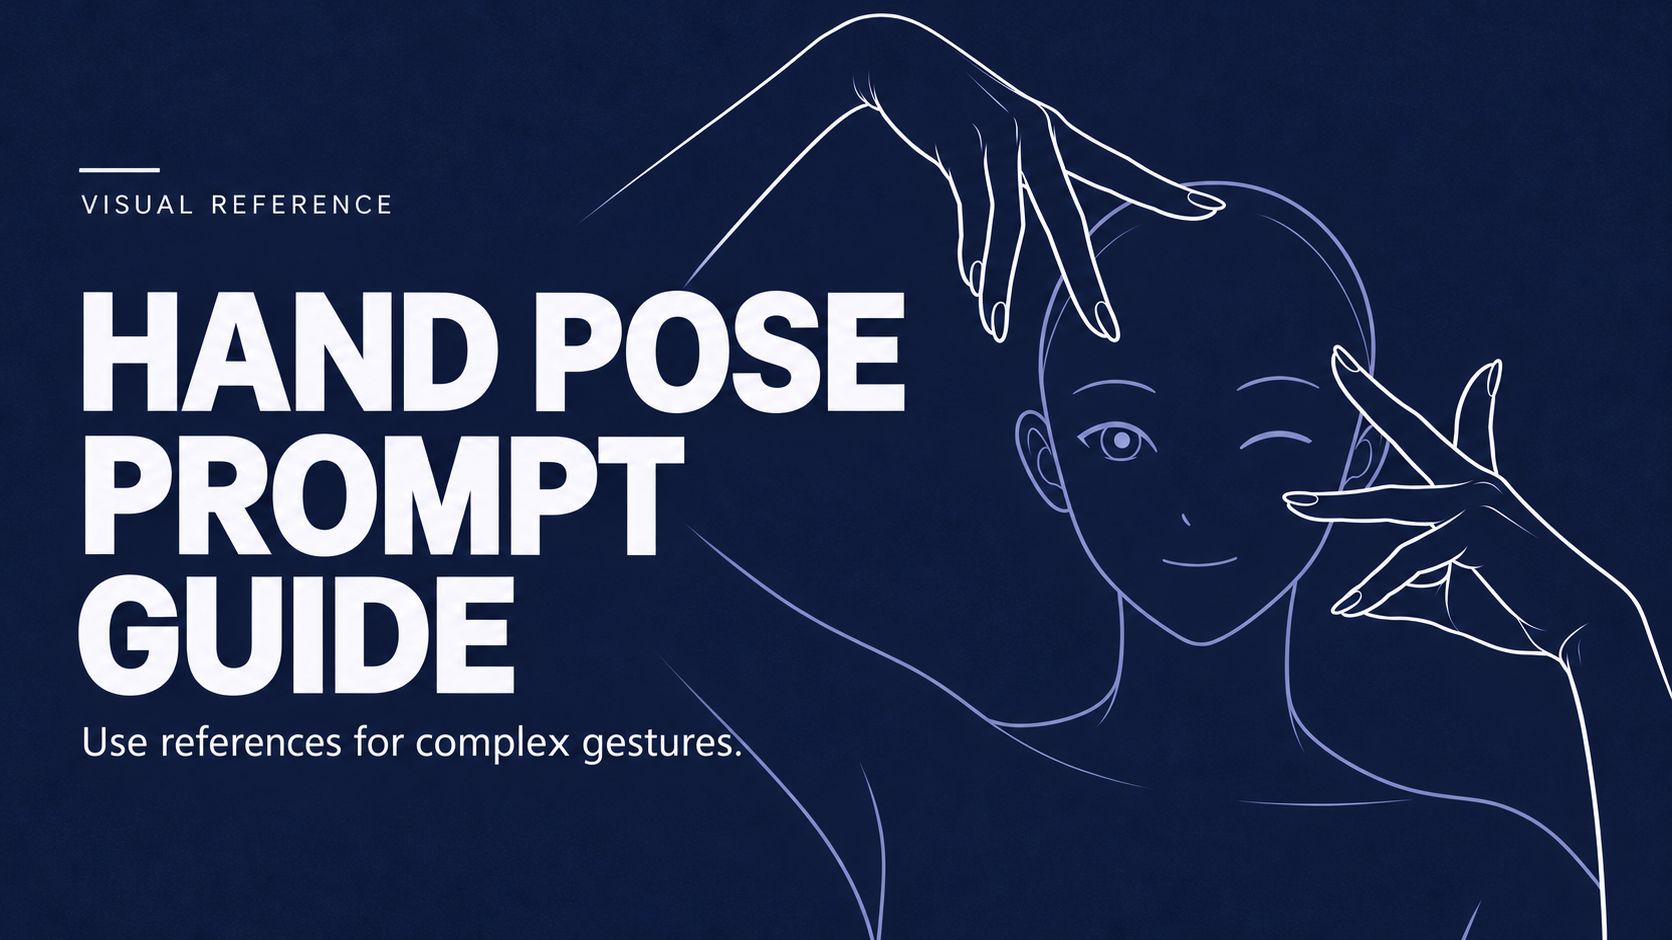
Heart gestures, clenched fists, waving, interlaced fingers: models generally understand these familiar gestures when you name them in a prompt. The tricky part is a particular pose: which way the wrist bends, which side of a finger faces the camera, where the fingertips meet, and how the two hands work together.
This guide focuses on that second situation: find an image of a similar gesture, turn it into line art, and give it to the model as a reference. It includes a prompt for creating line art references, plus six hand pose drawings and matching prompts you can try right away.
Why Unusual Hand Gestures Are Easy to Get Wrong
Start with an example. We asked a model to generate a line drawing of “fingertips touching,” using these written instructions:
Hold both hands opposite each other below the chin, with corresponding fingertips touching lightly and the palms apart, forming a small tent. The thumbs meet below, and the wrists remain separate.
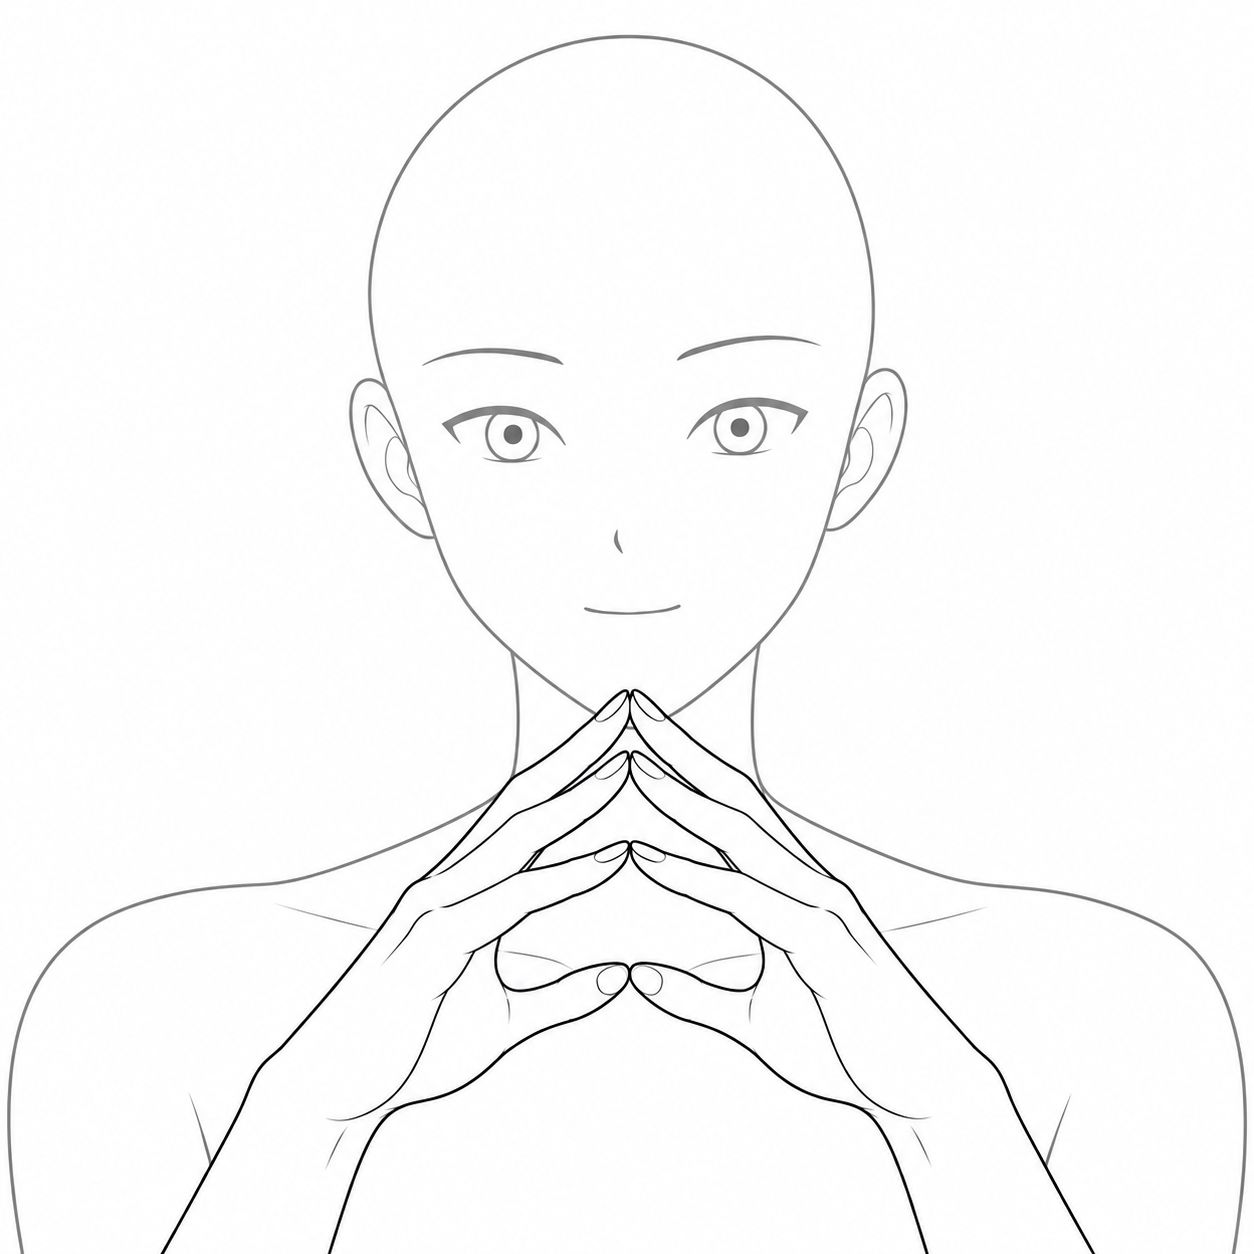
This image is wrong. Look at the two thumbs at the bottom: for the intended pose and this viewpoint, we should mainly see the pads or sides of the thumbs. Instead, the drawing shows the entire nails facing the camera.
The model captured the broad shape of “fingertips touching, palms apart,” but the local spatial relationships are confused: the orientations of the finger pads, nails, and palms do not line up. The little fingers and their occlusion are also unclear.
To correct this in words, you would need to explain how the thumbs rotate, where the pads meet, which way the nails face, how the other fingers are arranged, and which parts are hidden. A simple action description quickly becomes a long spatial explanation that is hard to check.
For unusual gestures, try a different approach: show the model the pose you want, then use one or two short prompts to specify which relationships to preserve. Check the reference itself first, too. An incorrect line drawing like the one above should not be used as a template.
For Familiar Gestures, Start by Naming Them
If you simply want someone to “make this gesture,” start with a natural sentence:
| Intended gesture | Prompt to try first |
|---|---|
| Two-handed heart | The person forms a heart with both hands in front of their chest. |
| Clenched fist | The person clenches one fist and raises it beside their shoulder. |
| Interlaced fingers | The person interlaces the fingers of both hands in front of their body. |
| Waving | The person raises one hand, palm facing the camera, and waves gently. |
| Finger in front of the lips | The person holds an index finger vertically in front of their lips, making a “shh” gesture. |
These descriptions are enough to get started. If palm orientation, finger overlap, or camera angle matters, add a sentence describing the key distinction. When you need to reproduce the precise outline in a particular image, add a pose reference.
Why Show the Model an Image of an Unusual Gesture?
Resting a palm against the side of the face, touching the chin with an index finger, and supporting the jaw with the thumb and index finger in a V all fall under “resting a hand on the chin,” yet look very different. “Covering the mouth” also changes with fingers together or apart, or with the whole mouth covered versus just the lower lip touched.
These poses involve several relationships at once: finger bends and arrangement, palm or back-of-hand orientation, wrist and forearm angles, contact with the face, and the order of overlapping parts. It is hard to explain every detail in words. A clear reference image shows them all at once.
The text should highlight the most important relationship. For example, alongside a line drawing, “The index finger lightly touches the chin; preserve the contact point between the finger and chin” gives the prompt a clear visual counterpart.
Step 1: Find an Image of a Similar Gesture
When a pose is hard to describe, look for an image online first. Image search, stock photography libraries, and pose reference websites all work. Find something close to your target, then turn it into line art.
Narrow your search with “gesture + contact point or angle,” such as “steepled fingers front view,” “one hand covering mouth profile,” or “both hands cupping face.” Check that the finger arrangement, wrist angle, and contact points are right, and that the hands are clearly visible. The person's appearance, clothing, and visual style do not need to match your target; those details will be reduced when you create the line art.
The key is to preserve the pose while reducing the influence of the original image's style and appearance. With a photo reference, a model may also pick up the face, hairstyle, makeup, clothes, background, colors, and lighting. You may only want the gesture, but other features can end up in the result.
Line art lets you remove color, materials, lighting, and background while simplifying the person's appearance. Finger arrangement, palm orientation, wrist angle, and contact become more prominent. If the hand touches a face or prop, retain the necessary outlines of the face, forearm, or object. Cropping down to an isolated hand can remove the context that explains the action.
Step 2: Turn the Gesture Image into a Line Art Reference
Upload the image you found and use this conversion prompt:
Convert this image into a hand pose reference line drawing, in a square 1:1 composition with a pure white background.
Accurately preserve the original finger arrangement, bending angles, palm orientation, wrist position, and contact and occlusion between the hands and face or objects.
Use clear black outlines for the hands; simplify the person to light gray outlines of the head, shoulders, and forearms, with only basic facial features.
Remove hairstyle details, makeup, accessories, clothing textures, background, text, colors, and lighting. Do not carry over the original image's visual style.
Where a hand touches an object, retain the object outlines needed to understand the action.
Compare the line drawing with the original image afterward. Check whether fingertip contact, nail orientation, finger overlap, or wrist connections have changed. The failure shown at the start is another reminder: drawing something as line art does not automatically make its spatial relationships correct.
The drawings below follow the same principle: simplify the person to basic facial features and body outlines, and emphasize the hands with clear lines. Keep the role of each reference explicit: the line drawing defines the gesture and contact relationships; other images or text define the character's appearance, clothing, and visual style. The simplified person in the line drawing does not need to appear in the final image.
Step 3: Generate an Image Using the Line Art Reference
In a tool that supports image references, upload your chosen line drawing and fill in the character and scene requirements:
Reference the hand pose in the uploaded line drawing. Preserve the finger arrangement, wrist angle, and contact points between the hands and face.
The character's appearance is [character description], wearing [clothing], in [setting], rendered in [visual style].
Use the line drawing for pose only. Do not copy the simplified person's appearance or retain the line art style.
Use a [close-up / half-body] composition, keeping the hands fully in frame.
If you upload both a character image and a hand pose drawing, specify their separate roles:
Image 1 defines the character's appearance and clothing; image 2 defines the hand pose.
Have the character from image 1 perform the gesture in image 2, preserving its finger arrangement, wrist angles, and contact points.
Use [visual style and setting] to create a natural-looking image of the character.
What you “preserve” should match your goal. If you only want the gesture, allow the head angle and expression to change. To reproduce the mood of the whole image, also specify the gaze, expression, and head direction.
Six Hand Pose Drawings and Example Prompts
Each drawing below comes with a pose prompt. Upload the matching image, then add your character, setting, and style. You do not need to explain every finger individually; identify the relationships that matter most for that gesture.
1. Framing the Eyes and Forehead with Both Hands
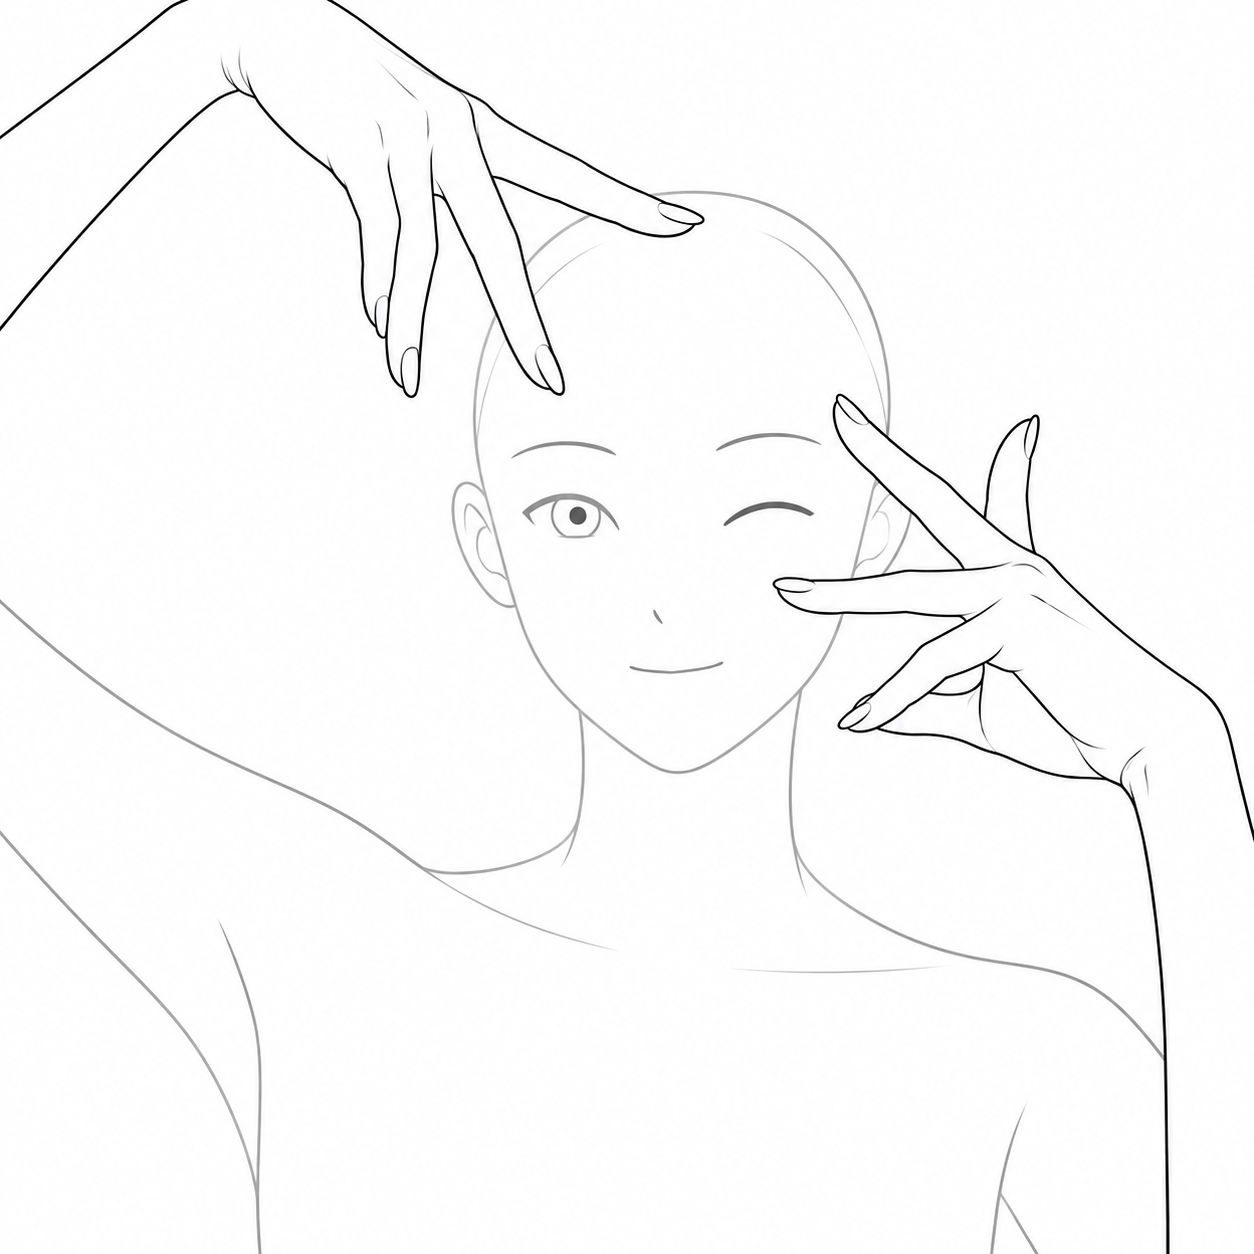
The hands are spread at different heights, leaving particular gaps between the fingers, eyes, and forehead. “Both hands beside the face” does not explain this outline well. A line art reference is easier to use.
Follow the two-handed face-framing pose in the line drawing: one hand spreads above the forehead, and the other spreads beside the eye and cheek.
Preserve the relative height of the hands, finger arrangement, and gaps between the fingers and eyes.
The person gently winks one eye. Use a close-up composition with both hands fully visible.
2. Lightly Touching the Cheek and Chin
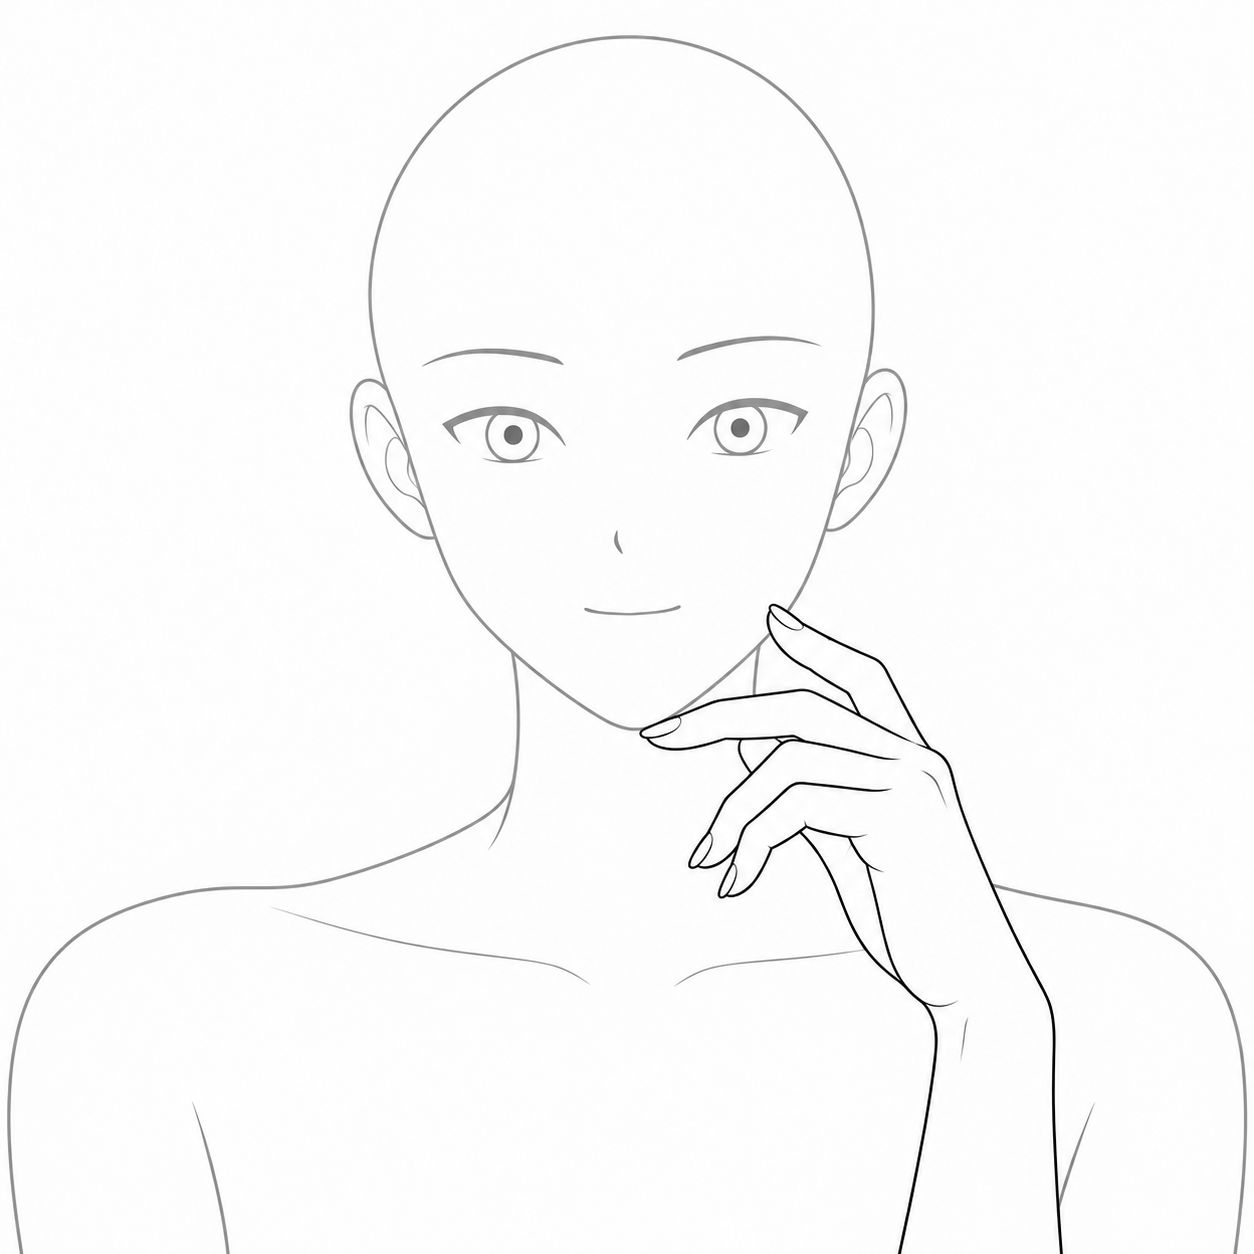
Here, the fingers rest near the cheek and chin, with a naturally bent wrist. This works for a light touch to the face. Watch the contact points so it does not turn into the whole palm supporting the cheek.
Follow the one-handed face-touching pose in the line drawing, with the fingers lightly touching the cheek and chin.
Preserve each fingertip's position and the natural wrist bend. Do not press the whole palm against the side of the face.
The person looks at the camera with a relaxed expression, in a half-body close-up.
3. Supporting the Chin with a V-Shaped Thumb and Index Finger
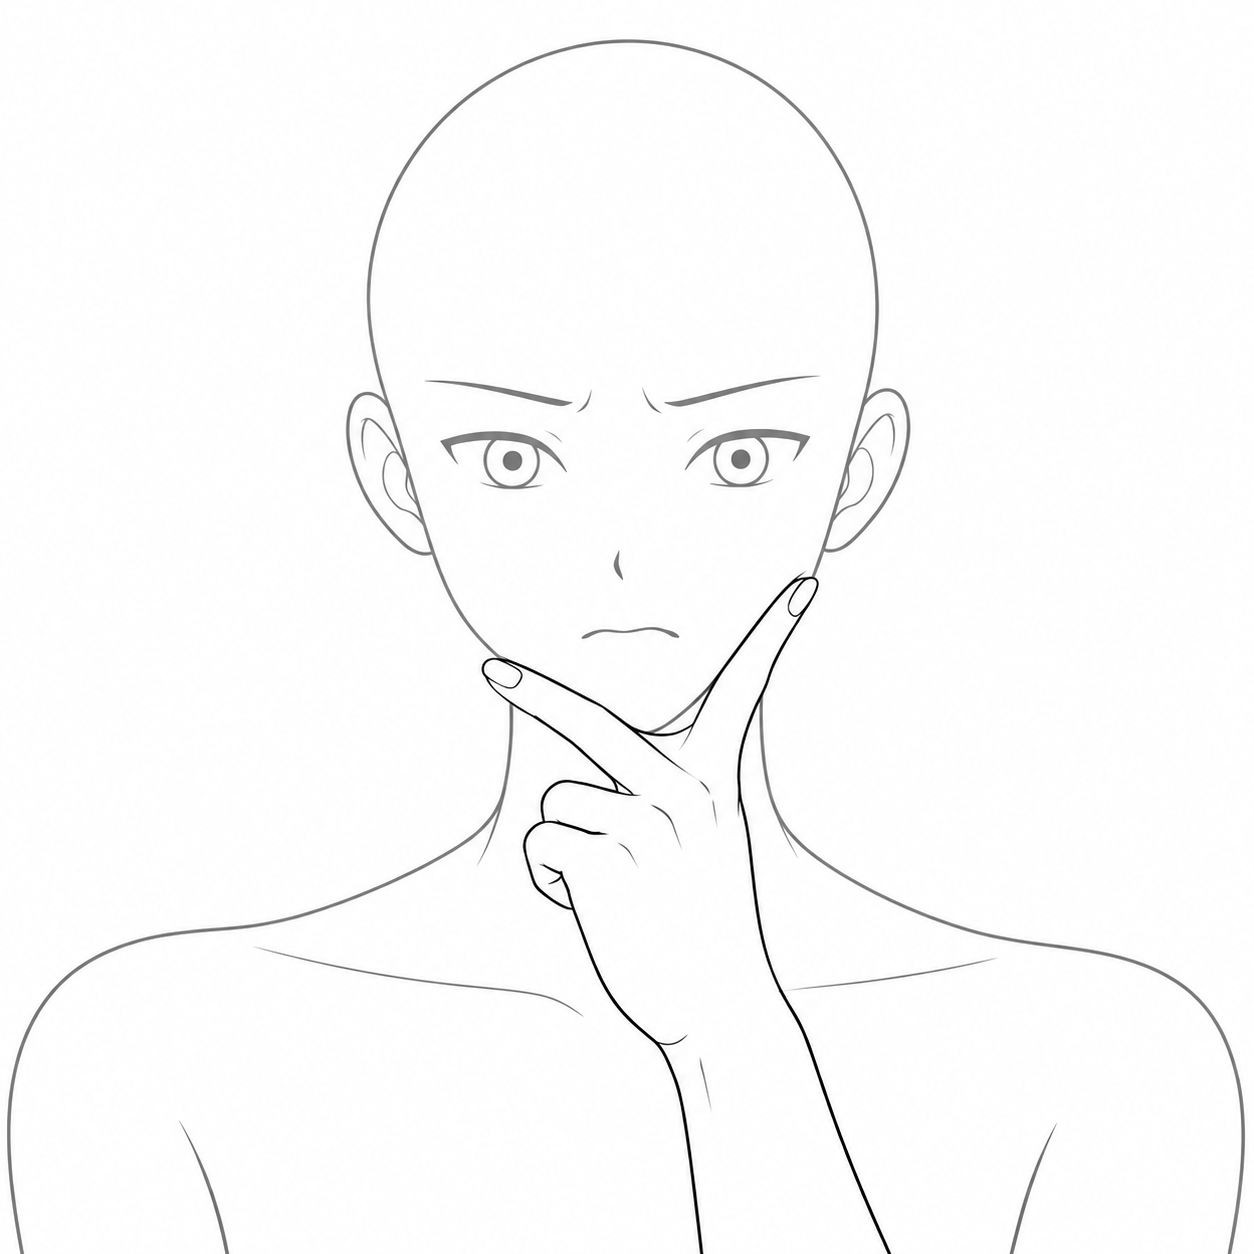
This differs from ordinary chin-resting or a peace sign beside the face. The thumb and index finger extend along opposite sides of the jaw, with the chin between them and the remaining fingers naturally curled. A reference image directly shows the relationship between that V and the chin.
Follow the V-shaped chin-supporting gesture in the line drawing: the thumb and index finger extend along the two sides of the jaw, the chin rests between them, and the remaining fingers curl naturally.
Preserve fingertip contact with the jaw, keeping the hand beneath the chin.
The person faces the camera, brows slightly furrowed and lips gently pressed together.
4. Looking Up with an Index Finger Touching the Chin
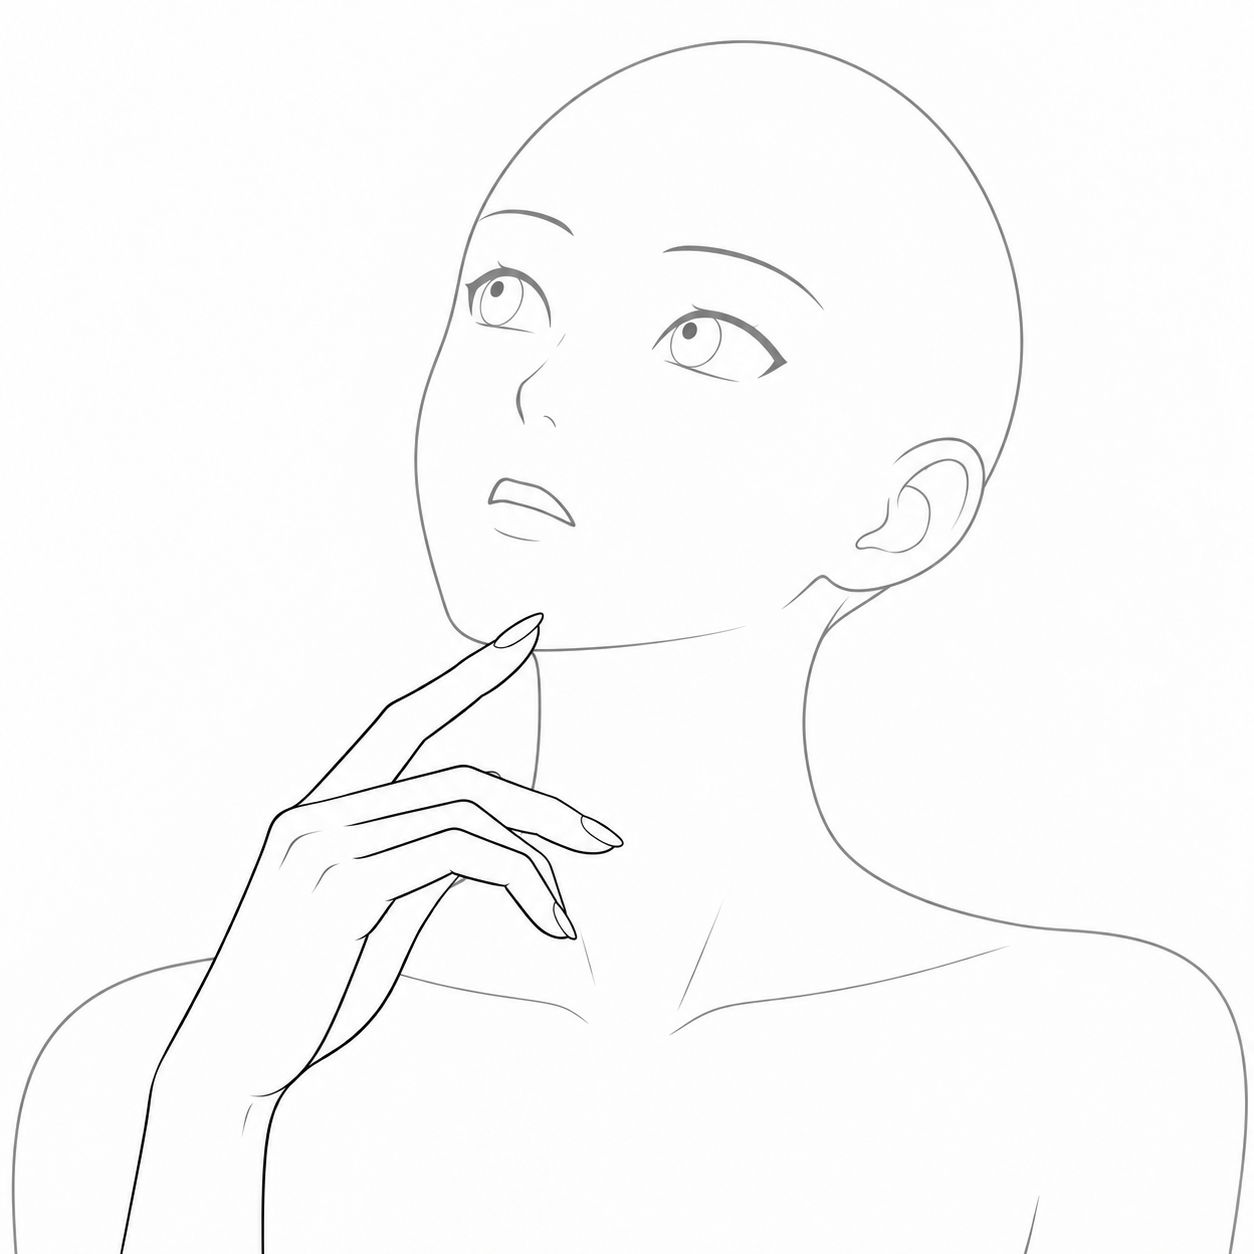
This pose depends on the head and finger working together. Referencing just the finger may produce a front-facing chin-resting pose; prompting only “thinking” may produce something entirely different. Preserve the head tilt, gaze direction, and fingertip contact together.
Follow the head and hand pose in the line drawing: the person lifts their head slightly, looks toward the upper left of the image, and lightly touches the front of the chin with an index finger. The remaining fingers bend loosely.
Preserve the turned head angle and fingertip contact with the chin, with the mouth slightly open.
5. One Hand over the Mouth, the Other Beside the Ear
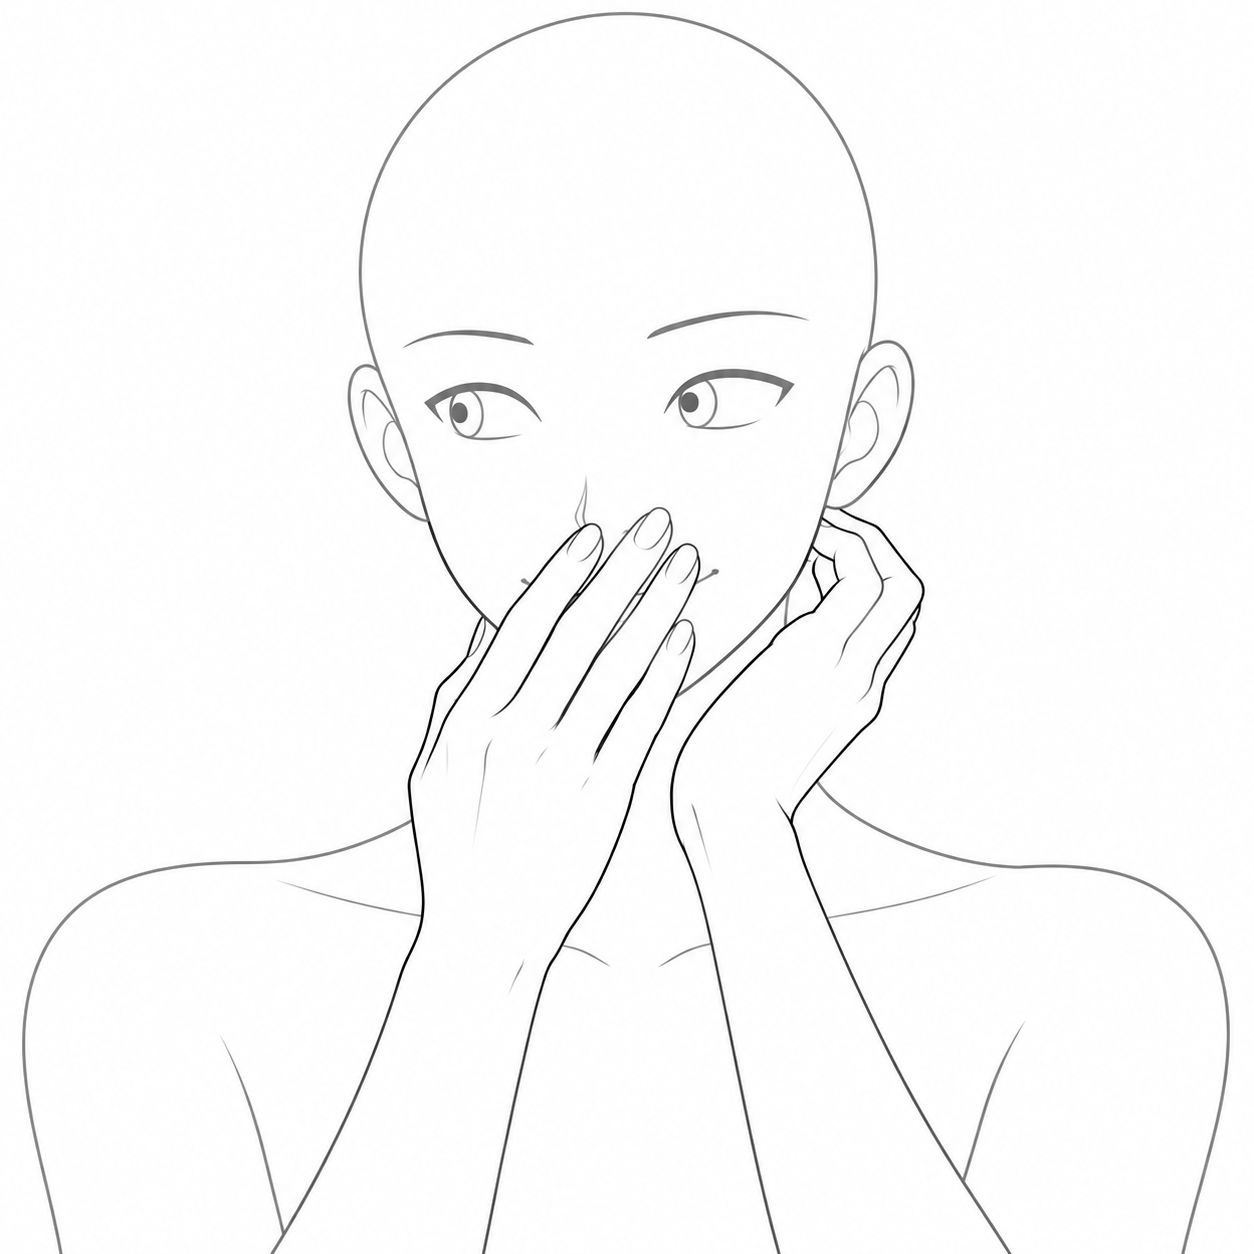
The hands perform different actions at different depths. Explain what each hand does and preserve their original occlusion relationships.
Follow the two-handed pose in the line drawing: the hand on the left side of the image lightly covers the mouth, while the hand on the right lightly touches below the ear and along the side of the jaw.
Preserve each hand's position, wrist angle, and occlusion relationships.
The person looks toward the left side of the image with a slight smile.
6. Lightly Covering the Lips with a Surprised Expression
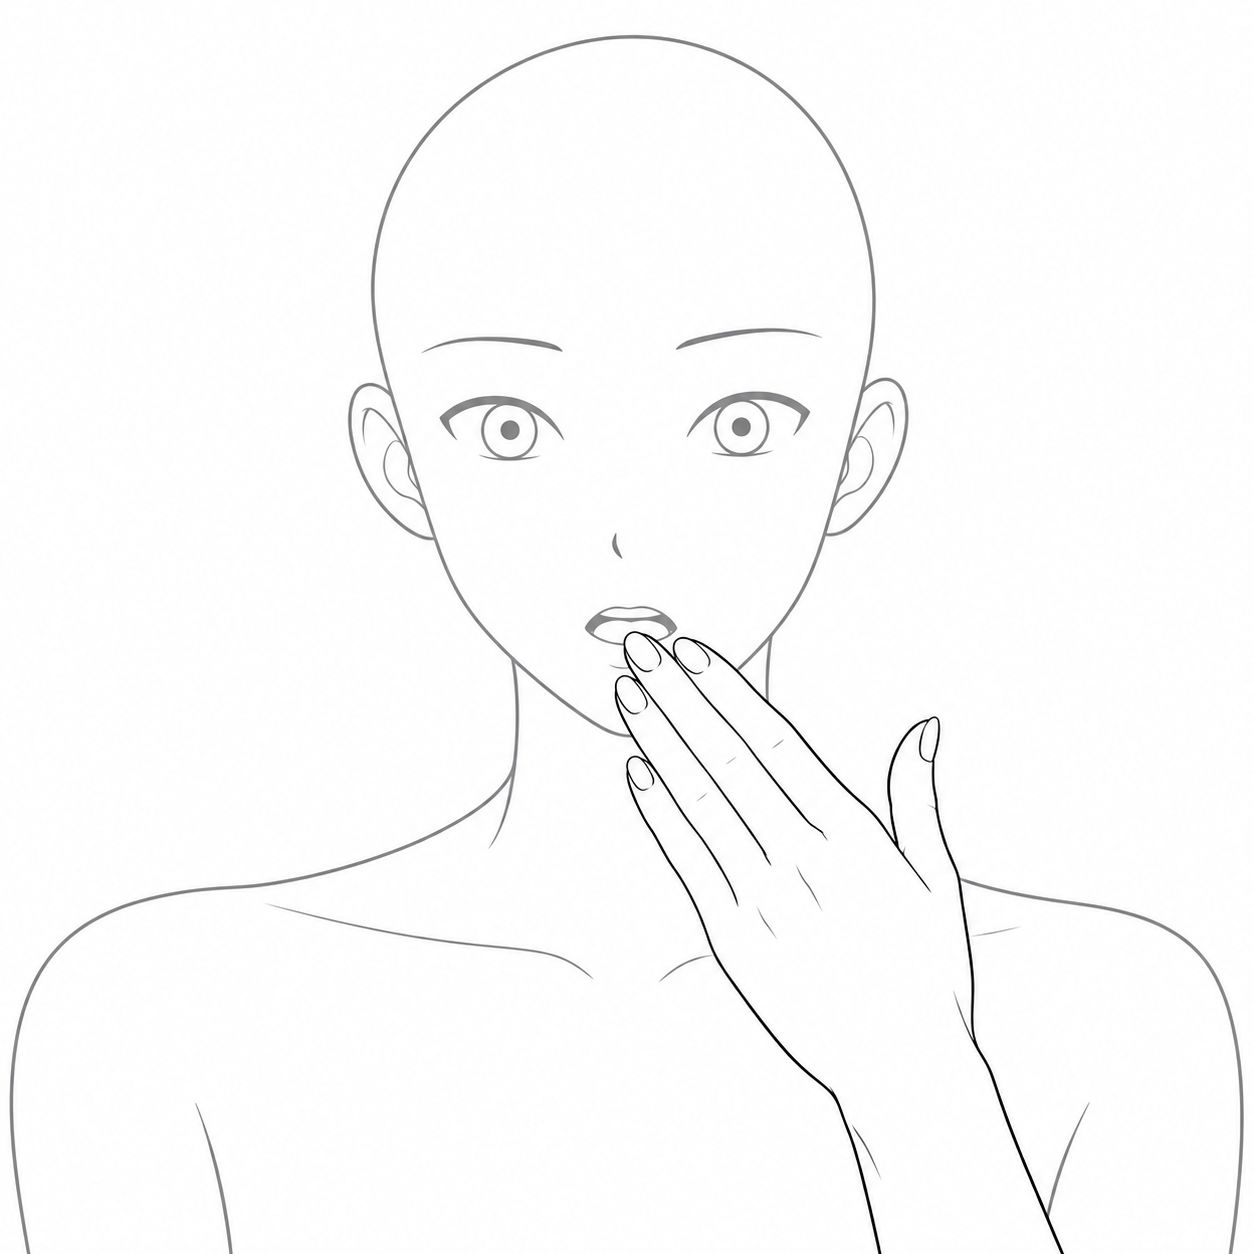
Leave part of the mouth visible so the slightly open mouth and wide eyes convey surprise together. Moving the hand too high or too low changes what the image communicates.
Follow the one-handed mouth-covering pose in the line drawing: four fingers rest naturally together, with the fingertips lightly touching near the lower lip and the thumb naturally separated.
Keep part of the mouth visible. The person's eyes are slightly widened and their mouth is slightly open, as if they have just been surprised.
Preserve the back-of-hand orientation and wrist angle from the line drawing.
Four Reminders for Better References
Choose a similar camera angle. Turning a frontal gesture into a side view creates new finger occlusions. To reproduce the outline closely, keep the reference's head direction and camera angle close to your intended image.
Check the line drawing first. Fingertip outlines, which finger belongs where, wrist connections, and contact points should be immediately readable. If the drawing is ambiguous, clarify it before giving it to the model.
Decide what to preserve. Gesture, expression, gaze, and composition can be controlled separately. For example, keep the V-shaped chin support but replace the frown with a smile. Ask to preserve the expression too when you want the full emotional effect.
When something is off, name one specific difference. For example, “The index finger should touch the side of the jaw,” “Part of the mouth should still be visible,” or “The upper hand should not cover the eye.” These changes are easy to compare with the reference and easier to check than a long list of hand descriptions.
Frequently Asked Questions
Q:Does every gesture need a reference image?
A:No. Start with words for familiar gestures such as hearts, fists, waving, and interlaced fingers. Add a reference when a particular finger arrangement, wrist angle, or contact point matters.
Q:Is line art or a photo better for a hand pose reference?
A:If you only want the gesture, find a suitable photo and convert it to line art to reduce the influence of the original person, style, colors, and lighting. If skin pressure, gripping details, or lighting also matter, upload the photo as an additional reference and explain its role.
Q:Will a line art reference make the result look like line art?
A:It can influence the result. State “pose reference only” in the prompt and specify your intended visual style. When using both a character reference and a hand pose drawing, explain each one's role separately.
Q:Does a reference guarantee every finger will match the original exactly?
A:No. You still need to compare the result with the reference, especially finger overlap, occlusion, and contact points. A reference makes the intended pose clearer and reduces the guessing involved in working from words alone.
Q:Can I make a line art reference from my own hand pose photo?
A:Yes. Choose a clear photo at a suitable angle. Retain the fingers, wrists, forearms, and any necessary face or prop outlines, while reducing details unrelated to the action. If the hand touches a face or object, keep that contact object in the reference too.